Bud-e FRIDGE – USER GUIDE 1.
NOTES BEFORE INSTALLATION 1. Allow unit to rest upright in the correct position for 1 hour before unboxing. 3. Position unit in a well ventilated area and ensure you allow a minimum of 2 inches clear area around the unit. 4. Do not rest any objects on the top or sides of the unit 5. The fridge requires a 110V US type power outlet. 6. After turning the fridge on allow it to reach pre-programmed temperature (0°C/32°F) (3 LEDs on) over a 12 hour period. 7.
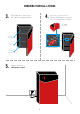
UNBOXING YOUR Bud-e Fridge 3. 4. Open fridge door and remove all internal packaging and tape. Insert one ‘colour roller’ per channel ensuring silver magnetic feet are facing down as shown. x 18 Remove packaging Remove tape Shelf channels Remove packaging 5. Plug the fridge into a 110V power outlet. 32 3.
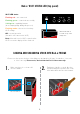
Bud-e Fridge TEMPERATURE SETTINGS The fridge has 5 temperature settings*: 1 LED on = 5°C = 41°F 2 LEDs on = 2°C = 35°F 3 LEDs on = 0°C (default) = 32°F 4 LEDs on = -1.5°C = 29°F 1 2 3 4 5 5 LEDs on = -3.0°C = 27°F Temperature settings are located on top of the fridge door. *Please note these are approximate temperature settings only. Actual temperature may differ depending on stock and environment. CONNECTING Bud-e TO WI-FI Before connecting to Wi-Fi you will need 1. 2.
Bud-e WI-FI STATUS LED (top panel) Wi-Fi LED status Flashing red = not connected Flashing green = connected successfully Solid green = updating firmware (do not unplug fridge during this process) Flashing amber = has not received any Wi-Fi settings Wi-Fi status LED is located on top of the fridge door. Off = normal operation (the unit is still connected to Wi-Fi) Note: If the unit loses its Wi-Fi connection the Wi-Fi icon on the display will also flash red.
LOADING AND UNLOADING STOCK INTO Bud-e FRIDGE 3. Make sure roller is directly behind bottle or can for accurate stock counting. 4. On closing the fridge door the stock levels will be displayed on the door for 5 seconds and then display the current fridge internal temperature. Stock count 5. The colour rollers measure the stock level. When removing beer make sure the colour roller slides as far towards the door as possible. 6.
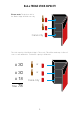
Bud-e FRIDGE STOCK CAPACITY Please note: The bottom shelf of the Bud-e fridge will hold cans only Cans only The total capacity of the Bud-e fridge is 78 vessels. This will be made up of either all cans or cans and bottles. Total bottle capacity is 60 bottles x 30 or x 30 x 18 or Total Cans only 78 7.
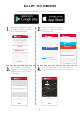
You must be of age to acce Territ Bud-e APP - Wi-Fi CONNECTION MM / DD Download the Bud-e APP and follow on screen prompts to connect Let me Loading screen 1. 2. Enter territory and date of birth to access the APP. User must be of legal drinking age. Bud-e ugh to share a Bud? t be of legal drinking o access Bud-e Set up my Bud-e Territory Google + Name Facebook We never post to your wall We never post to your wall What’s a Bud-e? We never post to your wall Activate with Email Address 3.
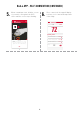
Step 3 of 6 connect his Wi-Fi. ud-e Press the ‘PAIR’ button on top of the fridge door. Next Bud-e APP - Wi-Fi CONNECTION (CONTINUED) 5. 8 6. Animations will help explain and simplify When countdown starts, hold the screen the connection process. Less ‘text heavy’ ofandyour device flat against more of a guided interaction. the Wi-Fi sensor until the screen stops flashing. HELP Bud-e Bud-e HELP HELP Once connected, the app will display real time stock count and temperature of the fridge.
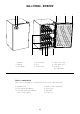
Bud-e Fridge - overview 1. 2. 3. 6. 1. Speaker 2. Display 3. Door hinge 7. 8. 4. Control panel 5. Door 6. Shelves (x3) 9. 7. Shelf roller (x18) 8. Shelf gates (x21) 9. Front feet (x2 adjustable) Bud-e sounds/alerts Bud-e has a set number of sounds that will alert you to different events. A. Adding stock B. Pressing the pair button C. Pressing any function button on the control panel D. End of cold countdown E. Door open F. Full fridge G. Power on 10. 4. 5.