BV-RH-801 Classic Series Under Cabinet Range Hood USER MANUAL
Table of Contents Important!! Test Before Installation ..................................................................................................................................................... Know Before Installation ...................................................................................................................................................................... Important Safety Notice ..........................................................................................
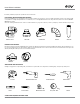
Know Before Installation Research, plan and prepare the optional accessories and tools. DUCT VENTING AND ACCESSORIES (NOT INCLUDED) If for new installation or your old range hood doesn’t have exhaust duct, prepare to cut the openings through the bottom of the cabinet, wall, or top cabinet to ceiling. And purchase the 6” metal duct (or 6” semi-rigid aluminum duct for easy connection). Refer to Section 5 VENTING METHODS for detail. Check the existing exhaust duct size.
Important Safety Notice READ ALL INSTRUCTIONS BEFORE INSTALLING AND OPERATING THIS APPLIANCE INSTALLATION CAUTIONS 1. The installation in this manual is intended for qualified installers, service technicians or persons with similar qualified background. Installation and electrical wiring must be done by qualified professionals and in accordance with all applicable codes and standards, including fire-rated construction. 3.
Important Safety Notice TO REDUCE THE RISK OF INJURY IN THE EVENT OF A STOVE TOP GREASE FIRE: 1. SMOTHER FLAMES with a close-fitting lid, cookie sheet, or metal tray, then turn OFF the burner. BECAREFUL TO PREVENT BURNS. NEVER PICK UP A FLAMING PAN—you may be burned. KEEP FLAMMABLE OR COMBUSTIBLE MATERIAL AWAY FROM FLAMES. If the flames DO NOT go out immediately, EVACUATE AND CALL THE FIRE DEPARTMENT or 911. 3. Use an extinguisher ONLY if: 2.
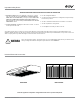
Venting Height Requirements VENTING HEIGHT REQUIREMENTS 1. Vent system must terminate to the outside (roof or side wall). 6. Always keep the duct clean to ensure proper airflow. 2. DO NOT terminate the vent system in an attic or other enclosed area. 7. Measure and estimate the following figures before installation: 3. DO NOT use 4” (10.2 cm) laundry-type wall caps. 4. Use metal/aluminum vent only. Rigid or flexible metal / aluminum vent duct is recommended. a.
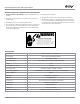
Venting Height Requirements IMPORTANT: 1. Please use Duct Run Calculation below to compute total available duct run when using elbows, transitions and caps. 5. Maximum mount height between stove top to hood bottom should be no higher than 32-inch. 6. It is important to install the hood at the proper mounting height. 2. ALWAYS, when possible, reduce the number or transitions and Hoods mounted too low could result in heat damage and fire turns.
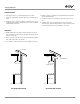
Venting Methods VENTING METHODS 1. This range hood is 6” top venting through the roof or wall. 2. Vent work can terminate either through the roof or wall as shown below. 3. A minimum of 6” round duct (purchase separately) or 3-1/4 x 10” rectangular duct (purchase separately) must be used to maintain maximum airflow efficiency. 4. Always use rigid or semi-rigid type metal/aluminum ducts if available to maximize airflow. 5. Decide the location of the venting pipe from the hood to the outside. 6.
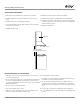
Electrical Requirements and Specifications IMPORTANT: Observe all governing codes and ordinances. 1. It is the customer’s responsibility to contact a qualified electrical installer. 5. DO NOT ground to a gas pipe. 6. The range hood must be connected with copper wire/plug only. 2. A 120 Volt, 60 Hz, AC only, fused electrical supply is required on a 15-amp circuit. 3. DO NOT have a fuse in the neutral or ground circuit. 4. The 3-prong outlet should be grounded.
Installation Preparation STEPS TO FOLLOW 1. Please unpack the range hood and accessories carefully. 2. Remove the baffle filters. 3. Check for any dent or damage inside and outside. If found any loosing parts, please remove them. 4. Place the range hood on a flat stable surface. Connect the range hood to a designated standard outlet (120-Volt, 60Hz, AC only). Press the power button and the speed buttons to turn on. to Section TROUBLESHOOTING if any malfunction was found. 6.
Installation Instructions 1. Installation planning a. Measure the distance between stove top and the bottom of range hood. A distance of 27” to 30” is recommended. b. Minimum 24” is required for safety concern. c. Decide the venting method and the location of the venting pipe from the hood to the outside. d. Purchase any necessary accessories from a hardware store, such as duct, elbow, reducer, damper, duct tape, screws, etc. e.
Range Hood Operations Control Panel Layout and Buttons Configurations: Light Control: Power-Off Delay Function: a. Press Light Control button once to turn on the lights, and once again to turn off the lights. a. b. The Light Control button operates independently from the Power Control (On/Off) button. Pressing the When the fans are operating in any speed, press the Power Control (On/Off) once to turn on the 3-minute power-off delay function. b. c.
Troubleshooting WARNING Hazard of electrical shock! Do not perform service on electrically live system. Disconnect the main electrical supply before servicing this device. Touching electrical connectors or other exposed electrical circuitry inside this range hodd when they are energized could result in death, serious bodily injury, or propety damage 1.
Maintenance and Cleaning Cleaning: Cleaning Stainless Steel Baffle Filters: 1. 1. Remove all baffles, spacers, filters, discard oil and residue. 2. IMPORTANT: Drain oil from baffles, spacers, and filters before oil and residue overflow! 3. Wash with warm soapy water. NOTE: Stainless steel baffles and spacers are top rack dishwasher safe. The saturation of greasy residue in the blower and filters may cause increased inflammability.
Warranty Please provide an original dated proof of purchase (sales receipt / invoice) in order to obtain warranty. One Year Parts Warranty: 1. What is Not Covered? 1. For one year from the date of original purchase, we will provide free of charge, non-consumable replacement parts or compo2. nents that failed due to manufacturing defects. Subject to the conditions and limitations set forth below, we will, at its option, either repair or replace any part of its products that prove defective 3.