
Installation Guide


Installation Instructions
BV-RH801 USER MANUAL
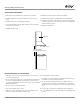
1. Installation planning
a. Measure the distance between stove top and the bottom of
range hood. A distance of 27” to 30” is recommended.
b. Minimum 24” is required for safety concern.
c. Decide the venting method and the location of the venting
pipe from the hood to the outside.
d. Purchase any necessary accessories from a hardware store,
such as duct, elbow, reducer, damper, duct tape, screws, etc.
e. Find and mark the stud locations using a stud nder to plan
the mounting locations rmly.
2. Measure the top vent and the power cord positions, cut the
openings (slightly larger for easy accessible) for hood exhaust and
power cord under the cabinet.
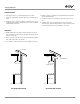
3. For installing under the cabinet with recessed bottom, attach
4-inch wide wood ller strips (not provided) on each side.
4. Puncture the power cord’s knockout hole and through the power
cord from inside of the range hood to outside.
5. Puncture the knockout screw holes on the top for screw mounting
under the cabinet.
6. Mount this range hood under the cabinet, 2 people are required
for this installation.
a. Draw power cord through cabinet access opening and center
the hood beneath the cabinet.
b. From inside of the hood, place screws into the exact center
of each knockout hole and secure to cabinet bottom. Finish
tightening all screws until secure.
c. CAUTION: Make sure the range hood is secure before
releasing!
d. For safety purpose, mount the screws through the pre-drilled
mounting holes or/and drill new holes from inside the back of
the hood to the studs or lumbers. For a more secure installa-
tion, use as many mounting holes as needed to secure from
the inside of hood.
7. Use 6” round metal duct (or semi-rigid aluminum duct, follow
building codes in your area) to connect the exhaust on the hood
to the duct-work above. Use foil tape or duct tape to make all
joints secure and air tight.
8. Connect the range hood to a designated grounded standard out-
let.
a Or cut off the plug and connect three wires (black, white and
green) to house wires and cap with wire connectors. Connect
according to colors (i.e. black to black, white to white, and
green to green). Store excess wires in the wiring box.
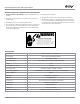
9. Install bafe lters and stainless spacer if any.
10. Turn power ON in control panel. Check all lights and fan opera-
tions.
4”WIDE 4”WIDE
WALL
BAFFLE FILTERS AND STAINLESS STEEL SPACERS
30” Range Hood
36” Range Hood
11