User guide
Contents Contents Hardware and product care Unboxing Vive headset 4 5 Link box 14 Vive controllers 16 Base stations 18 Product care 23 Play area What is the play area? 25 Planning your play area 25 Choosing the play area 26 Setting up Vive for the first time 27 Verifying your setup 29 Vive experience Turning the Vive system on 30 Turning the Vive system off 30 System Dashboard 31 Vive tab 31 What is Vive Home? 31 Moving around Vive Home 32 Adding an app shortcut to your H
About this guide About this guide In this user guide, we use the following symbols to indicate useful and important information: This is a note. A note often gives additional information, such as what happens when you choose to do or not to do a certain action. A note also provides information that may only be applicable to some situations. This is a tip. A tip gives you an alternative way to do a particular step or procedure, or lets you know of an option that you may find helpful.
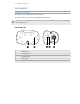
Hardware and product care Hardware and product care Unboxing What's inside the box Your Vive™ comes with the following items, which you'll use to experience immersive VR environments: Main component Accessories Vive headset § 3-in-1 cable (attached) § Audio cable (attached) § Earbuds § Face cushions (1 attached and 1 alternate for narrow face) § Cleaning cloth Link box § Power adapter § HDMI cable § USB cable § Mounting pad Vive controllers (2) § Power adapters (2) § Lanyards (2 attached) § Micro
Hardware and product care Vive headset About the Vive headset The headset is your window to the VR environment. The headset has sensors that are tracked by the base stations. The sensors on the headset are sensitive. Do not cover or scratch the sensor lenses, including the proximity sensor.
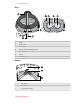
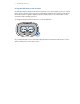
Hardware and product care Back 1 Strap 2 Audio cable 3 3-in-1 cable 4 IPD (interpupillary distance) knob 5 Face cushion 6 Lenses 7 Proximity sensor Bottom 1 Microphone 2 Nose rest 3 Lens distance knobs htcvivemanual.
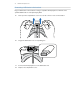
Hardware and product care Putting the headset on Before putting the headset on, make sure that you've peeled off the protective film from the lenses. 1. Pull the headset down over your eyes. 2. Slide the straps around the back of your head, and adjust them so that the headset fits snugly and comfortably. 3. Make sure that the cables pass through the sleeve at the back of the headset, and are positioned straight down your back.
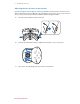
Hardware and product care Adjusting the lens distance on the headset If you wear large prescription glasses or have long eyelashes, you may need to increase the lens distance further from your face. Only increase this distance as necessary, as the closer the lenses are to your eyes, the better your field of view will be while wearing the headset. 1. Pull out each lens distance knob to unlock it. 2. Rotate both lens distance knobs to adjust the lens further or closer to your face. 3.
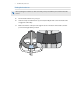
Hardware and product care Using the IPD knob on the headset Interpupillary distance (IPD) is the distance between the center of the pupils in your eyes. A quick way to get an estimate is by facing a mirror and holding a millimeter ruler against your brow. Use this measurement as a guide to adjust the distance between the lenses of the headset so that you'll have a better viewing experience. To change the distance between the lenses, rotate the IPD knob.
Hardware and product care Connecting a USB device to the headset Plug in a USB cable to the headset for using a compatible third-party device with Vive. Viveoptimized USB cable is sold separately by HTC. 1. Push open the compartment cover to access the connector slots on the headset. 2. Plug in the USB cable to its corresponding slot. 3. Connect the third-party device to the USB cable end. 4. Replace the compartment cover.
Hardware and product care Unplugging the 3-in-1 cable from the headset 1. Push open the compartment cover to access the connector slots on the headset. 2. Carefully pull the tab until the HDMI cable is unplugged. 3. Unplug the power cable and USB cable from the connector. 4. Replace the compartment cover. htcvivemanual.
Hardware and product care Replacing the face cushion If the attached face cushion is too wide for you, replace it with the alternate cushion (narrow) that comes in the box. You should also remove the face cushion to clean it. For more information, see Cleaning the face cushion on page 24. 1. To remove the face cushion, peel off starting from both ends of the face cushion until it detaches from the headset. 2.
Hardware and product care Replacing the nose rest 1. To remove the nose rest, peel off the flaps of the nose rest until it detaches from the headset. 2. To replace the nose rest, press its tabs into the corresponding slots on the headset. Make sure that the nose rest is fastened in place and its flaps are behind the face cushion. Updating headset firmware 1. From your computer, open the SteamVR app. 2. If you see the icon, mouse over it to check if the firmware is out of date.
Hardware and product care Link box About the link box Use the link box to connect the headset to your computer. 1 3-in-1 cable 2 Power port 3 USB port 4 Mini DisplayPort™ Note: Cable is not provided. Use if your computer doesn't have a spare HDMI port or doesn't support HDMI. 5 HDMI port Connecting the headset to your computer 1. Connect the power adapter cable on its corresponding port on the link box, and then plug the opposite end into an electrical outlet to turn the link box on. 2.
Hardware and product care 4. Connect the 3-in-1 headset (HDMI, USB, and power) cables on the side with matching orange trims on the link box. 5. To secure the link box in a permanent position, peel the covers from the mounting pad and firmly press one side of the adhesive surface on the bottom part of the link box, and then attach the link box on the area where you want it installed. htcvivemanual.
Hardware and product care Vive controllers About the Vive controllers Use the controllers to interact with objects in the VR world. The controllers have sensors that are tracked by the base stations. The sensors on the controllers are sensitive. Do not cover or scratch the sensor lenses.
Hardware and product care Charging the controllers You can check the battery level of the controllers when no apps are running, or when the System Dashboard is up. When the battery is low, the indicator will show a single red dot . Charge each controller using the provided power adapters and USB cables. When the controller is plugged in and fully charged, its status light shows green if the controller is on or white if the controller is off.
Hardware and product care Updating controller firmware 1. From your computer, open the SteamVR app. 2. If you see the icon, mouse over it to check if the firmware is out of date. If so, click Update controller firmware. 3. Using a micro-USB cable, connect the controllers to one of your computer's USB ports one at time. Once the controller is detected by the SteamVR app, the firmware update will start automatically. Do not unplug the micro-USB cable any time before the firmware update is complete.
Hardware and product care 6 Sync cable port (optional) 7 Micro-USB port (for firmware updates) § Do not attempt to pry open the base stations as doing so could injure you or damage the product. § If the front panel is cracked or damaged, stop using the base stations. Installing the base stations Before installing the base stations, decide first whether you want to set up a room-scale or seated/standing-only play area. See Planning your play area on page 25.
Hardware and product care Once turned on, do not move or adjust the angles of the base stations as it could disrupt the tracking process. Otherwise, you will need to set up the play area again. Tips for setting up the base stations You may set up the base stations in a way that's suitable for your place. For best results, you may follow these recommendations: § Mount the base stations diagonally and above head height, ideally more than 2 m (6 ft 6 in).
Hardware and product care Using the mounting kit For best results, install the base stations using the provided mounting kit. You will need a screwdriver or drill to install the mounts. Ask a professional for help when using power tools. 1. Mark where you want to install each of the mounts on your wall, and then screw the mounts in. When mounting on concrete or drywall, first drill ¼ inch holes and insert anchors before screwing mounts in. 2.
Hardware and product care Updating base station firmware 1. From your computer, open the SteamVR app. 2. If you see the icon, mouse over it to check if the firmware is out of date. If so, click Update base station firmware. 3. Unplug the base stations from their power adapters, and then carefully unmount them. 4. Using a micro-USB cable, connect the base stations to one of your computer’s USB ports one at time. 5.
Hardware and product care Product care Caring for your Vive Follow these tips to properly care for your Vive. § Keep the headset lenses away from sharp objects, including cable tips. This will prevent the headset lenses from being scratched. § When not in use, store the headset with the lenses pointed away from direct sunlight. Failure to do so may damage the headset display.
Hardware and product care Cleaning the product Dampen the cleaning cloth provided in the box with water to wipe the headset and the controllers (including its sensor lenses) clean. Except when recommended, using any other liquid may cause damage. Cleaning the headset lenses 1. Use the cleaning cloth provided in the box to wipe the lenses. 2. Moisten the cleaning cloth with alcohol or lens cleaner. 3. Wipe in a circular motion from the center to the outer edges of the lenses.
Play area Play area What is the play area? The play area sets the virtual boundaries of Vive. Your interaction with VR objects happen within the play area. Vive is designed for room-scale setup, but you can also use it for standing and seated experiences. Planning your play area Before choosing your setup, make sure that you have enough space. Room-scale setup needs a minimum play area of 2 m x 1.5 m (6 ft 6 in x 5 ft).
Play area Seated and standing experiences do not have space requirements. Examples of seated/standing setup: Choosing the play area Find a space that you will designate as the play area. For best results, do the following: § Move furniture and other obstacles (like pets) out of the play area. § Place your computer next to your play area. The headset cable extends around 5 m (16 ft 4 in) from your computer. § Make sure that there are power outlets close to where you mount the base stations.
Play area Setting up Vive for the first time Before you can use Vive, you’ll need to complete the setup process, which includes installing Vive and SteamVR software, setting up the hardware, and defining your play area. Downloading Vive Setup To start the setup process, download the setup file on your computer from: www.htcvive.com/setup Run the setup file and follow the prompts to complete the process.
Play area Setting up a standing-only play area Choose this option if you only want to experience VR in a seated or standing position. 1. From your computer, open the SteamVR app. 2. Click 3. Review the prompts and follow the on-screen instructions to complete the process. , and then select Run Room Setup > Standing only.
Play area Verifying your setup Once you've completed the Vive setup process, you can now put on the headset and hold the controllers to start exploring VR. While you're in the play area, the headset and the controllers should remain at least 0.5 m (1 ft 7 in) and no further than 5 m (16 ft 4 in) away from a base station. This will ensure that the devices are properly tracked within the base station’s 120-degree field of view.
Vive experience Vive experience Turning the Vive system on 1. From your computer, open the SteamVR app. 2. Make sure your base stations are powered. 3. Make sure that your headset is connected to the computer via the link box. For details, see Connecting the headset to your computer on page 14. 4. Turn the controllers on. For details, see Turning the controllers on or off on page 17. 5. Check that Vive hardware is tracked.
Vive experience System Dashboard The System Dashboard serves as your central point of entry in VR. While in the dashboard, some of the things you can do are: § Launch or close a VR app § Control sound volume and mic access § Change settings, such as style of the collision bounds in Chaperone or the in-headset background § Turn the Vive system off To bring up the dashboard, press the System button on either controller.
Vive experience § Launch VR apps § Add 3D app shortcuts to the Home space § Change the Home space Launching Vive Home 1. Press the System button to bring up the System Dashboard. 2. From your apps or from the Vive tab, select Vive Home. Moving around Vive Home Walk, crawl, jump—you can freely explore the virtual environment. Making a selection in Vive Home Aim your controller at an item, and then pull the trigger.
Vive experience Adding an app shortcut to your Home space Create 3D shortcuts on the Home space so you can easily launch VR apps. 1. Press the Menu button, and then select Apps. 2. Aim at an app icon, and then press and hold the Grip button. 3. Drag the icon to where you want to place it on the Home space, and then let go of the Grip button.
Vive experience Resetting the Home space Revert your Home space to its default settings, which removes shortcuts you've added, among other things. 1. Press the Menu button, and then select 2. Select Reset Space. htcvivemanual.com .
Phone notifications Phone notifications Downloading and installing the Vive phone app Before downloading the Vive app, please make sure that your phone meets the minimum system requirements indicated on the Vive app's download page. 1. On your phone, open the Play Store or App Store apps. 2. Search for Vive. 3. Download and install the Vive app. Pairing your phone with Vive Pair your phone with the Vive system to start receiving notifications while you're on VR. 1.
Phone notifications Choosing which notifications to receive on VR Manage which notifications you get while using Vive. 1. On your phone, open the Vive app. 2. Do one of the following: § Android™ users: Tap > Settings. § iOS users: Switch to the Settings tab. 3. Choose which types of notifications you'd like to receive. Receiving notifications while in VR Don't worry about missing important notifications.
Phone notifications 3. Tap Quick replies. 4. Select a predefined message to edit or tap to add a custom message. Unpairing your phone with Vive You can only use one phone at a time with your Vive. Unpair your current phone first if you need to use another phone with Vive. 1. On your phone, open the Vive app. 2. Do one of the following: § Android users: Tap > Settings, and then tap Unpair. § iOS users: Switch to the Settings tab, and then tap Forget this device.
Settings Settings SteamVR settings Activating the front-facing camera You need to enable the settings for the front-facing camera before you can use it in VR, such as for showing your actual room. 1. From your computer, open the SteamVR app. 2. Click 3. Click Enable Camera. 4. Close and reopen the SteamVR app. 5. Click 6. Select Allow Camera in Dashboard. , and then select Settings > Camera. , and then select Settings > Camera.
Settings 3. Choose the style of the collision bounds that you prefer. 4. Drag the sliders to change the color and opacity. 5. To show a constant visual reference of your floor while in VR, select Floor bounds always on. Changing the default background display When you turn on the Vive system, the first you'll see is a default background display. It's the same background that shows when you select Room view in System Dashboard. 1. From the System Dashboard, select . 2. Select In-Headset. 3.
Trademarks and copyrights Trademarks and copyrights ©2016 HTC Corporation. All Rights Reserved. Vive, the Vive logo, HTC, the HTC logo, and all other HTC product and service names are trademarks and/or registered trademarks of HTC Corporation and its affiliates in the U.S. and other countries. Steam, the Steam logo and SteamVR are trademarks and/or registered trademarks of Valve Corporation in the U.S. and/or other countries.
Index Index B P Base stations - about 18 - installing 19 - mounting with the kit 21 - setup tips 20 Phone notifications - checking 36 - choosing 36 - editing replies 36 - receiving 36 Play area - about 25 - choosing 26 - room-scale 27 - setting up 25 - standing/seated experience 28 - verifying the setup 29 C Chaperone 38 Controllers - about 16 - attaching lanyards 17 - charging 17 - pairing with the headset 17 - turning on or off 17 F Firmware updates 38 H Headset - about 5 - adjusting the IPD 9
Index Vive system - turning off 30 - turning on 30 Vive tab 31 htcvivemanual.