Preparations Using Software Operations Manual Adjusting System Settings Note: See p. 2 for a complete list of items included with the system. In this manual, the term “Nintendo 3DS system” refers to all systems in the Nintendo 3DS™ family, which includes New Nintendo 3DS™, New Nintendo 3DS XL, New Nintendo 2DS™ XL, Nintendo 3DS, Nintendo 3DS XL and Nintendo 2DS™. • • Nintendo may change product specifications and update the manual from time to time.
This seal is your assurance that Nintendo has reviewed this product and that it has met our standards for excellence in workmanship, reliability and entertainment value. Always look for this seal when buying games and accessories to ensure complete compatibility with your Nintendo Product. Thank you for selecting the New Nintendo 2DS XL system.
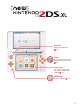
Circle Pad Allows for precision movement ( p. 12) C Stick Reacts to the pressure you place on it, allowing for easy, precise movement ( p. 12) Touch Screen Touch-sensitive screen that allows you to control software by touching and sliding ( p. 12) HOME Button Displays the HOME Menu ( p.
Enjoy online services with a… Nintendo Network ID A Nintendo Network™ ID allows you to enjoy various features of Nintendo Network. Download free software and demos from Nintendo eShop. Communicate with other users around the world in Miiverse™. We hope you enjoy using these services by creating a Nintendo Network ID ( p. 31). 4 You can use your Nintendo eShop funds on both your New Nintendo 2DS XL system and a Wii U™ console.
Find the latest software! Search for software Watch videos Download software Download demo versions Note: This requires a Nintendo Network ID. Connect to the internet and access Nintendo eShop to view the latest information and videos about different kinds of software, purchase downloadable software and try out software demos. What you can buy Downloadable software Virtual Console™ Nintendo DSiWare™ You can buy new software exclusive to Nintendo eShop, or download versions of card-based software.
Receive updates and information SpotPass™ Your system will automatically search for wireless access points, connect to the internet and exchange data at various times, including while in Sleep Mode (when the system is closed but the power is on). Internet Free software Image content Notifications System updates Other information Flashes blue when receiving notifications Note: Data received via SpotPass is saved to the microSD card.
Communicate automatically with other Nintendo systems StreetPass™ Your system automatically searches for and exchanges data with other Nintendo 3DS systems when you carry it around, such as when you're out walking or when you travel by train. Flashes green when data is being transferred. Note: A notification is added to your Notifications list ( p. 24).
Contents • Set Contents • Health and Safety Information 2 9 Preparations Component Names and Functions 11 Recharging 14 Turning the Power On and Off 15 Configuring the System for the First Time 15 Using the Keyboards 17 Power LED 18 Battery Life 18 Using Software System Settings 30 Nintendo Network ID Settings 31 Creating or Linking a Nintendo Network ID Internet Settings 32 33 Required Items for Internet Connection 33 Connecting to the Internet 34 Parental Controls 38 Options T
Health and Safety Information Please read and observe the health and safety information. Failure to do so could result in injury or damage. Adults should supervise the use of this product by children. Health and Safety Information WARNING – SEIZURES Some people (about 1 in 4000) may have seizures or blackouts triggered by light flashes or patterns, and this may occur while they are watching TV or playing video games, even if they have never had a seizure before.
Health and Safety Information WARNING – GENERAL 10 Keep this system, its accessories and packaging materials away from young children. Small parts such as Game Cards, microSD cards and packaging items may be swallowed. The cables can coil around the neck. Do not use this system within 25 centimetres (10 inches) of a cardiac pacemaker while using wireless c ommunication. If you have a pacemaker or other implanted medical device, first consult a doctor.
Component Names and Functions The functions of these components are explained in this Operations Manual. Power LED ( ) ( p. 18) Used by software with microphone functionality. Lights up when the power is on. Preparations Microphone Inner Camera Used by software with camera functionality. POWER Button ( ) ( p. 15) Component Names and Functions Speaker (R) Game Card Slot ( p. 27) For loading Nintendo 3DS Game Cards, Nintendo DS Game Cards, Nintendo DSi Game Cards and Nintendo DSi enhanced Game Cards.
Notification LED Notifies you of the status of the system by flashing and changing colour. Received SpotPass notification (flashes blue for five seconds) ( p. 6) Received StreetPass communication (flashes green for five seconds) ( p. 7) Friend has come online (flashes orange for five seconds) ( p. 24) Battery power is low (flashes red) ( p.
Outer Cameras Used by software with camera functionality. These two cameras allow 3D photographs/videos to be taken. Note: 3D images cannot be viewed on New Nintendo 2DS XL. Allows connection of the Nintendo 3DS AC adapter (WAP-002(AUS)). Infrared Transceiver Sends and receives signals for software with infrared functionality. L Button ZR Button ZL Button Stylus Holder microSD Card Slot Used to store the stylus.
Recharging You must charge the battery before you use your system for the first time. Recharging Preparations AC plug connectors DC plug (logo facing upwards) Recharge LED lit (The LED will go out when charging is complete.) 1 Connect the DC connector plug to the system 2 Insert the AC adapter plug into a standard 230 - 240V AC electrical outlet Note: Be sure the DC connector plug is the right way up before inserting it into the system.
Turning the Power On and Off The POWER Button is used to turn the system both on and off. You must configure the System Settings the first time the power is turned on. Note: It may take several seconds for the HOME Menu to display after the power is turned on. For information about the power LED and battery life, see p. 18. • • Lit Power on Preparations Turn the system on by pressing the POWER Button. The power LED will light up when the system has been turned on.
Preparations Turning the Power On and Off 3 Enter a user name 4 Enter your date of birth 5 Select your country of residence, then your region Note: For information on keyboard usage, see p. 17. Names can be a maximum of 10 characters. The name you choose will be visible on other Nintendo 3DS and Nintendo DS systems via wireless communication, so do not include words or phrases that others may find offensive.
Using the Keyboards A keyboard will be displayed on the Touch Screen when you are required to input characters. Touch a character to enter it. Standard Alphanumeric Choose the word you want from a list. Predictive text on/off Delete the character to the left of the cursor. Switch between upperand lowercase for the next character entered. Move to the next line. S witch between upper- and lowercase characters. Symbols Show additional characters.
Power LED The power LED lights up blue when the system is turned on, turns red when the battery charge is low and flashes red when the battery is starting to run out. High Preparations Low Remaining battery charge Solid Blue Solid Red Almost empty Flashes Red Turning the Power On and Off The notification LED will also flash. Note: If the power LED is red, save your game quickly and recharge. If the battery charge runs out before you save, you may lose unsaved data.
HOME Menu The HOME Menu is displayed when you turn on the power. Software titles can be launched from the HOME Menu by touching the icon that corresponds to the title you want to play. The HOME Menu also shows the time and date, current wireless communication mode and the number of steps you’ve taken that day. Look out for on a software icon to instantly tell when a title has received new information or an update via SpotPass ( p. 6).
HOME Menu Electronic Manual in the top-left corner of the screen, and then select Touch HOME MENU ELECTRONIC MANUAL to display a detailed manual on how to use the HOME Menu. Viewing Manuals 1 Choose an item from the contents Slide up and down to scroll through the contents of the manual and touch the page you want to view. Using Software Note: Press the Y Button to change the language of the manual. 2 View the page Slide up and down to scroll through the contents of the page.
Software Icon Types Card software icons Nintendo 3DS Game Card Nintendo DS / Nintendo DSi Game Card The software title’s icon appears after a Game Card is inserted into the Game Card slot. Built-in application icons For information on how to use these software titles, please see their respective electronic manuals ( p. 22). AR Games: Augmented Reality Read important health and safety information for your system.
Opening Software Touch the software icon, then touch OPEN. Closing / Suspending software Press the HOME Button during game play to suspend a software title and display the HOME Menu. Touch RESUME or press the HOME Button again to resume play, or touch CLOSE on the HOME Menu to close the software. Note: See p. 24 for details on actions you can perform while software is suspended. Other software titles can be launched, but you must close the suspended title to do this.
HOME Menu Settings Touch on the HOME Menu to configure the following settings, or to view the HOME Menu electronic manual. Save / Load Layout Save the layouts for themes and software icons on the HOME Menu, and swap between them. Screen Brightness Choose between five levels of brightness. Power-Saving Mode Automatically adjusts the brightness of the screen depending on what is being displayed in order to conserve battery power.
HOME Menu Application Icons Touch the icons displayed on the HOME Menu on the upper part of the Touch Screen to use the functions below. Note: Refer to each application’s electronic manual for more details ( p. 22). The Miiverse manual can be viewed within Miiverse after launching the software. • • Game Notes Write down notes on games whenever you want. Using Software Play and communicate with registered friends via the internet, wherever they may be.
Points to note regarding the friend list Do not share your friend code with people you do not know The friend list is a system intended for use by you and people you know. Posting your friend code on online forums or sharing it with people you do not know can result in you receiving unwanted data or status messages containing language that you may find offensive. Do not share your friend code with people you do not know. Parental Controls ( p.
Card-Based Software How to use Game Cards with your Nintendo system. Note: If the system language is set to Dutch, Portuguese or Russian, non-Nintendo 3DS titles will default to English. In some cases, this may be adjustable within the software. Nintendo 3DS, Nintendo DS, Nintendo DSi and Nintendo DSi enhanced software can be used on this system.
Using Game Cards 1 Insert a Game Card into the Game Card slot Game Card (label facing upwards) The label on the card and the bottom of the system should both face in the same direction. Note: • If you have trouble inserting the Game Card, remove it and check that it is facing the right direction with the label facing away from the system. Forcing the card in when it is facing the wrong direction could lead to damage.
Closing software Press the HOME Button to bring up the HOME Menu, then touch CLOSE to end a software title. (Any unsaved data will be lost if you close a software title without saving.) • Touch RESUME to return to the point where the software title was suspended. • To close Nintendo DS / Nintendo DSi software titles, first save your data, then press the HOME Button and touch OK. Note: If you press the POWER Button, the software title will close and the POWER Menu will be displayed ( p. 15).
Downloadable Software Enjoy free software downloaded via SpotPass or software purchased via Nintendo eShop. With the exception of Nintendo DSiWare ( p. 5), downloaded software is saved to a microSD card. The corresponding icons are displayed in the HOME Menu. You can get new software by… • Receiving free software via SpotPass ( p. 6). • Purchasing software via Nintendo eShop ( p. 5).
System Settings Configure your internet settings, Parental Controls and other basic system settings here. Touch the System Settings icon on the HOME Menu to open the System Settings. For detailed information, consult the electronic manual. NINTENDO NETWORK ID Adjust your Nintendo Network ID profile, delete your ID or link an existing ID to your system ( p. 31).
Nintendo Network ID Settings Create or link a Nintendo Network ID and configure your user information. A Nintendo Network ID allows you to enjoy various features of Nintendo Network. Download free software and demos from Nintendo eShop ( p. 5). Communicate with other users around the world in Miiverse ( p. 24). Use your Nintendo eShop funds on both your system and a Wii U console. • An internet connection ( p.
Creating or Linking a Nintendo Network ID There are two methods: • Create a new Nintendo Network ID. • Use an ID already linked to a Wii U console. If you own a Wii U console… Recommended for owners of You can link the existing ID from your Wii U console to this system. Doing so allows you to share your existing Nintendo eShop funds between devices, and to post to Miiverse as the same user.
Internet Settings Connect your system to the internet to open up even more options, such as purchasing software in Nintendo eShop or communicating with players around the world. Required Items for Internet Connection A wireless connection is required to connect your system to the internet. A computer is needed to configure the settings on your wireless access point (router).
Connecting to the Internet Once you have everything you need to connect to the internet, you can start configuring the settings on your system. Note: In order to connect to the internet when using a Nintendo DS Game Card, you must configure Nintendo DS Connections. 1 Touch CONNECTION SETTINGS 2 Touch NEW CONNECTION Internet Settings Adjusting System Settings Find your ideal settings with the tutorial 34 Touch TUTORIAL to receive help with the connection setup process.
Connecting using AOSS If your access point supports AOSS, you can set up a connection quickly and easily. Refer to the instruction manual for your access point in addition to this manual. Note: Using AOSS may cause your access point settings to change. If your computer is connected to the access point without using AOSS, it may no longer be able to connect after using AOSS. Establishing a connection using an access point found through a search will not change any of the access point’s settings ( p. 37).
Connecting using Wi-Fi Protected Setup You can set up a connection quickly and easily using Wi-Fi Protected Setup. Refer to the instruction manual of your access point for further information. Note: If your access point is set to use WEP security encryption, you will be unable to connect your Nintendo system using Wi-Fi Protected Setup.
Searching for and connecting to an access point You can use this method to search for and connect to an access point if your access point does not support AOSS or Wi-Fi Protected Setup. You should also consult the instruction manual that came with your access point. Note: If your access point is set to use WPA2™-PSK (TKIP) security encryption, your system will not be able to connect to the access point.
Parental Controls Use this option to restrict children from playing games, making purchases or using certain system functions (such as the internet browser). Options That Can Be Restricted The following options can be restricted. Please configure these options as necessary when allowing children to use the New Nintendo 2DS XL system.
Configuring Parental Controls Touch PARENTAL CONTROLS to begin the configuration ( p. 30). 1 Follow the instructions on the screen 2 Enter a four-digit PIN, then touch OK Information about Parental Controls will appear on the screen. Follow the instructions to proceed with configuration. To ensure the information entered is correct, you will be asked to enter your PIN twice. Note: Your PIN is required to change Parental Controls settings as well as remove them temporarily. Be careful not to forget it.
Data Management Check or organise software, data and settings saved to the system memory or the microSD card. You can manage downloaded software, check or configure software using StreetPass functionality and reset the blocked-user settings. Select DATA MANAGEMENT from System Settings, then select the corresponding option. Check or delete Nintendo 3DS download software or Virtual Console software.
Other Settings Change your user information and configure various other settings. Touch / at the sides of the screen to change pages. Set your user name, date of birth, region and Nintendo DS profile. PROFILE Note: Your profile is different to the user information for your Nintendo Network ID. Changing your profile here will not change any information connected to your ID. Your Nintendo DS profile includes a colour and message that are used in some Nintendo DS and Nintendo DSi software.
System Transfer You can transfer data to your new system from any one of the following: • A Nintendo DSi or Nintendo DSi XL system • A Nintendo 3DS, Nintendo 3DS XL or Nintendo 2DS system • Another New Nintendo 2DS XL, New Nintendo 3DS or New Nintendo 3DS XL system Online Step-by-step System Transfer Guide There is a convenient online step-by-step transfer guide that you can follow while performing a system transfer at systemtransfer.nintendo.co.
Transferring from systems in the Nintendo 3DS family Transfer save data for built-in applications, Nintendo eShop funds/account activity etc. from a Nintendo 3DS, Nintendo 3DS XL, Nintendo 2DS, New Nintendo 3DS, New Nintendo 3DS XL or New Nintendo 2DS XL system.
Transferring SD card data The method for transferring data on an SD card will differ depending on the systems you are using. Transferring between New Nintendo 3DS, New Nintendo 3DS XL or New Nintendo 2DS XL systems Source system Target system Transfer New Nintendo 3DS, New Nintendo 3DS XL or New Nintendo 2DS XL New Nintendo 3DS, New Nintendo 3DS XL or New Nintendo 2DS XL Take the microSD card from the source system and insert it in the target system.
Wireless Transfer (Limited Data) Except Nintendo 3DS software Use this method when the microSD card in the target system does not have enough free space available. All data except Nintendo 3DS download software will be transferred to the microSD card. After performing the transfer, any purchased downloadable software can be redownloaded at no extra cost from Nintendo eShop. • Save data will be restored once you start the software after redownloading it.
Precautions for Transferring After transferring data, all data on the source system will be deleted. System memory data deleted Source system System memory data overwritten Target system Note: With the exception of Nintendo DSiWare, the data in the target system’s system memory (e.g. pre-installed application save data) will be deleted and overwritten with the data from the source system. If you have data such as photos and recordings, copy these to a microSD card first.
System Update Update the HOME Menu and applications with new applications and functions. You must be connected to the internet to perform system updates. Configure your internet connection settings before using system update ( p. 33). (When performing a system update from a Game Card, an internet connection is not necessary.) Note: System updates cannot be carried out if the battery charge is running low. Check the Nintendo website for a summary of update details.
Format System Memory Select this option to delete all data saved to the system, and return it to factory settings. Note: If you have linked a Nintendo Network ID to your system, you will need an internet connection to format the system memory. The system version will remain at the current version even if you format the system memory.
Replacing the microSD Card Note: If the system is used by a young child, a parent or legal guardian should replace the microSD card for them. Always turn the power off before replacing the microSD card. • • Replacing the microSD Card 1 Open the Game Card slot cover 2 Push the card in, then remove it Note: Removing the microSD card without pushing it in first may lead to damage to the microSD card slot.
If Your microSD Card is Full… To free up space on a full microSD card, delete photo, video or sound files you no longer need via Data Management in the System Settings ( p. 40). Alternatively, transfer all of the data from your current microSD card to one with a larger capacity. You can save software to another microSD card, but cannot later combine the contents of multiple microSD cards.
Troubleshooting Before contacting Nintendo Customer Service, please use this section of the manual to determine the cause of the problem. Note: You can also check the Troubleshooting section of the HOME Menu electronic manual ( p. 20). If the problem involves a game or accessory, please also refer to the corresponding manual/documentation.
Problem The screen hue changes suddenly / The brightness changes and it becomes difficult to see bright colours Solution • Is power-saving mode on? P ower-saving mode changes the brightness and colour gradient automatically according to the content being displayed, to extend the battery charges for longer periods of time. This can lead to pale colours whitening and other colours changing. To maintain fixed colour and brightness level, turn power-saving mode off ( p. 23).
Problem Solution • Is the software compatible with the C Stick? The C Stick doesn’t work properly • T he C Stick is only usable in software titles or sections of software titles that support it, or in place of the Right Circle Pad for software that supports the Nintendo 3DS Circle Pad Pro ( p. 12). Does the C Stick input match what you see on screen? If you move the C Stick while the system is turning on, movements may be input despite the C Stick not being used.
Problem Even though a Game Card has been inserted, the icon for the software title does not appear and the HOME Menu displays: "There is nothing inserted into the Game Card slot." Solution • Is the Game Card inserted properly? • This message appears while playing Nintendo DS / Nintendo DSi software: "An error has occurred. Press and hold the POWER Button to turn the system off. Please refer to the Operations Manual for details.
Problem Solution • Did you enter the correct PIN? Enter the correct PIN ( p. 39). • Did you enter the correct answer to your secret question? Enter the correct answer to your secret question ( p. 39). If you have forgotten your PIN or secret question answer… If you have forgotten your PIN Touch FORGOT PIN on the first screen that appears after touching PARENTAL CONTROLS in System Settings, or touch I FORGOT on the PIN entry screen. Enter the answer to your secret question.
Problem Solution I t may have entered Sleep Mode as the result of an external magnetic field. Move your system away from magnetic objects, including other Nintendo 3DS systems. My system suddenly enters Sleep Mode Note: Stacking this system on top of other Nintendo 3DS systems may also result in the system entering Sleep Mode.
Technical Specifications Note: These specifications may be changed without prior notice. New Nintendo 2DS XL Model Number JAN-001 LCD Screens (Screen Size / Resolution) Upper Screen: widescreen LCD 4.88 inches (106.2mm wide x 63.72mm high) 400x240 pixels Can display 16.7 million colours Lower Screen: Touch-screen LCD 4.18 inches (84.96mm wide x 63.72mm high) 320x240 pixels Can display 16.7 million colours AC Adapter Nintendo 3DS AC adapter (WAP-002(AUS)) Dimensions 86.4mm high x 159mm wide x 20.
Warranty Information For warranty information, see support.nintendo.com Support Information Nintendo Customer Service Nintendo Customer Service Australia: (03) 9730 9822 New Zealand: 0800 743 056 Hours of operation: 9:00am to 5:00pm Monday to Friday (AEST/AEDT). Call charges vary. Check with your telecommunications provider. Email: warrantyadmin@nal.nintendo.com.
Notes 59
© 2017 Nintendo Co., Ltd. Trademarks are property of their respective owners. Nintendo 2DS and Nintendo 3DS are trademarks of Nintendo. microSDHC Logo is a trademark of SD-3C, LLC. Powered by Devicescape Software. Portions of this products are © 2003 – 2010 Devicescape Software, Inc. All rights reserved. Copyright © 2003 – 2010, Jouni Malinen and contributors All Rights Reserved. WPA Supplicant licensed pursuant to BSD License.
THIS SOFTWARE IS PROVIDED BY ERIC YOUNG "AS IS" AND ANY EXPRESS OR IMPLIED WARRANTIES, INCLUDING, BUT NOT LIMITED TO, THE IMPLIED WARRANTIES OF MERCHANTABILITY AND FITNESS FOR A PARTICULAR PURPOSE ARE DISCLAIMED.