
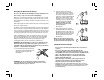
User Manual


2
1
3
4
6
14
12
13
11
10
9
8
5
7
System Setup and Privacy Information
PictoChat (see page 16) is not an internet application. However, when
using PictoChat, you can communicate with up to 15 other Nintendo DS users
within range of your DS (approximately 65 feet). Such users will be able to see
your nickname and messages. To protect your privacy, do not give out personal
information such as last name, phone number, age, e-mail or home address
when communicating with others.
An adult should assist children with system setup and instruct them not to use
personal information. Children should be warned about communicating with
or meeting strangers.
During system setup, whatever date you choose to enter as your month/day of
birth (year is not asked for), an "It's your birthday" message will be
communicated in the chat room on that date.
For more information on wireless communication and privacy, visit our web site
at http://www.nintendo.com/consumer/dsprivacy.
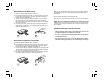
The first time the Nintendo DS is turned on, you will be asked to select the
screen language. Use the +Control Pad or stylus to select a language, then
touch "Yes" or press the A Button.
Follow the on-screen instructions to input your nickname, screen color,
date, time, and month and day of birth (not the year). Press the B Button to
step backward through this process if you would like to change the settings.
You will be able to change these settings later from the Settings Menu on
pages 19-23. For help using the on-screen keyboard, see page 18.
At the end of this process,
the DS will save your
settings and turn off.
Turn the power on to go
to the Nintendo DS
Menu Screen shown
at right.
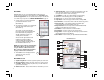
Nintendo DS Menu Screen
1. User Name - Can be adjusted from the Settings Menu.
(Page 22)
2. Clock/Alarm and Current Time - Can be adjusted from the
Settings Menu. (Page 21)
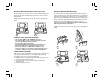
3. DS Game Selection Panel - Select to play a DS Game Card
inserted into Slot 1. (See Using Nintendo DS Game Cards on
page 12.)
4. PictoChat Selection Panel - Select to begin a PictoChat session.
(See PictoChat on pages 16-17.)
5. Game Boy Advance Game Pak Selection Panel - Select to play a
Game Boy Advance Game Pak inserted into Slot 2. (See Using Game
Boy Advance Game Paks on page 12.)
6. Settings Menu Panel - Select this panel to go to the Settings Menu
to change initial setup information and other settings. (See Settings
Menu on pages 19-23.)
7. Display Light ON/OFF - Touch to turn the display light on or off.
8. Power Indicator Icon - Shows battery charge. This is green while
the battery has a
normal charge and will change to red when the
battery charge gets low.
9. Screen Startup Mode Icon -
This icon shows which startup mode
the DS will use when turned on.
• In A (AUTO) mode, the DS will automatically load a game if there
is one in Slot 1 or Slot 2. The DS will load a DS Game Card
automatically if both slots have games loaded.
• In M (MANUAL) mode, the DS Menu Screen screen will appear.
Can be adjusted from the Settings Menu. (Page 20)
10. Game Boy Advance Display Screen Icon - This icon indicates
which screen will display Game Boy Advance games. Can be
adjusted from the Settings Menu. (Page 20)
11. Calendar and Current Date - Can be adjusted from the Settings
Menu. (Page 21)
12. DS Download Play Selection Panel - Select to use Single-Card
Download Play mode. See Wireless Communication & Game Play
Modes. (Pages 14-15)
13. Wireless Communication Icon - Indicates that wireless
communication will begin if this panel is selected. NOTE: Use of
wireless devices are prohibited in some locations. See page 3,
Radio Frequency Interference.
14. Alarm ON/OFF Panel - Touch to turn the alarm on. Can be
adjusted from the Settings Menu. (Page 21)
10
11