Pilates Reformer with Full Trapeze Assembly Instruction Manual
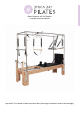
Pilates Reformer with Full Trapeze Assembly Instruction Manual ENGLISH FRANÇAIS ITALIANO DEUTSCH ESPAÑOL
Pilates Reformer with Full Trapeze Assembly Instruction Manual Important: This manual contains important safety and usage information. Please read thoroughly.
RECOMMENDED USE Byron Bay Pilates Co. recommends consulting a physician for a complete medical exam before beginning any exercise program. Having a complete medical exam is particularly important if the user has a history of high blood pressure, has heart disease, is over the age of 45, smokes, has high cholesterol, is obese or has not exercised regularly in the past year. If, at any time while exercising, the user feels faintness, dizziness, pain, or shortness of breath, he or she must stop immediately.
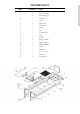
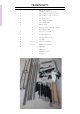
REFORMER PARTS Part Quantity 5 6 7 2 2 1 1 2 3 4 8 9 10 11 12 13 14 15 16 17 18 19 20 4 4 2 2 5 1 2 2 2 5 8 2 2 2 4 1 5 Item Reformer frame Reformer Foot Aluminium Bar Side Bar Screw Adjust Bar Foot Board Spring Cart Shoulder Rest String Anchor Spring Support Roller Wheel Rubber Stopper Pulley Elavator (R) M8*75 Screw Elevator (L) Spring Hook
TRAPEZE PARTS Part Quantity C 2 E 2 Red springs (heavy) G 2 Yellow springs (light) B Item 4 D Trapeze frame poles (including 2 roll down cross poles) Trapeze frame horizontal top poles 2 F Trapeze frame 3 way corner poles 2 H 2 J 1 I Green springs (medium) Trapeze springs 2 Sliding cross bars (horizontal + vertical) Push-through U bar K 2 Long screws for U bar L 1 Wooden trapeze bar 1 Foot strap M 1 O 1 set (2) Q 1 N P Wooden roll down bar Fuzzy Looped Handles 1
REFORMER INSTALLATION 1. Lift the reformer frame and remove it from the main box. 2. Remove the protective cardboard and take out the carton containing the upholstery. 3. Inside the carton, you will find the tools necessary to complete the installation of the Pilates Reformer. 4. Clean all frames, cart and upholstery with a damp cloth. Place the frame in a place where you want it permanently. 5. Install the cart by putting the cart onto the frame with head-rest facing the opposite end of the foot bar. 6.
10. The footbar is already assembled when the reformer arrives. Simply pick it up and adjust it to the level you would like. 11. The jump board slots into the metal bracket at the end of the reformer, and should be screwed in securely when you are using it.
12. The toolkit contains two pulleys with black knobs. Unscrew the black knobs. 13. Remove the large washer and insert the screw on the pulley through the slot of the elevator. Put the washer on back of the elevator and then screw the black knob back on. Do the same with both elevators, making sure that the pulleys face the cart. 14. You can raise or lower the pulleys by loosening the black knob and sliding the pulley upwards or downwards through the slot. 15.
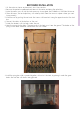
TRAPEZE INSTALLATION 1.. Tightly screw the four trapeze frame poles (B) into the wooden reformer bed. 2. Once all four of the trapeze frame poles have been screwed into the base (above), assemble the ‘U’ bar (J) by screwing this into the two roll down cross poles (B) (with circular hooks) with the two long screws provided (K).
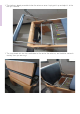
3. Slide the horizontal .sliding cross bar (I) down onto the opposite trapeze bars. 4. Assemble the top bar on the ground by screwing the trapeze frame horizontal top bars (C) on one side into the trapeze frame corner pole brackets (D) and tightening.
5. Slide the vertical sliding cross bar (I) down onto the other end of the horizontal frame bars (C). 6. Screw the trapeze frame corner pole brackets (D) into the remaining open horizontal top bars (C) to form the rectangle shape below.
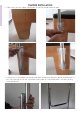
7. Place the top trapeze rectangle on top of the cadillac corner poles (B) and screw in tightly to have completely assembled the trapeze frame. 8. Attach the 6 coloured springs (E, F, G) using the closed loop hooks as per the image below to the frame and roll down bar(M). Use the long trapeze springs (H) to attach the wooden trapeze bar (L). Add the double loop handles (P) to the ends of the long springs.. Springs can be varied according to user preference.
9. Loop the fuzzy handles (O) around the top trapeze frame. Add and secure the stability sling (R) around the U-bar (J), and the table sling (Q) around the cadillac frame. 10. Final assembled Pilates Cadillac Trapeze Table above. The flat bed converter can be slotted into the end of the reformer to make the table one piece that doesn’t move. The long box can be added to vary your exercise routine.
WARRANTY Vitality 4 Life are the warranty providers for Byron Bay Pilates Co. products. To activate your warranty, please register online at warranty.vitality4life.com. Do not return to place of purchase other than Vitality 4 Life. Vitality 4 Life warrant this Byron Bay Pilates Co.
Reformer Pilates avec Trapèze Complet Manuel de Montage Important: Ce manuel contient des informations importantes de sécurité et d’utilisation.
RECOMMANDATIONS D’UTILISATION Byron Bay Pilates Co. recommande de consulter un médecin et d’effectuer un examen médical complet avant de commencer tout programme d’exercice physique. Cet examen médical complet est d’autant plus important si l’utilisateur a des antécédents d’hypertension artérielle, de maladie cardiaque, a plus de 45 ans, est fumeur, a un taux élevé de cholestérol, est obèse ou n’a pas pratiqué d’exercice physique régulier pendant l’année écoulée.
Piece 1 2 3 4 5 6 7 8 9 10 11 12 13 14 15 16 17 18 19 20 PIÈCES DU REFORMER Quantité 4 4 2 2 2 2 1 5 1 2 2 2 5 8 2 2 2 4 1 5 Article Cadre du Reformer Pieds du Reformer Barre aluminium Barre latérale Vis Barre réglable Planche de pied Ressort Chariot Appui d‘épaules Cordon Point d‘ancrage Support de ressort Roue du Roller Arrêt en caoutchouc Poulie Elévateur (D) Vis M8*75 Elévateur (G) Crochet de ressort
PIÈCES DU TRAPÈZE Piece Quantité C 2 E 2 Ressorts rouges (durs) G 2 Ressorts jaunes (légers) B Article 4 D Barres de cadre du trapèze (comprenant 2 barres transversales déroulantes) Barres Horizontales du haut du cadre du trapèze 2 F Barres de coins tridirectionnelles 2 H Ressorts verts (médium) 2 I Ressorts du trapèze 2 J Barres transversales à glissière (horizontale + verticale) 1 Barre Poussoir en U K 2 L 1 Barre de trapèze en bois N 1 Strap de pieds M Vis longues
INSTALLATION DU REFORMER 1. Soulevez le cadre et sortez-le de l’emballage principal. 2. Enlevez le carton de protection et sortez l’emballage contenant la sellerie. 3. A l’intérieur du carton, vous trouverez les outils nécessaires pour effectuer l’installation du Pilates Reformer. 4. Nettoyez tous les cadres, le chariot et la sellerie avec un chiffon humide. Placez le cadre à l’endroit où vous voulez qu’il reste de façon permanente. 5.
10. La barre de pieds est déjà assemblée quand le reformer vous est livré. Prenez-la et réglez-la au niveau qui vous convient. 11. La planche de saut se fixe dans la patte métallique à l’extrémité du reformer, et doit être vissée fermement quand vous l’utilisez.
12. Le kit d’outils contient deux poulies avec des boutons de serrage noirs. Dévissez ces boutons. 13. Enlevez la grande rondelle et insérez la vis dans la poulie à travers la fente de l’élévateur. Remettez la rondelle sur la face de l’élévateur et revissez le bouton noir. Faites de même avec les deux élévateurs, en vous assurant que les poulies soient en face du chariot. 14.
INSTALLATION DU TRAPÈZE 1.. Vissez serré les quatre barres (B) de cadre du trapèze dans la base en bois du reformer. 2. Une fois que les quatre barres de cadre du trapèze ont été vissées dans la base (voir ci-dessus), assemblez la barre en U (J) en la vissant dans les deux barres transversales déroulantes (B) (avec des crochets circulaires) avec les deux vis longues (K) fournies.
3. Faites glisser la barre transversale horizontale (I) vers les barres de trapèze opposées. 4. Assemblez au sol la barre supérieure en vissant les barres horizontales du haut du cadre du trapèze (C) d’un côté dans les pattes (D) de barres de coin du cadre du trapèze et serrez.
5. Faites glisser la barre verticale à glissière (I) vers le bas sur l’autre extrémité des barres horizontales de cadre (C). 6. Vissez les pattes (D) de coin du cadre du trapèze dans les barres supérieures horizontales restantes (C) pour réaliser la forme rectangulaire ci-dessous.
7. Placez le rectangle supérieur du trapèze en haut des barres de coin du Cadillac (B) et serrez bien pour achever l’assemblage du cadre du trapèze. 8. Attachez les 6 ressorts de couleur (E, F, G) à l’aide des crochets fermés (comme dans l’image cidessous) au cadre et à la barre déroulante (M). Utilisez les ressorts longs du trapèze (H) pour attacher la barre de trapèze en bois (L). Ajoutez les poignées à anneau double (P) aux extrémités des ressorts longs.
9. Enroulez les poignées fourrées (O) autour du haut du cadre du trapèze. Ajoutez et fixez la lanière de stabilité (R) autour de la barre en U (J) et la lanière de table (Q) autour du cadre du Cadillac. 10. Voir ci-dessus image de la table Reformer Pilates avec Trapèze Complet complètement assemblée. Le convertisseur lit à plat peut être fixé à l’extrémité du reformer pour en faire une table d’une seule pièce et fixe. Vous pouvez ajouter la long box pour varier le déroulement de vos exercices.
GARANTIE Vitality 4 Life est le fournisseur de la garantie pour les produits Byron Bay Pilates Co. Pour activer votre garantie, prière de vous inscrire en ligne sur http://www.vitality4life.fr/enregistrez-votre-garantie/. Ne renvoyez pas le produit au lieu d’achat mais à Vitality 4 Life. Vitality 4 Life garantit que ce Reformer Pilates avec Trapèze Complet de Byron Bay Pilates Co.
Pilates Reformer con trapezio completo Manuale istruzioni di montaggio Importante: Questo manuale contiene importanti informazioni riguardanti la sicurezza e l’utilizzo. Si prega di leggerlo attentamente.
RACCOMANDAZIONI PER L’USO Byron Bay Pilates Co. consiglia di consultare un medico e sottoporsi ad un completo esame medico prima d’iniziare qualsiasi programma d’allenamento. Sottoporsi ad un esame medico completo è particolarmente importante se l’utente ha una storia di pressione sanguigna elevata, problemi di cuore, ha un età superiore ai 45 anni, fuma, ha il colesterolo alto, è obeso o non si è allenato regolarmente nell’ultimo anno.
Parte 1 2 3 4 5 6 7 8 9 10 11 12 13 14 15 16 17 18 19 20 PARTI DEL REFORMER Quantità 4 4 2 2 2 2 1 5 1 2 2 2 5 8 2 2 2 4 1 5 Articolo Telaio del Reformer Piede del Reformer Barra in alluminio Barra laterale Vite Barra regolabile Barra poggiapiedi Molla Carrello Spalliera Corda Ancora Supporto della molla Rullo a ruota Stopper di gomma Puleggia Elevatore (R) Vite M8*75 Elevatore (L) Gancio a molla
PARTI DEL TRAPEZIO Parte Quantità B Articolo 4 Pali telaio trapezio (include 2 barre trasversali di scorrimento verticale) C 2 E 2 Molle rosse (pesante) G 2 Molle gialle (leggero) D Pali superiori orizzontali del telaio del trapezio 2 F Montanti angolari del trapezio a 3 vie 2 H 2 J 1 I Molle verdi (medio) Molle trapezio 2 Barre di scorrimento (orizzontale + verticale) Barra di spinta ad U K 2 Viti lunghe per la barra ad U L 1 Barra di legno del trapezio 1 Cinturino per i
INSTALLAZIONE DEL REFORMER 1. Sollevare il telaio e rimuoverlo dalla scatola. 2. Rimuovere il cartone protettivo ed estrarre la scatola contenente il rivestimento. 3. All’interno del cartone saranno presenti tutti gli strumenti necessari per completare l’installazione del Pilates Reformer. 4. Pulire tutti i telai, carrello e rivestimento con un panno umido. Collocare il telaio nella sua posizione permanente. 5.
10. La barra poggiapiedi è già montata al ricevimento del reformer. Ti basterà raccoglierla e regolarla al livello che preferisci. 11. Il jump board (tappeto elastico) s’inserisce nella staffa in metallo all’estremità del reformer e dovrebbe essere avvitato in modo sicuro quando lo si utilizza.
12. Il set di attrezzi contiene due carrucole con manopole nere. Svitare le monopole nere. 13. Rimuovere la rondella grande ed inserire la vite sulla puleggia attraverso la fenditura dell’elevatore. Mettere la rondella nella parte posteriore dell’elevatore e poi riavvitare la manopola nera. Fare lo stesso con entrambi gli elevatori, facendo in modo che le pulegge siano rivolte verso il carrello. 14.
INSTALLAZIONE DEL TRAPEZIO 1.. Fissare saldamente I quattro pali del telaio del trapezio (B) nel lettino del reformer in legno. 2. Una volta che tutti e quattro i pali del telaio del trapezio sono stati avvitati alla base (sopra), montare la barra a “U” (J) avvitandola ai due pali trasversali di scorrimento verticale (B) (con ganci circolari) tramite le due viti lunghe fornite (K).
3. Far scorrere la barra trasversale di scorrimento orizzontale (I) sulle barre del trapezio opposte. 4. Montare la barra superiore a terra avvitando le barre superiori orizzontali del telaio del trapezio (C) su un lato nei montanti angolari del telaio del trapezio (D) e stringere.
5. Scorrere la barra di scorrimento verticale (I) all’altra estremità delle barre superiori orizzontali del telaio (C). 6. Avvitare I montanti angolari del telaio del trapezio a 3 vie (D) nelle barre superiori orizzontali restanti (C) per formare la forma a rettangolo sotto.
7. Collocare il rettangolo superiore del trapezio sopra i montanti angolari del cadillac (B) e stringere bene per completare il montaggio del telaio del trapezio. 8. Fissare le 6 molle colorate (E, F, G) usando i ganci ad anello chiuso, come mostrato nell’immagine sottostante, al telaio ed alla barra di scorrimento (M). Usare le molle lunghe del trapezio (H) per fissare la barra in legno del trapezio (L). Aggiungere le maniglie a doppio anello (P) alle estremità delle molle lunghe.
9. Avvolgere le maniglie foderate (O) intorno alla parte superiore del trapezio. Aggiungere e fissare la fascia di stabilità (R) intorno alla barra ad U (J) e la fascia del lettino (Q) intorno al telaio del Cadillac. 10. Sopra è rappresentato il Pilates Cadillac con trapezio completo montato Il flat bed converter (materasso di protezione) può essere inserito all’estremità del reformer per rendere il lettino un pezzo unico che non si muove.
GARANZIA Vitality 4 Life è il fornitore di garanzia per i prodotti di Byron Bay Pilates Co. Per attivare la garanzia, si prega di registrarsi online a vitality4life.com. Non restituire il prodotto ad un punto d’acquisto diverso da Vitality 4 Life. Vitality 4 Life garantisce che questo attrezzo di Byron Bay Pilates Co.
Pilates Reformer mit Voll Trapez Montage- und Gebrauchsanleitung Wichtig: Diese Anleitung enthält wichtige Sicherheits- und Nutzungsinformationen. Bitte lesen Sie sie sich sorgfältig durch.
EMPFOHLENE NUTZUNG Die Byron Bay Pilates Co. empfiehlt Ihnen, einen Arzt zu konsultieren und eine umfassende klinische Untersuchung vornehmen zu lassen, bevor Sie mit dem Training beginnen. Eine umfassende klinische Untersuchung ist besonders wichtig, falls der Benutzer unter Bluthochdruck oder einer Herzkrankheit leidet, über 45 Jahre alt ist, raucht, einen hohen Cholesterinspiegel hat, fettleibig ist oder im letzten Jahr nicht regelmäßig trainierte.
Teil 1 2 3 4 5 6 7 8 9 10 11 12 13 14 15 16 17 18 19 20 TEILE DES REFORMERS Menge 4 4 2 2 2 2 1 5 1 2 2 2 5 8 2 2 2 4 1 5 Artikel Rahmen des Reformers Fuß des Reformers Aluminiumstange Seitliche Stange Schraube Verstellbare Stange Fußbrett Feder Schlitten Schulterpolster Schnur Klemme Federstange Laufrolle Gummi-Stopper Flaschenzug Hebewerk (R) M8 x 75 Schraube Hebewerk (L) Federhaken
TRAPEZ-TEILE Teil Menge C 2 E 2 Rote Federn (stark) G 2 Gelbe Federn (leicht) B Artikel 4 D Trapez-Rahmenstangen (inklusive 2 Roll-Down Kreuzstangen Trapez-Rahmen: horizontale obere Stangen 2 F Trapez-Rahmen: Eckstangen (3 Richtungen) 2 H 2 J 1 I Grüne Federn (mittel) Trapez-Federn 2 Gleitende Querstangen (horizontal + vertikal) Push-Through U-Bar K 2 Lange Schrauben für U-Bar L 1 Trapez-Stange aus Holz 1 Fußband M 1 O 1 Set (2) Q 1 N P Roll-Down-Bar aus Holz Fla
MONTAGE DES REFORMERS 1. Heben Sie den Rahmen aus dem Paket. 2. Entfernen Sie den schützenden Karton und nehmen Sie den Karton mit den Polstern aus dem Paket. 3. m Paket finden Sie alle notwendigen Werkzeuge, um den Pilates Reformer zu montieren. 4. Reinigen Sie alle Rahmen, den Schlitten und die Polsterung mit einem feuchten Tuch. Platzieren Sie den Rahmen an der Stelle, an der der Reformer später stehen soll. 5.
10. Die Fußstange wird bereits montiert geliefert. Heben Sie sie einfach an und stellen Sie sie in der gewünschten Höhe ein. 11. Das Jump Board rastet in die Metallhalterung am Ende des Reformers ein und sollte sicher festgeschraubt sein, während Sie es verwenden.
12. Das Werkzeugset enthält zwei Flaschenzüge mit schwarzen Knöpfen. Schrauben Sie die schwarzen Knöpfe ab. 13. Entfernen Sie die große Unterlegscheibe und schrauben Sie die Schraube durch den Schlitz im Hebewerk an den Flaschenzug. Stecken Sie die Unterlegscheibe wieder auf das Hebewerk und schrauben Sie den schwarzen Knopf fest. Wiederholen Sie diesen Schritt mit beiden Hebewerken und stellen Sie sicher, dass die Flaschenzüge zum Schlitten zeigen. 14.
TRAPEZ-MONTAGE 1.. Schrauben Sie die vier Rahmenstangen des Trapez (B) fest an den Holzrahmen des Reformers. 2. Sobald alle vier Trapez-Rahmenstangen an der Basis festgeschraubt wurden (siehe oben), bauen Sie die U-Bar (J) zusammen, indem Sie sie mit den beiden mitgelieferten langen Schrauben (K) an den beiden Roll-Down-Kreuzstangen (B) (mit Rundschrauben) fixieren.
3. Stecken Sie die horizontale gleitende Querstange (I) in die gegenüberliegenden Trapez-Stangen. 4. Bauen Sie die obere Stange am Boden zusammen, indem Sie die horizontalen oberen Stangen (C) des Trapez an einer Seite an den Eckstangen des Trapez (D) befestigen und festziehen.
5. Stecken Sie die vertikale gleitende Querstange (I) in das andere Ende der horizontalen oberen Stangen (C). 6. Schrauben Sie die Eckstangen des Trapez-Rahmens (D) an den verbleibenden horizontalen oberen Stangen (C) fest, um die unten gezeigte rechteckige Form zu erhalten.
7. Platzieren Sie das obere Trapez-Rechteck auf den Rahmenstangen (B) des Cadillacs und schrauben Sie es fest. Jetzt ist der Trapez-Rahmen fertig. 8. Befestigen Sie die 6 farbigen Federn (E, F, G) wie unten gezeigt mit den geschlossenen Haken mit dem Rahmen und der Roll-Down-Bar (M). Verwenden Sie die langen Trapez-Federn (H), um die Trapez-Stange aus Holz (L) zu befestigen. Befestigen Sie die doppelten Handschlingen (P) an den Enden der langen Federn.
9. Wickeln Sie die flauschigen Handschlingen (O) um den oberen Trapez-Rahmen. Befestigen Sie das Stabilitätsband (R) an der U-Bar (J) und binden Sie das Tischband (Q) um den Rahmen des Cadillacs. 10. Oben sehen sie den fertig zusammengebauten Pilates Reformer mit Voll Trapez. Der Flat Bed Converter kann in das Ende des Reformers gesteckt werden, um den Tisch zu einem unbeweglichen Element zu machen. Die Long Box kann hinzugefügt werden, um Ihre Trainingseinheiten zu variieren.
GARANTIE Vitality 4 Life ist der Garantie-Dienstleister für Byron Bay Pilates Co. Produkte. Um Ihre Garantie zu aktivieren, registrieren Sie sich bitte online unter http://www.vitality4life.de/garantie-registrierung/. Bringen Sie das Gerät nicht in das Geschäft zurück, sofern es sich dabei nicht um Vitality 4 Life handelt. Vitality 4 Life garantiert für einen Zeitraum von drei Jahren ab dem Kaufdatum, dass dieser Pilates Reformer mit Voll Trapez von Byron Bay Pilates Co.
Pilates Reformer con Trapecio Completo Manual de Instrucciones Importante: Este manual contiene información importante de seguridad y uso. Por favor, léalo detenidamente.
USO RECOMENDADO Byron Bay Pilates Co. recomienda consultar con un médico para hacerse un examen médico completo antes de empezar cualquier programa de ejercicio. Es especialmente importante realizar un examen médico completo si el usuario tiene un historial de hipertensión, tiene enfermedad cardíaca, tiene más de 45 años, fuma, tiene el colesterol elevado, es obeso o no ha realizado ejercicio de forma habitual en el último año.
Pieza 1 2 3 4 5 6 7 8 9 10 11 12 13 14 15 16 17 18 19 20 PIEZAS DEL REFORMER Cantidad 4 4 2 2 2 2 1 5 1 2 2 2 5 8 2 2 2 4 1 5 Artículo Marco de reformer Pie de reformer Barra de aluminio Barra lateral Tornillo Barra de ajuste Tablero para los pies Muelle Carro Apoyo para los hombros Cuerda Anclaje Soporte de muelle Rueda de rodillo Stopper de goma Polea Elevador (D) Tornillo M8*75 Elevador (I) Gancho de muelle
PIEZAS DEL TRAPECIO Pieza Cantidad C 2 E 2 Muelles rojos (pesados) G 2 Muelles amarillos (ligeros) B Artículo 4 D Postes de marco de trapecio (incluye 2 postes transversales de rodamiento vertical) Postes superiores horizontales de marco de trapecio 2 F Postes de 3 vías de esquina de marco de trapecio 2 H Muelles verdes (medio) 2 I Muelles de trapecio 2 J Barras transversales deslizantes (horizontal + vertical) 1 Barra de empuje U K 2 L 1 Barra de trapecio de madera N 1
INSTALACIÓN DEL REFORMER 1. Levante el marco del Reformer y sáquelo de la caja principal. Retire el cartón protector y saque la caja con la tapicería. 3. Dentro de la caja, encontrará las herramientas necesarias para completar la instalación del Pilates Reformer. 4. Limpie los marcos, el carro y la tapicería con un paño húmedo. Coloque el marco donde lo quiera tener permanentemente. 5. Instale el carro colocándolo sobre el marco con el reposacabezas en el extremo opuesto de la barra para los pies. 6.
10. La barra para los pies ya viene montada cuando se recibe el reformer. Sencillamente ajústela al nivel adecuado. 11. El tablero de salto encaja en el soporte de metal en el extremo del reformer y debe fijarse firmemente para utilizarlo.
12. El kit de herramientas contiene dos poleas con botones negros. Desenrosque los botones negros. 13. Retire la arandela grande e inserte el tornillo en la polea por la ranura del elevador. Ponga la arandela en la parte posterior del elevador y luego vuelva a enroscar el botón negro. Haga lo mismo con ambos elevadores, asegurándose de que las poleas dan al carro. 14. Puede subir o bajar las poleas aflojando el botón negro y deslizando la polea hacia arriba o hacia abajo por la ranura. 15.
INSTALACIÓN DEL TRAPECIO 1.. Atornille firmemente los cuatro postes de marco de trapecio (B) en la cama de madera del reformer. 2. Cuando los cuatro postes de marco de trapecio estén enroscados en la base (arriba), monte la barra ‘U’ (J) atornillándola a los postes transversales de rodamiento vertical (B) (con ganchos circulares) con los dos tornillos largos (K).
3. Deslice la barra transversal deslizante horizontal (I) hacia abajo sobre las barras del trapecio en frente. 4. Monte la barra superior en el suelo atornillando firmemente las barras superiores horizontales de marco de trapecio (C) por un lado a los soportes de los postes de 3 vías de esquina de marco de trapecio (D).
5. Deslice la barra transversal deslizante vertical (I) hacia abajo al otro extremo de las barras superiores horizontales del marco del trapecio (C). 6. Atornille los soportes postes de las 3 vías de la esquina del marco del trapecio (D) en las barras superiores horizontales del marco del trapecio restantes (C) para formar el rectángulo que se muestra a continuación.
7. Coloque el rectángulo superior del trapecio sobre los postes de esquina de cadillac (B) y enrosque firmemente para completar el marco del trapecio. 8. Enganche los 6 muelles de colores (E, F, G) con los ganchos de círculo cerrado según muestra la imagen abajo, al marco y a la barra de rodamiento vertical (M). Utilice los muelles de trapecio largos (H) para conectar la barra de trapecio de madera (L). Añada las asas de doble vuelta (P) a los extremos de los muelles largos.
9. Pase las asas curvadas suaves (O) alrededor del marco superior del trapecio. Añada y asegure la eslinga de estabilidad (R) alrededor de la barra U (J) y la eslinga de mesa (Q) alrededor del marco de cadillac. 10. Mesa Pilates Trapecio Cadillac completamente montada arriba. El convertidor de cama plana puede encajar en el extremo del reformer para que la mesa se convierta en una pieza inmóvil. La caja larga se puede añadir para variar los ejercicios.
GARANTÍA Vitality 4 Life es el proveedor de la garantía para productos de Byron Bay Pilates Co. Para activar su garantía, regístrese en línea en http://www.vitality4life.es/registra-la-garantia. No realice la devolución de su compra a ningún otra empresa que no sea Vitality 4 Life. Vitality 4 Life garantiza que el Pilates Reformer con Trapecio Completo de Byron Bay Pilates Co. está libre de defectos en los materiales y de mano de obra.
Vitality 4 Life Australia – Head Office and Showroom 5/10 Brigantine Street, Byron Bay, NSW 2481, Australia International Phone: +612-66807444 Toll-Free (within Australia): 1800 802 924 Fax: +612-66807481 Email: support@vitality4life.com Website: www.vitality4life.com Vitality 4 Life – New Zealand Toll-Free (within NZ): 0800 882 924 Email: support@vitality4life.co.nz Website: www.vitality4life.co.