
User Manual


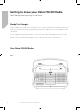


Getting to know your Retro FM/AM Radio
You’ll be up and running in no time
Getting to know your Retro FM/AM Radio
5
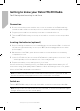
Connection
1. Connect the mains power lead into the socket on the back of the Radio and fully
extend the radio aerial in a vertical position to obtain the maximum signal strength.
2. Plug the power lead into the mains power wall socket and switch on.
3. Turn the OFF/FM/AM rotary on the top of the radio to clockwise to turn the product
On.
Inserting the batteries (optional)
1. Before installing the batteries (not included) please ensure that the Radio is switched
off (turn the right hand rotary on the top to ‘OFF’) and is unplugged from the mains
power supply.
2. On the back of the Radio, push down the tabs to release and remove the battery
compartment cover.
3. Insert 4 x 1.5V AA-size (also known as LR-6) batteries, making sure to note the ‘+’ and
‘-‘ markings and position the batteries the correct way around.
4. Replace the battery cover, making sure it ‘clicks’ shut.
If used continuously on battery power, your Radio has an approximate battery life of 5
hours when using good quality alkaline batteries. When the battery power is low, please
switch off the Radio and replace the batteries.
Note: For battery operation please ensure that the mains power is switched off and
remove the mains power plug from the socket on the back of the Radio.
Switch on
Turn the OFF/FM/AM rotary on the top of the radio clockwise to turn the product On.
Note: Always make sure that the aerial is fully extended, to ensure the maximum signal
strength and the best possible sound quality.