
Owner manual


10
DCX-900C Large Format Instructions 9-30-13
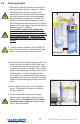
3.2 Running the Gel
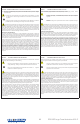
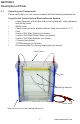
1. Place stirring bar into bottom of reservoir in
stirring corral (as shown in gure 6). Place
core assembly into lower reservoir. The
anode (red) and cathode (black) electrodes
are color-coded on both the core/cassette
assembly and lower reservoir. Ensure the
red dot on the cassette assembly is on the
same side as the red receptacle on the lower
reservoir. Fill core upper reservoir with freshly
prepared buffer (~ 190mls).
If any buffer is spilled into banana jack
receptacles (outlined in yellow boxes in
gure 6) in lower reservoir, dry completely
using compressed air! Failure to do this
will result in accelerated banana jack cor-
rosion.
2. If using cooling capability of DCX-900C at-
tach external cooler to tubing adapters and
begin circulating coolant through base.
3. Pour only enough freshly prepared buffer into
lower chamber so that the nal buffer level
is just below bottom of sample wells. Using
a pipette or syringe, thoroughly ush out the
wells in the glass plate sandwich with buffer.
Load samples. If outer lanes do not con-
tain sample, it is recommended that you run
standards and/or ll outer lanes with loading
buffer to reduce smiling and wrap-around ef-
fects.
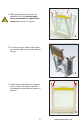
4. Attach safety cover and turn on magnetic
stirrer. The closed unit ready for power is
shown in gure 7.
5. Connect the leads to the power supply,
matching the color-coded red to red and
black to black. See Section 4.1 for recom-
mended power conditions. Begin separa-
tion by electrophoresis.
6
stirring bar
7