Wiser Home Control 5200PG Installation Instructions
Wiser Home Controller Installation Instructions © Copyright Clipsal Australia Pty Ltd, 2009. All rights reserved. This material is copyright under Australian and international laws. Except as permitted under the relevant law, no part of this work may be reproduced by any process without prior written permission of and acknowledgement to Clipsal Australia Pty Ltd. Clipsal and C-Bus are registered trademarks of Clipsal Australia Pty Ltd. The information in this manual is provided in good faith.
Wiser Home Controller Installation Instructions Contents 1.0 2.0 Product Description 5 1.1 Hardware Components 5 1.2 Software 7 1.3 Product Information 8 Network Topology 9 2.1 Mapping Your Existing Network 3.0 9 2.2 Adding the Wiser Home Controller and CNI 10 2.3 Setting up a Wireless LAN 13 Installation 14 3.1 Installation Location 14 3.2 Important Notes 14 3.3 Overview of Hardware Installation Steps 15 3.4 Step 1, Connect the CNI to the C-Bus Network Cable 16 3.
Wiser Home Controller Installation Instructions 6.2 Useful MS-DOS Command Prompt Programs 36 6.3 Frequently Asked Questions (FAQs) 37 6.4 Release Notes 41 7.0 Terms 43 8.0 Product Specifications 44 9.0 Standards Complied 45 10.0 GNU General Public Licence 47 11.
Wiser Home Controller Installation Instructions 1.0 Product Description The 5200PG Wiser Home Controller provides an easy-to-use graphical user interface (GUI) to access the home C-Bus network and other home applications. The Wiser Home Controller lets you monitor and control your home environment locally, or remotely over the Internet.
Wiser Home Controller Installation Instructions Cat.5e network cable The blue or black network cable connects the customer's broadband device to the Wiser Home Controller's router. Do not use this cable for C-Bus connections. Link The link comes attached to the CNI and locks the Wiser Home Controller and CNI together to form a single unit. Support stand The optional stand is useful when placing the Wiser Home Controller on a table or desk. (Not shown in Figure 1.
Wiser Home Controller Installation Instructions 1.2 Software Normally, the installer loads PICED and C-Bus Toolkit on a PC and brings it to the customer site. Software Applications When installing the Wiser Home Controller, you must use the downloaded versions of the following Clipsal software applications: • PICED setup software, version 4.5, or later. Access the PICED software using the link in the readme.htm file located on the provided Wiser USB drive. • C-Bus Toolkit setup software, version 1.10.
Wiser Home Controller Installation Instructions 1.3 Product Information The following documents and online files are available from the downloads site noted previously: C-Bus Wiser Home Controller 5200PG Setup Sheet The Setup Sheet provides quick installation information for installers who are familiar with home LANs. The Setup Sheet is shipped with the product. C-Bus Wiser Home Controller 5200PG Installation Instructions A copy of this document is shipped with the product on a USB drive.
Wiser Home Controller Installation Instructions 2.0 Network Topology You should carefully consider the existing network layout at the customer site before installing the Wiser Home Controller. Try to minimise the amount of reconfiguration required. There are a couple of important points to remember during the Wiser Home Controller installation. • The Wiser Home Controller is not a modem. You must connect the router to an Internet connection, NOT a telephone line.
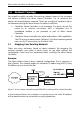
Wiser Home Controller Installation Instructions 2.2 Adding the Wiser Home Controller and CNI The installer has several choices when adding the Wiser Home Controller to the customer's network. The basic options are: • Option A. Connect the Wiser Home Controller's WAN port to the output of the customer's modem/router as shown in Figure 3. In this configuration, all network traffic passes through the Wiser Home Controller's wired and wireless LANs. • Option B.
Wiser Home Controller Installation Instructions Option B Figure 4. Option B, Wiser Home Controller placed on the customer's LAN Option B requires a minimum of changes to the existing customer configuration. After adding the Wiser Home Controller, move the customer's wireless equipment to the Wiser wireless LAN. Be sure to set up security on the new wireless LAN, if used. Option C Figure 5. Option C, Wiser Home Controller connected to a bridging modem.
Wiser Home Controller Installation Instructions Choosing a Network Setup Option The following table can be helpful in deciding which of the three basic options is best suited to the customer's needs. Feature Option A Option B Option C WAN access for programming and configuration Yes Yes note 1 Yes All traffic is routed through the Wiser unit.
Wiser Home Controller Installation Instructions 2.3 Setting up a Wireless LAN Many homes use wireless devices connected to the wireless LAN on the customer's ADSL modem/router. The Wiser Home Controller provides a wireless LAN that should be used for wireless-connected devices. Install the unit as close as possible to the wireless devices on the LAN. The IP address of the Wiser Home Controller wireless LAN is the same as the wired LAN, 192.168.2.1.
Wiser Home Controller Installation Instructions 3.0 Installation Use the C-Bus Wiser Home Controller 5200PG Setup Sheet, provided with the equipment to do the hardware installation. Consult other Wiser Home Controller product information for details. 3.1 Installation Location It is important to select the best location to install the Wiser Home Controller. Some considerations are listed below: • The Wiser Home Controller is designed for indoor use only.
Wiser Home Controller Installation Instructions 3.3 Overview of Hardware Installation Steps The steps listed in Table 3 are detailed in this document and in the Wiser Home Controller 5200PG Setup Sheet. Prerequisite Install Clipsal C-Bus Toolkit and PICED software on a PC using the downloaded versions (refer to Section 1.2). Bring the PC to the customer site. Main Installation Steps Step Tasks to Perform Refer to Section 1 Connect the CNI to the customer's C-Bus network cable.
Wiser Home Controller Installation Instructions 3.4 Step 1, Connect the CNI to the C-Bus Network Cable The C-Bus network and the Ethernet LAN are electrically isolated inside the CNI unit. The C-Bus network provides power for the C-Bus side of the CNI circuit board. Do not connect the C-Bus side of the CNI to an Ethernet LAN. Damage to the equipment will occur. 1. Open the cable access door on the CNI unit. 2. Crimp the wire pairs using bootlace connectors.
Wiser Home Controller Installation Instructions 3.5 Step 2, Assemble the Router, CNI and Busbar Assemble the Wiser Home Controller's router, CNI and busbar to form a single unit. Use the instructions below: 1. Install the three antennas on the Wiser Home Controller's router box. The antennas must be installed to prevent internal damage to the wireless transceivers. 2. Using the link that is attached to the CNI, connect the CNI and the router together.
Wiser Home Controller Installation Instructions 3.6 Step 3, Install the Hardware 1. Choose a suitable location for the Wiser Home Controller. 2. Adjust the antennas. Normally, the higher you mount the equipment, the better the performance. 3. Mount the equipment on a wall using the two keyhole screws on the back of the router, or place the unit on a desk or table. If you are using the Wiser Home Controller's wireless LAN, do not place the router within 20 cm of the operator.
Wiser Home Controller Installation Instructions 3.7 Step 4, Connect your Configuration PC You can now connect and test the connection to the customer's C-Bus network using the Wiser Home Controller and the inline CNI. 1. Connect the configuration PC to one of the open RJ-45 LAN connectors on the Wiser Home Controller. You may use the Wiser Home Controller's wireless LAN, if preferred. 2. Connect the power supply wire to the busbar power port. Plug the power supply unit into a wall power outlet.
Wiser Home Controller Installation Instructions Wiser Home Control indicators Power Security (orange) Wireless Router Diag (red) Internet LAN Purpose or Meaning The Power LED lights when power is applied to the unit and stays lit, as long as power is present. Not used for Wiser Home Control functions. Lit when wireless is available. Blinks when transmitting or receiving data. When the unit is working as a ‘router’ the LED is lit. Lit during self-test and a few moments thereafter.
Wiser Home Controller Installation Instructions The C-Bus network powers the C-Bus indicator and C-Bus circuits in the CNI. The C-Bus LED lights only when the network is powered on. For C-Bus LED meanings refer to Table 6. C-Bus Indicator Meaning Orange C-Bus clock signal is present, voltage is good Orange/Red flash C-Bus good, active communication between C-Bus and Ethernet Off No C-Bus connection Table 6.
Wiser Home Controller Installation Instructions 4.0 Software Configuration You are now ready to configure the Wiser Home Controller and create a custom project for the customer. The installer can develop the PICED project for the customer's Wiser Home Controller before arriving at the customer's home. Prerequisites Perform the hardware installation and basic checks found in Section 3.
Wiser Home Controller Installation Instructions 4.1 Step 1, Configure the Wiser Home Controller's Router Follow these steps to make changes to the router configuration: 1. To access the user interface (GUI) and router configuration pages use an Internet browser such as Microsoft Internet Explorer or Firefox on the configuration PC and enter the following address: http://192.168.2.1 The username is admin and the password is admin The user GUI is displayed. For details about the GUI refer to Section 5. 2.
Wiser Home Controller Installation Instructions If you have previously configured a broadband router, the Wiser Home Controller configuration procedure is very similar.
Wiser Home Controller Installation Instructions 1. On the main Wireless section, enable or disable wireless. Select a network mode. If you enabled wireless, go to Step 2. Network Mode: B/G Mixed Wireless-B Only Wireless-G Only Wireless-BGN Wireless-N Only 2. Provide a Network Name. The default SSID is WiserHomeControl. 3. Select radio band (standard: 20 MHz or wide: 40 MHz). 4. Select a channel. Select a channel that does not conflict with other local wireless devices. 1 - 2.412 GHz 2 - 2.417 GHz 3 - 2.
Wiser Home Controller Installation Instructions 4.2 Step 2, Use C-Bus Toolkit to Collect Project Information You can access the C-Bus network with C-Bus Toolkit software using the Wiser Home Controller and the CNI. C-Bus Toolkit lets you update the Customer's project and gather information for the PICED project. Do not run C-Bus Toolkit software and PICED at the same time on your computer. Both applications use the C-Gate program but in slightly different modes of operation.
Wiser Home Controller Installation Instructions 4.3 Step 3, Use PICED to Create and Transfer a Project Note: PICED software Help files contain new information specific to the Wiser Home Controller. Be sure to access PICED Help during installation, as needed. Setting up a New Project in PICED 1. 2. Start PICED. Select Create a New Blank Project. Click Next. 3. Select Wiser Home Controller. Click Next.
Wiser Home Controller Installation Instructions 4. Enter details as for other C-Bus products. 5. When you get to the Options 2 tab, select a Skin (use the drop down to see the choices). 6. 7. 8. To verify that the Wiser Home Controller and CNI are connected correctly, or to configure them, click the respective Open buttons. Click Next. Enter details as for other C-Bus products. When complete, click Finish. The Widget Manager will be displayed. Add some Locations.
Wiser Home Controller Installation Instructions 9. Add some Function Groups. Refer to the PICED help file for details. Most projects will include Lighting, Security and Climate Control. Click Next when complete. 10. Add some Widgets. Refer to the PICED help file for details Tip: at the top of the page are drop-down lists to change some of the properties of selected Widgets. This is much quicker to use than opening each Widget separately.
Wiser Home Controller Installation Instructions 11. If needed, add: • Scenes • Schedules • Logic • User System IO Variables • E-Mail Accounts Refer to PICED help files for details. Transferring the Project to the Wiser Home Controller 1. When the project is complete, click on the Transfer button (box with a red arrow). The Transfer Project to Wiser Home Control form will be shown.
Wiser Home Controller Installation Instructions 2. Click OK. The Wiser Connection Wizard will be displayed. 3. Select Fixed IP and enter the IP Address of the Wiser Home Control (192.168.2.1 by default). Click OK. If the Wiser unit has out of date firmware, the Firmware tab will be displayed. Enter a password (admin by default) and click on Transfer Firmware. Wait for the Wiser unit to re-start, then repeat steps 1 to 4. If the Wiser firmware is up to date, the Transfer tab will be selected.
Wiser Home Controller Installation Instructions 5.0 Introduction to the User's Interface (UI) Access the Wiser Home Controller's user interface with a web browser such as Internet Explorer or Mozilla Firefox. Type the following URL and press Enter on your keyboard. http://192.168.2.1/ username is admin password is admin, or your changed password Note: if your Wiser Home Controller's IP Address is not 192.168.2.1, use the correct IP Address in the URL above.
Wiser Home Controller Installation Instructions A Widget is a graphical component displayed on the Wiser Home Controller that is used to control and/or display the state of something. Typical functions for widgets include: • Controlling lighting • Controlling a home audio system • Controlling and monitoring a security system • Displaying a web camera The Wiser Home Controller displays the widgets using the selected skin.
Wiser Home Controller Installation Instructions 6.0 Additional Information 6.1 Using Static TCP/IP Settings on the PC (if necessary) When possible, use the automatic IP setting feature (DHCP enabled). Use static IP addressing when a fixed IP address is needed. The following steps might be necessary for your installation. Windows 2000 or Windows XP 1. Connect the PC cable to an unused LAN port on the Wiser Home Controller. Apply power to the router and allow it to initialise. 2.
Wiser Home Controller Installation Instructions 7. Now your PC is ready to access and configure the Wiser Home Controller's router. Windows VISTA 1. Connect the PC cable to an unused LAN port on the Wiser Home Controller. Apply power to the router and allow it to initialise. 2. Click Start, Control Panel, and then Network and Internet: Manage network connections. 3. Right-click the Local Area Connection icon and then click Properties. The Local Area Connection Properties window appears. 4.
Wiser Home Controller Installation Instructions 6.2 Useful DOS Command Prompt Programs The two DOS programs illustrated here use command lines. These programs can be useful to diagnose some connectivity problems and gather information about IP addresses. Go to Start/Run and then type: cmd.exe then click OK then type: ipconfig /all and press Enter ping and then press Enter In the example below, the PC is using an automatically assigned address of 192.168.2.101.
Wiser Home Controller Installation Instructions 6.3 Frequently Asked Questions (FAQs) Q1: What do I do if I have forgotten my password? A1: The default username is admin. The default password is admin. You cannot change the username on the router. You can only change the password. If you have changed the default password and have forgotten the new one, you must reset the router back to factory defaults. Q2: How do I reset the router back to factory defaults? A2: There are two ways to do this.
Wiser Home Controller Installation Instructions Q6: What are the meanings of the icons at the top right of the graphical user interface? A6: See the following paragraphs. This icon reflects the state and stability of the graphical user interface's connection to the router. For example, if you see it going red, this means that it is no longer connected to the router. This can happen for many reasons. Typically, this happens when using the web UI over Wi-Fi and the Wi-Fi is going out of range.
Wiser Home Controller Installation Instructions Projector Control Enable allows the web user interface to function even when run remotely over the Internet. This feature is intended to allow an end-user or installer to interact with their C-Bus network even when outside of their home or premise. Project Update Enable allows a PICED project to be uploaded to the device over the Internet.
Wiser Home Controller Installation Instructions Application ID ECHO1 Protocol Ext Port 8080 Int Port 8080 TCP ECHO2 TCP 8888 & 8889 8888 & 8889 CBUS TCP 14000 14000 CTCT TCP 8336 & 8337 8336 & 8337 ECHOROUTE TCP 80 8080 Port Function Port 8080 is the default port used for connecting to the web server of the Wiser Home Controller, When enabled the Wiser Home Controller UI can then be reached at http://:8080/ You will be required to authenticate with a username a
Wiser Home Controller Installation Instructions 6.4 Release Notes Functional product issues listed here are sorted into two main categories. The first category is "Router Issues" and the second is "C-Bus/GUI Issues". Router issues refer to anything to do with the routing/network related functionality of the device. C-Bus/GUI issues refer to anything to do with the C-Bus related functionality of the device. Router Issues 1.
Wiser Home Controller Installation Instructions during a transfer, you will need to retry the process. Also the modem must be in bridge mode to use dyn DNS. 3. Search for Wiser Home Controller using the transfer client fails when running on Windows Vista. The workaround is to use the search by IP functionality. 4. Slow boot up depending on utilized functionality. If the router is configured to use DHCP to retrieve its IP address, boot up can sometimes take longer than expected. 5.
Wiser Home Controller Installation Instructions 7.0 Terms Busbar A passive connector for Ethernet and power connections to the Wiser Home Controller and CNI. CNI C-Bus Network Interface. The CNI handles Ethernet to C-Bus communication and provides electrical isolation between the networks. Customer’s modem The hardware component connecting the Wiser Home Controller to the Internet. Default gateway A network node, for example a router, that serves as an access point to another network.
Wiser Home Controller Installation Instructions 8.0 Product Specifications Parameter Description or value Power Source Wiser Home Controller's router: AC power pack Inline C-Bus Network Interface: AC power pack through busbar for Ethernet; C-Bus side is powered by the C-Bus network Mounting location Wall mounted with two keyhole openings Must be installed indoors Minimum distance to operator 20 cm from nearest antenna Mounting screw spacing 95.
Wiser Home Controller Installation Instructions 9.0 Standards Complied Declarations of Conformity Changes or modifications not expressly approved by Clipsal could void the user's authority to operate the equipment.
Wiser Home Controller Installation Instructions US FCC Regulations The Wiser Home Controller complies with the following: Regulation Title FCC Part 15, Subpart B Radio Frequency Devices This device complies with Part 15 of the FCC Rules. Operation is subject to the following two conditions: (1) this device may not cause harmful interference, and (2) this device must accept any interference received, including interference that may cause undesired operation.
Wiser Home Controller Installation Instructions 10.0 GNU General Public Licence Some software components included in the Wiser Home Controller are provided under a general public license. GNU GENERAL PUBLIC LICENSE Version 2, June 1991 Copyright (C) 1989, 1991 Free Software Foundation, Inc. 51 Franklin Street, Fifth Floor, Boston, MA 021101301, USA Everyone is permitted to copy and distribute verbatim copies of this license document, but changing it is not allowed.
Wiser Home Controller Installation Instructions a) Accompany it with the complete corresponding machinereadable source code, which must be distributed under the terms of Sections 1 and 2 above on a medium customarily used for software interchange; or, b) Accompany it with a written offer, valid for at least three years, to give any third party, for a charge no more than your cost of physically performing source distribution, a complete machinereadable copy of the corresponding source code, to be distribute
Wiser Home Controller Installation Instructions 11.0 Two-Year Warranty The 5200PG Wiser Home Controller carries a two-year warranty against manufacturing defects.
Product of Clipsal Australia Pty Ltd A member of Schneider Electric CIS Technical Support Hotline: 1300 722 247 (Australia) Technical Support email: cis_support@clipsal.com.au Contact us: clipsal.com/feedback National Customer Service Enquiries Tel 1 300 202 525 Fax 1 300 202 556 clipsal.