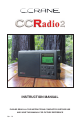
INSTRUCTION MANUAL PLEASE READ ALL THE INSTRUCTIONS COMPLETELY BEFORE USE Ver. 1.
About the CCRadio 2 Thank you for purchasing a CCRadio 2. The CCRadio 2 has many of the refinements and improvements requested by customers who have bought other CCRadios. The CCRadio 2 is built for the highest performance ever on AM and has been designed to be long lasting. Youʼll notice that we removed the television (TV) band from the radio. This change was necessary because of the new government mandated digital format set for February of 2009. We have replaced the TV band with the 2-Meter VHF Ham band.
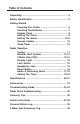
Table of Contents Unpacking ................................................................................. 4 Button Identification ............................................................... 5 Getting Started Powering Your Radio ................................................ 6 Installing The Batteries ............................................ 7 Display Panel ............................................................. 8 Setting The Clock ......................................................
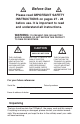
Ꮨ Before Use Please read IMPORTANT SAFETY INSTRUCTIONS on pages 27 - 28 before use. It is important to read and understand all instructions. WARNING: TO PREVENT FIRE OR ELECTRIC SHOCK HAZARD, DO NOT EXPOSE THIS PRODUCT TO RAIN OR MOISTURE. Ꮨ THE LIGHTNING FLASH AND ARROWHEAD WITHIN THE TRIANGLE IS A WARNING SIGN ALERTING YOU OF “DANGEROUS VOLTAGE” INSIDE THE RADIO. CAUTION RISK OF ELECTRIC SHOCK DO NOT OPEN CAUTION: TO REDUCE THE RISK OF ELECTRIC SHOCK, DO NOT REMOVE THE RADIO BACK.
Button Identification 14 17 16 15 13 12 18 11 4 10 9 8 1 1) 2) 3) 4) 5) 6) 7) 8) 9) • Clock Set • Alarm Set • Timer Set 2 10) 11) 12) Display Clock or Frequency 13) 14) Bass Control 15) Treble Control Tuning / Time Set (Up/Down) 16) 17) Headphone Jack 18) Volume Control 3 5 7 6 Lock Switch Tuning Knob / • Squelch Set Power or • Sleep Timer Display Light Telescopic Antenna Memory (1-5) Weather Alert (3 Modes) Band or • AUXILIARY • Weather Alert Light Note: When you see a “•” next to a but
Getting Started POWERING YOUR RADIO Before powering your radio be sure to read the Safety Instructions on pages 27 and 28. The CCRadio 2 will run on (4) “D” size NiMH or alkaline batteries or on 120V AC house current using the included power cord. Batteries are optional. The batteries are necessary to retain the timer, clock, and memory settings if the power cord is removed from the radio for more than three minutes. Rechargeable batteries work well in this radio.
Getting Started INSTALLING THE BATTERIES 1) Position the radio face down on a soft surface to protect it. 2) Remove the battery compartment cover. 3) Insert the (4) “D” cell batteries into the compartment as indicated in the drawing below. Be sure the negative (-) end is against the spring. Refer to the drawing below to insure correct installation of your batteries. 4) Replace the battery cover. You are now ready to operate your radio.
Getting Started DISPLAY PANEL 1 2 3 4 5 15 6 14 13 7 12 8 11 1) Weather Alert Modes 2) Memory Location (1 - 5) 3) Key Lock On/Off 4) Sleep Timer/Snooze Status 10 9 8) Timer Active Indicator 9) Clock Seconds 10) Frequency / Clock Display 11) Alarm Status and Type 5) Battery Symbol 12) AM/PM Indicator 7) Squelch Indicator 15) Stereo Reception 6) Battery Power Level Indicator and Signal Strength Meter Page 8 13) Indicates Band In Use 14) AUX IN Indicator CCRadio 2
Getting Started SETTING THE CLOCK Please read this entire section carefully before you start. Set the time with the radio off. You must go through the steps listed below without stopping for more than 15 seconds at any given time or you will have to start over. (Refer to page 5 for Button Identification.) 1) Press the Clock Set Button. The hour digit will flash. 2) Using the Up/Down Tuning Button, select the appropriate hour digit and AM or PM.
Getting Started Notes on the Alarm You can also set the alarm time immediately after selecting the radio or buzzer alarm as described on page 9. To stop the alarm from going off every day, press and hold the Alarm Button until ALARM disappears from the display. Once the alarm is set, it will automatically go off the next day at the same time. Use the Power Button to shut off the alarm until the next day.
Radio Operation TUNING The CCRadio 2 features four bands: AM / FM / 2-Meter Ham (VHF) and Weather. Manual Tuning 1) Press the Power Button to turn on the radio. 2) Select the band by pressing the Band Button. 3) A single press of the Up or Down Tuning Buttons will change the frequency up or down for AM, FM and Ham (VHF) bands, and channel up or down for Weather. Each press of Up and Down Tuning Buttons will change the frequency by 10 kHz in AM mode, 100 kHz in FM mode, and 5 kHz in Ham (VHF).
Radio Operation WEATHER ALERT SYSTEM The WEATHER ALERT modes on the CCRadio 2 can alert you to special weather related emergencies. During an emergency or weatherrelated hazard, NOAA issues an emergency tone that will set off an audible and/or visual alarm on the radio. NOTE: Hazard warnings are not available in all areas. There are seven standard NOAA weather channels used in the US and Canada. This radio receives broadcasts up to 40 miles from transmitting stations.
Radio Operation This is WEATHER ALERT mode with flashing light only (no Alarm). If NOAA issues a weather related emergency, the radio will automatically alert you with a small flashing light near the top of the radio. The Alert light continues to flash until any button is pushed. 2) To access the second mode, (WEATHER ALERT with NOAA Audio). Press and hold the WEATHER ALERT Button again for two seconds until you hear a long beep. The symbol shown at right will be displayed in this mode.
Radio Operation 2-METER HAM (VHF) BAND (144 TO 148 MHZ) The 2-Meter Ham Band is a popular radio band used by amateur radio operators for civil defense. After a hurricane, earthquake or other calamity, 90% of emergency coordination at the local level takes place on this band. Listening to this band during an emergency can be extremely valuable and even life saving. For most people, the CCRadio 2 will probably be their first experience with Ham radio.
Radio Operation SEARCHING FOR A NEW ACTIVE FREQUENCY At times, more frequencies will become active than have been preprogrammed into the radio. You can search the 2-Meter Ham band by pressing the Up or Down Tuning Button and holding it momentarily. You can also start scanning by pressing and releasing the main Tuning Knob. The radio will begin searching the entire 2-Meter Ham band until it finds an active frequency and then it will stop.
Radio Operation DISPLAY LIGHT Display Light on AC Power When the radio is plugged into AC power, the display light will always be on unless you turn it off. The special green LED bulbs last about 100,000 hours and use very little electrical energy. The display light has three light levels. If you want to change the light level or turn off the display light, press and release the Light button until you reach the desired level. Refer to page 5 for button identification.
Radio Operation AUDIO & RECORDING JACKS The jacks on the back left side of the radio are for audio input (AUX IN), audio output (LINE OUT) and a timer activation switch . AUX IN Jack Timer Activation Switch LINE OUT Jack RECORDING ACCESSORY VersaCorder Designed to work with the CCRadio 2. Record up to 4 hours on one side of a cassette. (See page 22 for details.
Radio Operation LINE OUT Jack The red jack, labeled LINE OUT, is used to output the audio from the CCRadio 2 to another device such as a recorder, your home stereo, or some other unit. To do this, you will need an 1/8" stereo patch cord. Note: The LINE OUT jack differs from a headphone jack because the volume level of a headphone jack varies depending on the volume of the radio. The LINE OUT jack has a set line level so the volume is consistent no matter what the position of the volume knob.
Radio Operation STEP 2: TO SET THE OFF TIME 1) Press the Timer/Set Button again until the word OFF, the hour digit and TIMER flash on the display. 2) Use the Tuning Up/Down Buttons to set the hour. Again, verify that the time is set correctly for AM or PM. 3) Press the Timer/Set Button again so the word OFF and TIMER and the minutes, flash on the display. 4) Use the Tuning Up/Down Buttons to set the minutes.
Specifications FREQUENCY COVERAGE FM Band: 87.5 - 108 MHz Stereo AM Band: 520 - 1710 kHz Ham (VHF): 144 - 148 MHz WEATHER Channel 1: Channel 2: Channel 3: Channel 4: BAND 162.400 162.425 162.450 162.475 MHz MHz MHz MHz Channel 5: 162.500 MHz Channel 6: 162.525 MHz Channel 7: 162.
Specifications AUX IN JACK 300 - 1000mV RMS (line level) input from external audio source. Do not overload. LINE OUT JACK 300 - 1000mV RMS (line output) TIMER ACTIVATION SWITCH Low impedance, transistor driven switch. Used for operation of external recording devices. Note: Specifications are subject to change without notice.
Accessories Check with your dealer for the following accessories: RECORDING DEVICES VersaCorder Dual speed tape recorder. Designed to work with CCRadio 2 with the Patch Cord below. Record up to 4 hours on one side of a cassette tape. Item #VC Patch Cords 3 x 1/8" Stereo Patch Cord at 40" long. Item #VPC CC Witness MP3 RECORDER-Player with built-in AM/FM Radio. Record radio shows from CCRadio 2 or use the AUX IN jack to use the CCRadio 2 as an external speaker.
Troubleshooting Guide The CCRadio 2 will not turn on and none of the buttons work: The Lock Switch, located on the right side of the radio between the tuning and the volume knobs, is in the up position. Push the switch down to release the lock and resume normal operation of the radio. (Please see Lock Switch on page 16.) The CCRadio 2 comes on by itself or changes to a different station while I’m listening: The Timer has been set. The word TIMER will appear in the display if the Timer is set.
Troubleshooting Guide The best AM antenna made today for these buildings is the Twin Coil Ferrite® AM Antenna by C. Crane shown on page 22. Poor reception on FM, Ham (VHF), or Weather band: The CCRadio 2 uses its telescopic, or “whip” antenna for FM, Ham (VHF), and the weather bands. To improve reception of these bands, fully extend the telescopic antenna. Reception of FM and weather broadcasts is normally improved with the antenna extended straight up.
Radio Noise Troubleshooting AM RADIO NOISE PROBLEMS AND POSSIBLE SOLUTIONS If you hear an annoying buzz when listening to AM radio, itʼs most likely radio noise. Here are some of the usual culprits: • Dimmer switch (even in an adjacent room). • Lights: Fluorescent light, "touch lamp" type fixtures, automatic night lights, motion-activated outdoor lights, dying bulbs, blinking bulbs. • Nearby television or computer. • Electronic bug and pest controllers. • Faulty electrical switch. • Radio scanners.
AM Tuning & Listening Tips Most portable radios including the CCRadio 2 have an internal AM antenna. Best performance is achieved when the radio is swiveled on its base for maximum signal pickup from the transmitting tower. This same technique can be used to help nullify unwanted signals or radio noise. Experimentation is the best way to see how it works for you. Top View CCRadio 2 The CCRadio 2 has an external antenna terminal for AM.
Safety Instructions READ BEFORE OPERATING EQUIPMENT SAVE THESE INSTRUCTIONS 1) Read and understand all safety and operating instructions before the radio is operated. 2) Retain Instructions: The safety and operating instructions should be retained for future reference. 3) Heed Warnings: All warnings on the appliance and in the operating instructions should be followed. 4) Water and Moisture: The appliance should not be used near water.
Safety Instructions points or short out parts. This could cause a fire or electrical shock. 11) If the radio is left unattended and unused for long periods of time, unplug it from the wall outlet. This will prevent damage caused by lightning or power line surges. 12) If the radio is left unattended and unused for long periods of time, remove the batteries. The batteries may leak and damage furniture or your radio. 13) Do not attempt to service the receiver yourself.
PERSONAL STATION LOG City Station Call Letters Frequency Date Time Please feel free to copy this page.
2-METER HAM FREQUENCY LOG Frequency Location/Call Sign Date Time Please feel free to copy this page.
About C. Crane Company Inc. The C. Crane Companyʼs radio division began soon after Bob and Sue Crane moved from the San Francisco Bay Area to the beautiful and remote Redwood Country of far Northern California. As they settled into Fortuna, nestled in the heart of the Redwoods, Bob tried to tune in his favorite Bay-Area stations, and was shocked. There were only a few radio stations available until nighttime arrived and thatʼs when the AM dial came alive.
Model: CCRadio 2 FCC ID: BYG 014 THIS DEVICE COMPLIES WITH PART 15 OF THE FCC RULES. OPERATION IS SUBJECT TO THE FOLLOWING TWO CONDITIONS. 1) THIS DEVICE MAY NOT CAUSE HARMFUL INTERFERENCE, AND 2) THIS DEVICE MUST ACCEPT ANY INTERFERENCE RECEIVED, INCLUDING INTERFERENCE THAT MAY CAUSE UNDESIRED OPERATION. Notice: Any changes or modifications not expressly approved by the party responsible for compliance could void the user’s authority to operate the equipment.