INSTRUCTION MANUAL PLEASE READ ALL THE INSTRUCTIONS COMPLETELY BEFORE USE AND SAVE THIS MANUAL FOR FUTURE REFERENCE Revision 1 - 14
Introduction/ Safety Instructions Thank you! Thank you for purchasing a C.Crane CC WiFi 2 Internet Radio. We hope that you enjoy this radio as much as we do. If you have any questions or need more information about your radio, go to www.ccrane.com or give us a call at 1-800-522-8863. Technical Phone Support is available: • Monday-Friday, from 9:00 a.m. to 5:00 p.m. Or send us an Email: • customersupport@ccrane.
Table of Contents Unpacking .................................................................................... 2 Location of Controls - Radio...................................................... 4 Location of Controls - Remote................................................... 5-7 Connecting to the Internet.............................................................8 The Home Menu Screen................................................................11 Using Internet Radio..........................
Location of Controls - Radio q E D B C FRONT F H G u Volume / Home Knob F Remote Sensor G Headphone Jack H Dial / Select Knob q Power Button r Presets Button s Left Arrow t Right Arrow C D B q E BACK q USB Phone Charging Jack r USB Flash Drive or LAN Adapter Jack Page 4 s Line-Out Jack t Aux-In Jack u Power Jack (DC 12V) CC WiFi 2
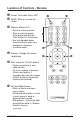
Location of Controls - Remote q r s t u F Power: Turn radio ON or OFF. B MUTE: Mute or unmute the audio. Memory Buttons 0-9: • Recall a memory preset. • Save a memory preset. (First press and hold the “Star” button for 3 seconds). • Use the alphabet below these buttons to enter your password, username, or station name. Dimmer: Change the screen brightness. q C t u F F Star: (same as “Preset” button).
Location of Controls - Remote (Continued) • Add a preset: (Press the left arrow button and then the right arrow button). • Automatically tune to next or previous station in FM Radio mode. G H Up and Down Arrows: (same as dial knob). • Highlights next or previous item in a menu screen. • Scroll through letters, numbers, and special characters in word/password entry mode. • Plays next or previous station or song in the selected list. • Manually tunes FM Radio. OK: (same as “Select” button).
Location of Controls - Remote (Continued) I J VOLUME +/-: Adjust volume. ALARM: Set two alarms, a nap timer, or alarm volume. SLEEP: Set sleep timer to turn off radio in 15, 60, 90, 120, 150, or 180 minutes. HOME: Go to main menu (press once) or go back to playing station info (press twice). MODE: Switch between iRadio, FM, AUX, Bluetooth, UPnP, and USB mode. Equalizer: Adjust sound for Normal, Flat, Jazz, Rock, Movie, Classical, Pop, or News (the news setting is best for talk radio).
Turning Your WiFi Radio On 1. Plug the power adapter cube into a 120V AC power outlet. Connect the power adapters small plug into the jack on the back of the radio that is labeled “DC 12V”. Caution: Only use the power adapter supplied with the radio. Connecting a power adapter other than the one that was supplied with your radio could cause permanent damage to the radio and may be hazardous. 2.
Connecting to the Internet 1. If you have a newer router with a WPS button on the router then choose “YES (WPS)”. If your router does not have a WPS button, then choose only “YES”. 2. If you chose “Yes (WPS)” then this screen will appear. Press the button on your router to complete the wireless network setup. Please wait as the radio finalizes the connection to your router. This can take a minute to complete. Continue on page 11. 3. If you chose “YES” then this screen will appear.
Connecting to the Internet Rotate the dial and choose the name of your network or router, then press the SELECT button. 5. If the network requires a wireless password before connecting, then you will see this screen. To enter the password, rotate the DIAL until the first character of the password is showing, then press the button to begin selecting the next character. When finished, press the SELECT button to submit. To erase, press the button.
The WiFi signal strength icon will indicate one, two, or three bars to show how strong your connection is between the radio and your WiFi router. The ethernet icon will let you know when you are connected with an ethernet cable. If the radio cannot connect to the network, then this screen may be displayed. Try placing the radio closer to the WiFi network. Also check the wireless password and make sure that it is correct. The wireless password is case specific and needs to be entered precisely.
Browsing Radio Stations Select “Browse Stations” to narrow your search by category; such as Local Radio, Music, Talk, Sports, By Location, By Language, and by Podcasts. Note: If you are looking for a specific station, topic, artist, genre, show, or host, you can directly enter the name into “Search Stations”. See page 13 for more information. There are many selections possible depending on your preference.
Note: You can use your computer to browse the station list by going to www.tunein.com. You can also setup your radio’s Web Preset list from your computer after you have created a free account. Unfortunately, some stations will only be playable from tunein.com because of format and licensing requirements. See page 15 for more information.
Setting up Memory Presets - TuneIn Radio Save your favorite stations into memory for quick access later on. When a station is saved (preset) it is stored in the “Browse Presets” list. There are 20 memory preset slots available for internet radio and 20 memory preset slots available for FM radio. There are a few different ways for presetting a station into memory; Using the radio: • Method 1: While playing a station, press and hold the “PRESET” button for two seconds. The screen will show “000”.
Recalling Radio Presets - TuneIn Radio Using the radio: • Press the “PRESET” button once quickly to access a list of your saved radio presets. Rotate the dial and choose which preset you would like to play from the list, then press the “SELECT” button to begin play. Using the remote control: • Method 1: Press the “STAR” button once quickly to access your radio presets. Press the up or down arrow to choose which preset you would like to play, then press the “OK” button to begin to play.
Using Web Presets - TuneIn Radio (Continued) 5. Rotate the DIAL until "Configuration" is highlighted, then press "SELECT". 6. Rotate the DIAL until "Login TuneIn" is highlighted, then press "SELECT". 7. Press SELECT when "Login TuneIn" is highlighted. 8. Enter the username or email address that is associated with your online TuneIn account. To enter the username you can use the dial and arrow keys or the number/letter buttons on the remote control.
Using Web Presets - TuneIn Radio (Continued) Note: Some stations will only be playable from tunein.com using your computer because of formatting and licensing requirements. These unavailable stations will usually open in a separate popup player when playing them from Tunein.com with your computer. Playing a Station from HISTORY – Tunein Radio The radio will remember your previous 10 stations played and will offer you quick access to these stations from the "History" menu.
Using Media Center (Continued) 3. The radio will display the folder structure and playable contents of the USB flash drive. Media Center Controls: Play next song, or rotate “Dial” knob clockwise. Play previous song, or rotate “Dial” knob counterclockwise. Play or Pause song. To stop song, press “OK”, or push the “Dial” knob. Playing audio from a Computer or UPnP server: Before the radio can play audio that is stored on a computer, the computer will need to be setup to allow UPnP access to the radio.
Using Media Center (Continued) 8. Select “Media Center” from the home menu, then select “UPnP”, then select your computer from the UPnP list. 9. Select “Music”. At this point, you will be able to browse the stored audio on your computer. Windows Vi sta Users: 1. Open “Network and Sharing Center” from the control panel. 2. Click the drop down arrow next to “Network discovery”. 3. Click the option to “Turn on network discovery”. 4. Click “Apply” button below this section. 5. Restart your computer. 6.
Using Media Center (Continued) If your computer did not show up in the UPnP list then continue with the remaining steps 7-16. From the computer: 7. Open the “Control Panel” from the “Start” menu. 8. Open “Add or Remove Programs” and click “Add/Remove Windows Components” from the pane on the left. 9. Scroll down and click on the words for “Networking Services” to highlight it, then click the “Details” button below. 10.
Playing Audio from My Playlist “My Playlist” lets you add your favorite songs from the UPnP player (explained on page 18) to a custom playlist. While browsing audio titles in “UPnP” press and hold the “DIAL/SELECT” button (or "OK" button on the remote control) until an icon appears on the top of the screen. The selected song will now be listed in “My Playlist”. To clear “My Playlist”, select “Clear My Playlist” from the “Media Center” menu list.
Using FM Radio Manually Tune – Rotate DIAL, (or use up and down arrows on remote) Scan Tune – Press the or buttons, (or left and right arrows on remote). Setting FM Radio Presets Automatical ly set FM Presets: The radio has the ability to automatically set up all FM presets with one button push. Press and hold the SELECT button on the front of the radio (or the "OK" button on the remote control) for two seconds. The radio will scan the FM band and preset all available local stations in order.
Using FM Radio • Method 2: Enter the preset number for your desired station using the number keypad. After a few seconds the station will begin to play. Using the Information Center View the local weather report, stock market averages, and technical information about your radio. From the home menu screen, rotate the DIAL and select “Information Center”. Vi ewi ng the Weather from around the world: Select “Weather Information” then choose your desired continent, then country, then city.
Using the Information Center Vi ew ing System Informati on: “System Information” will display technical information about the radio, including firmware versions, IP information, current network name, and MAC addresses. Using AUX to connect a player: Use the radio’s speaker to amplify audio from your portable player or other device with AUX. From the home menu screen, rotate the DIAL and select “AUX”.
Using Bluetooth® to connect a player (Conti nued) Depending on your phone or tablet, navigate to the Bluetooth settings screen and scan for devices. Select “CCrane Radio” from the list. Your device will make a connection to the radio and then it will be ready to play your audio wirelessly. The volume is controlled by the radio and also by your device. It is best to set the volume to medium on both to begin with. Use the controls on your device to navigate and play audio.
Configuring your radio - “Wired Network Configuration” Connect to your network using a USB-To-Ethernet adapter or ethernet cable. (Optional - Sold separately.) - “Wireless Network Configuration” will guide you through the process of scanning for nearby wireless networks and connecting to them. Refer to page 9 for more details. - “Wireless Network [WPS PBC]” is the easiest way to connect to your internet router, provided that your router has a button for WPS also.
Configuring your radio - “Set Time Format” – Choose between 12 and 24 hour time. 12 hour time uses AM/PM (for USA), 24 hour time is often referred to as military time or world time. Rotate the dial to highlight your section, then press the SELECT button to save. - “Set Date Format” – Choose the format in which the date is viewed. In the USA we view month first, then day, then year (MM/DD/YYYY). Other parts of the world will display the day or year first.
Configuring your radio 3. Rotate the dial and choose “Time”. Rotate the dial to choose the hour, then press the right arrow once. Rotate the dial again to choose minutes. Press the right arrow again. Choose AM or PM and press the SELECT button when finished. 4. Rotate the dial and choose “Sound”. Now you can choose a buzzer alarm, melody alarm, TuneIn radio preset, or FM radio preset to wake to. Rotate the DIAL and make your selection by pressing the SELECT button.
Configuring your radio - “Power Saving” will allow you to adjust the brightness of the screen when the radio is turned off. If this mode is selected, the screen will maintain this brightness all the time, whether the radio is on or off. - “Dimmer Timer” will only work while “Power Saving” mode is selected. Choose how much time will pass before the screen brightness changes from “Turn On” brightness to “Power Saving” brightness.
Configuring your radio - “Show on Standby” – when this setting is “ON” the current weather will display on the standby screen when the power is off. The standby screen will interval between time and weather every 10 seconds. Press the SELECT or OK button to quickly interval between time and weather. While viewing weather on the standby screen, press the right or left arrow to cycle through the forecasts for later dates. The current temperature will update only once a day for smaller cities.
Configuring your radio R esume When Power On: The radio is designed to resume play of the last station when it is powered “on”. If there is a power outage in the middle of the night, and then the power is restored, the radio will automatically start playing the last station at previous volume level. As you can imagine, this could disturb your sleep and may even be frightening. Change this setting to “Off” to have the radio go to standby mode when power is restored after an outage.
Troubleshooting FAQ’s Q: Is there a quicker way to get back to the main menu screen? A: On the radio, press the Home button/knob once or the “house icon” button on the remote control with the house icon. Q: How can I quickly return to the currently playing station when I am in a menu? A: On the radio, press the Home button/knob two times or the “house icon” button on the remote control two times. Q: I don’t remember my wireless network password.
Optional Accessories Available at ccrane.
This product contains software licensed under version 2 of the GNU public license and version 2.1 of the GNU Lesser Public License. The source code for this software is available from: http://www.reciva.com/gpl/ This product includes technology owned by Microsoft Corporation and under a license from Microsoft Licensing GP. Use or distribution of such technology outside of this product is prohibited without a license from Microsoft Corporation and/or Microsoft Licensing, GP as applicable.
NOTE: Changes or modifications not expressly approved by the party responsible could void the user’s authority to operate this device. NOTE: This equipment has been tested and found to comply with the limits for a Class B digital device, pursuant to Part 15 of the FCC Rules. These limits are designed to provide reasonable protection against harmful interference in a residential installation.