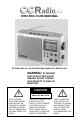
INSTRUCTION MANUAL PLEASE READ ALL THE INSTRUCTIONS COMPLETELY BEFORE USE. WARNING: TO PREVENT FIRE OR ELECTRIC SHOCK HAZARD, DO NOT EXPOSE THIS PRODUCT TO RAIN OR MOISTURE. CAUTION RISK OF ELECTRIC SHOCK DO NOT OPEN THE LIGHTNING FLASH AND ARROWHEAD WITHIN THE TRIANGLE IS A WARNING SIGN ALERTING YOU OF “DANGEROUS VOLTAGE” INSIDE THE RADIO. CAUTION: TO REDUCE THE RISK OF ELECTRIC SHOCK, DO NOT REMOVE THE RADIO BACK. NO USER SERVICEABLE PARTS INSIDE. REFER SERVICING TO QUALIFIED SERVICE PERSONNEL.
Copyright © 2002 by C. Crane Company, Inc., Fortuna, CA 95540 800-522-8863 • ccrane.com All rights reserved. No part of this booklet may be reproduced, in any form or means whatsoever, without permission in writing from C. Crane Company, Inc. ccradioplusmanual.
TABLE OF CONTENTS SAFETY INSTRUCTIONS ......................................................... 4-5 INTRODUCTION ........................................................................... 6 UNPACKING ................................................................................ 6 BUTTON IDENTIFICATION ........................................................... 7 GETTING STARTED POWERING YOUR RADIO .............................................. 8 INSTALLING THE BATTERIES ...............................
SAFETY INSTRUCTIONS READ BEFORE OPERATING EQUIPMENT SAVE THESE INSTRUCTIONS 1) Read and understand all safety and operating instructions before the radio is operated. 2) Retain Instructions: The safety and operating instructions should be retained for future reference. 3) Heed Warnings: All warnings on the appliance and operating instructions should be followed. 4) Water and Moisture: The appliance should not be used near water.
10) Do not overload wall outlets or extension cords. This can result in a risk of fire or electrical shock. Never insert objects of any kind into the receiver through openings. The objects may touch dangerous voltage points or short out parts. This could cause a fire or electrical shock. 11) If the radio is left unattended and unused for long periods of time, unplug it from the wall outlet. This will prevent damage caused by lightning or power line surges.
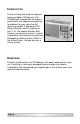
INTRODUCTION Thank you for purchasing the high performance digital CCRadio plus. The CCRadio plus incorporates the highest quality parts and superior engineering to produce the most sensitive AM receiver available. It also covers FM Stereo, Weather, and TV audio channels 2-13. The special Weather Alert System may sound an alarm if a signal is broadcast from National Oceanic and Atmospheric Administration (NOAA) in the United States. Canada also has a similar system.
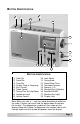
BUTTON IDENTIFICATION 16 13 15 14 12 18 17 11 4 10 9 8 1 2 3 6 5 7 BUTTON IDENTIFICATION 1) 2) 3) 4) 5) 6) 7) 8) 9) Clock Set Alarm/Set Timer/Set Display Clock or Frequency Bass Control Treble Control Tuning/ Time Set (Up/Down) Headphone Jack Volume Control 10) 11) 12) 13) 14) 15) 16) 17) 18) Lock Switch Tuning Knob Power/Sleep Timer Telescopic Antenna Memory (1-5) Weather Alert (3 Modes) Band/AUXILIARY Weather Alert Light Display Light Note: When you see a “ • ” next to a word describing a
GETTING STARTED POWERING YOUR RADIO Before powering your radio be sure to read the Safety Instructions on pages 4 and 5. The CCRadio plus will run on (4) “D” size NiCad or alkaline batteries or on 120V AC house current using the included power cord. Batteries are optional. The batteries are necessary to keep the time clock and memories if the power cord is removed from the radio for more than three minutes. AC OPERATION Before you plug the AC cord into the radio be sure the AC voltage is 120Volts/60Hz.
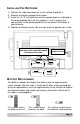
INSTALLING THE BATTERIES 1) Position the radio face down on a soft surface to protect it. 2) Remove the battery compartment cover. 3) Insert the (4) “D” cell batteries into the compartment as indicated in the drawing below. Be sure the negative (-) end is against the spring. Refer to the drawing below to insure correct installation of your batteries. 4) Replace the battery cover. You are now ready to operate your radio.
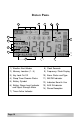
DISPLAY PANEL 1 2 3 4 5 14 6 13 12 11 7 10 9 8 1) Weather Alert Modes 8) Clock Seconds 2) Memory Location (1 - 5) 9) Frequency / Clock Display 3) Key Lock On/Off 10) Alarm Status and Type 4) Sleep Timer/Snooze Status 11) AM/PM Indicator 5) Battery Symbol 12) Indicates Band In Use 6) Battery Power Level Indicator and Signal Strength Meter 13) AUX IN Indicator 7) Timer Active Indicator Page 10 14) Stereo Reception
SETTING THE CLOCK Please read this entire section carefully before you start. Set the time with the radio off. You will need to go through the steps listed below without stopping for more than 15 seconds at any given time or you will have to start over. (Refer to page 7 for Button Identification.) 1) Press the Clock Set Button. The hour digit will flash. 2) Using the Up/Down Tuning Button, select the appropriate hour digit and AM or PM.
NOTES ON THE ALARM You can also set the alarm time immediately after selecting the radio or buzzer alarm as described on page 11. To stop the alarm from going off every day, press and hold the Alarm Button until ALARM disappears from the display. Once the alarm is set, it will automatically go off the next day at the same time. Use the Power Button to shut off the alarm until the next day.
RADIO OPERATION The CCRadio plus features four bands: AM / FM / TV Audio 2-13 and Weather. MANUAL TUNING 1) Press the Power Button to turn on the radio. 2) Select the band by pressing the Band Button. 3) A single press of the Up or Down Tuning Buttons will change the frequency up or down for AM and FM bands, and channel up or down for Weather and TV bands. Each press of tuning Up and Down buttons will change the frequency by 10 KHz in AM mode and 100 KHz in FM mode.
WEATHER ALERT SYSTEM The WEATHER ALERT modes on the CCRadio plus can alert you to special weather related emergencies. During an emergency or weather related hazard, NOAA issues an emergency tone that will set off an audible and/or visual alarm on the radio. NOTE: Hazard warnings are not available in all areas. There are seven standard NOAA weather channels used in the US and Canada. This radio receives broadcasts up to 50 miles from transmitting stations.
This is WEATHER ALERT mode with flashing light only (no Alarm). If NOAA issues a weather related emergency, the radio will automatically alert you with a small flashing light near the top of the radio. The Alert light continues to flash until any button is pushed. 2) To access the second mode, (WEATHER ALERT with NOAA Audio). Press and hold the WEATHER ALERT Button again for two seconds until you hear a long beep. The symbol, shown at right, will be displayed in this mode.
DISPLAY LIGHT DISPLAY LIGHT ON AC POWER When the radio is plugged into AC power, the display light will always be on unless you turn it off. The special green LED bulbs last about 100,000 hours and use very little electrical energy. If you want to turn off the display light, press the Light button. Refer to page 7 for button identification. DISPLAY LIGHT ON BATTERIES When batteries are used the display light can be turned on by pressing the light button.
AUDIO & RECORDING JACKS The jacks on the back, left side of the radio are for audio input (AUX IN), audio output (LINE OUT) and a timer activation switch . AUX IN Jack Timer Activation Switch LINE OUT Jack RECORDING ACCESSORY VersaCorder Designed to work with the CCRadio plus. Record up to 4 hours on one side of a cassette. (See page 23 for details.
through the other source. You can still listen to the CCRadio plus while using the LINE OUT jack. TIMER ACTIVATION SWITCH The black jack labeled with this symbol is for use with a recorder that has a timer activated switch. You would use this switch if you wanted to do a timed recording. It is used in conjunction with the LINE OUT jack. See your recorder for specific instructions. SETTING THE TIMER Please read this entire page carefully before you start.
The timer will go ON and OFF at the same time and same station every day until you turn the timer off or reprogram it. TO TURN OFF THE TIMER If TIMER is showing on the display then the Timer is set. Press and hold the Timer/Set Button until you hear a short beep and the word TIMER disappears from the display. NOTES ON THE TIMER To stop the timer from going off every day press and hold the Timer/Set Button until you hear a short beep the word TIMER disappears.
light will extend up to 12’. Just pull on the connector and unreel it to the desired length. The black base of the light opens up to reveal a handle that is used to reel the cord back in. The base is also a magnet, so you can mount it to any metal surface like a refrigerator or a car. OPTIONAL NICAD BATTERY CHARGING SYSTEM WARNING: NEVER CHARGE ALKALINE BATTERIES WITH 6V DC CHARGING ADAPTER OR SOLAR PANEL 6V DC Charging Circuit Please note: All NiCad batteries come slightly charged.
Run Times And Charge Times For NiCad Batteries CCRadio plus with heavy duty NiCad batteries ......... Approx. 48 Hrs. Approx. time to charge NiCad batteries with AC Adapter ......... 27 Hrs. Approx. time to charge NiCad batteries with Solar Panel ......... 67 Hrs. Times are approximate. Please read previous page for more radio/light operational tips. NiCad batteries are a great financial and ecological investment if you know how to use them.
SPECIFICATIONS FREQUENCY COVERAGE FM Band: 87.5 - 108 MHz Stereo AM Band: 520 - 1710 kHz TV Band: Channels 2-13 Audio Only WEATHER BAND Channel Channel Channel Channel 1: 2: 3: 4: 162.400 162.425 162.450 162.475 MHz MHz MHz MHz Channel 5: 162.500 MHz Channel 6: 162.525 MHz Channel 7: 162.
SPECIFICATIONS 6V DC CHARGING JACK 2.1 mm ID tipped negative. 6 - 9V DC @ 400mA input for directly charging NiCad batteries. Can also power your radio and charge NiCad batteries using a 4 Watt Solar Panel. Do not charge alkaline batteries. Item #6CA ................... $10.95 6V Charging Adapter Item #S04 .................... $59.95 Sangean 4 Watt Solar Panel LED LAMP JACK 4 Volt output for use with external LED lamp. Item #CWL ................... $19.
RADIO NOISE TROUBLESHOOTING AM RADIO NOISE PROBLEMS POSSIBLE SOLUTIONS Annoying buzzes are many times transmitted through an AM radio. Here is a check-off list of the most likely causes: • Dimmer switch. • Fluorescent light. • “Touch lamp” type light fixture (even when turned off). • Automatic on and off night lights. • Outdoor yard lights which come on automatically. • Electronic bug and pest controllers. • A light bulb that is about to burn out. • A faulty electrical switch of any kind.
AM TUNING & LISTENING TIPS Most portable radios including the CCRadio plus have an internal AM antenna. Best performance is achieved when the radio is swiveled on its base for maximum signal pickup from the transmitting tower. This same technique can be used to help nullify unwanted signals or radio noise. Experimentation is the best way to see how it works for you. Top View CCRadio plus The CCRadio plus has two external antenna terminals for AM.
PERSONAL STATION LOG City Station Call Letters Frequency Date Please feel free to copy this page.
Model: CCRadio plus FCC ID: BYG 003 THIS DEVICE COMPLIES WITH PART 15 OF THE FCC RULES. OPERATION IS SUBJECT TO THE FOLLOWING TWO CONDITIONS. 1) THIS DEVICE MAY NOT CAUSE HARMFUL INTERFERENCE, AND 2) THIS DEVICE MUST ACCEPT ANY INTERFERENCE RECEIVED, INCLUDING INTERFERENCE THAT MAY CAUSE UNDESIRED OPERATION. Notice: Any changes or modifications not expressly approved by the party responsible for compliance could void the user’s authority to operate the equipment.