5900335 R Optipay CC TM A-66 Coin Changer Operation and Maintenance Manual (Revision 1) Includes configuration setup using a Palm Pilot Setting Module R May 05 1-800-628-8363 JCM Part Number 960-000102.Rev.
JCM is a registered trademark of JCM American Corporation. All other product names mentioned herein may be registered trademarks or trademarks of their respective companies. Furthermore, ™, ® and © are not always mentioned in each case throughout this publication.
Optipay™ CC Table of Contents 1 TOC 1 GENERAL INFORMATION...................................................................................1-1 General Information .................................................................................................... 1-1 General Information Concerning Coin Changer ........................................................................1-2 Advantages ................................................................................................................
Optipay™ CC Table of Contents Validator Change Filling .............................................................................................. 7-1 Inhibiting Coin Types Using DIP Switch Block Settings .......................................... 7-2 8 CLEANING............................................................................................................ 8-1 9 TRANSPORT ........................................................................................................
Optipay™ CC List of Figures 1 LOF Figure 1-1 Figure 3-1 Figure 3-2 Figure 3-3 Figure 3-4 Figure 3-5 Figure 3-6 Figure 4-1 Figure 5-1 Figure 5-2 Figure 6-1 Figure 7-1 Figure 7-2 Figure 8-1 Figure 11-1 Figure 11-2 Figure 12-1 Figure 12-2 Figure 12-3 Figure 12-4 Figure 12-5 Figure 12-6 Figure 12-7 Figure 12-8 Figure 12-9 Figure 12-10 Figure 12-11 Figure 12-12 Figure 12-13 Figure 12-14 Figure 12-15 Figure 12-16 Figure 12-17 Figure 12-18 Figure 12-19 Figure 12-20 Figure A-1 5900335 Optipay™ CC A-66 Coin Chang
Optipay™ CC List of Figures THIS PAGE INTENTIONALLY LEFT BLANK 5900335 © 2005 JCM-American CCorporation 1-iv
Optipay™ CC List of Tables 1 LOT Table 3-1 Table 3-2 Table 3-3 Table A-1 Table A-2 5900335 Side Label Features ..............................................................................3-3 Front Label Features .............................................................................3-3 U.S. Coin Cassette Capacity .................................................................3-3 LED Indicator Meanings .......................................................................
Optipay™ CC List of Tables THIS PAGE INTENTIONALLY LEFT BLANK 5900335 © 2005 JCM-American Corporation 1-vi
Optipay™ CC A-66 Coin Changer Section 1 1 GENERAL INFORMATION separately in the software instructions of section 11. This section provides a general overview of the advantages and options of the Optipay™ CC A-66 Coin Changer. This first section is designed to help you navigate through this manual with ease. The appended "Index", "Setting Module Functional Overview", and "Trouble Shooting" sections reduce the search for specific explanations and additional help when required.
Section 1 Optipay™CC GENERAL INFORMATION At the beginning of each section you will find a "Chapter Guide", that summarizes the content of the specific section. Token types not programmed by the manufacturer, can be programmed directly at the Coin Changer by inserting the new tokens. Separate software instructions to configure the Coin Changer are located in "Configuration" section 11.
GENERAL INFORMATION Optipay™CC Section1 Chapter 11 "Configuration" explains which of the preceding configuration tools can be used to set the different Coin Changer parameters. If it is desirable to test all functions and not just the MDB functions, an additional G55.0348 RJ-45 PC plug adaptor is available from JCM, allowing you to connect the Coin Changer directly to the PC using the easily accessible 8-pin modular RJ-45 jack receptacle located on the top right side of the device.
Section 1 Optipay™ CC THIS PAGE INTENTIONALLY LEFT BLANK 5900335 © 2005 JCM-American Corporation 1-4
Optipay™ CC A-66 Coin Changer Section 2 2 SAFETY INSTRUCTIONS The Coin Validator‘s printed circuit board (pcb) is fitted with electronic components which may be damaged beyond repair by electrostatic discharge. Please observe the handling instructions regarding static sensitive components. This section providessafety instructions for using the Optipay™ CC A-66 Coin Changer.
Section 2 Optipay™ CC THIS PAGE INTENTIONALLY LEFT BLANK 5900335 © 2005 JCM-American Corporation 2-2
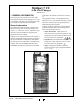
Optipay™ CC A-66 Coin Changer Section 3 3 DESIGN The Coin Validator This section describes the general design of the Optipay™ CC A-66 Coin Changer and the various Coin Validator components within it important to the operation of the device. The following items will be discussed: Coins inserted into the Coin Validator (3) (See Figure 3-1 ) pass through the Coin Insertion Funnel (11) into the validation area of the device.
Section 3 Optipay™CC Return Lever DESIGN Board (PCB) edge connector (See Figure 3-2 [11]) which allows connection of the Coin Validator to a programming PC and a JCM Test Station. The Return Lever (See Figure 3-1 [1]) on the top of the Coin Validator is operated by using the Vending Machine’s Return Button. Operating this lever is necessary if inserted coins are awaiting return, or a coin jam caused by stuck coins require removal.
DESIGN Optipay™CC Section3 Product Labels Table 3-2 Front Label Features The Coin Validator’s Side Product Label ((See Figure 3-1 [11] and Figure 3-4) contains all the device defining data, such as the device type and series, and the data programmed according to customer specifications such as their currency and relative country’s coin type requirements listed in Table 3-1. 1. Country flag, country code and currency/coin type requirements 2. Order number (6 digit) 3. Nominal voltage & Interface 4.
Section 3 Optipay™CC DESIGN Filling Level Sensors If at any time another combination of tube coins is required, the appropriate cassette can be ordered from the JCM and simply exchanged in the assembly (See Figure 3-6 [1]).
Optipay™ CC A-66 Coin Changer Section 4 4 FUNCTIONS This section describes the main functions of the Optipay™ CC A-66 Coin Changer with particular emphasis on: • Filling and emptying the change tubes • Considering the maximum number of coins configured for the change tube • Considering the configured security stock of tube coins • Inhibiting certain coin types • Disabling the inventory keys • Configuring tokens • Sending the telephone/currency code to the Vending Machine control • Correcting the tube cou
Section 4 Optipay™CC Security Stock Considerations However, a wide acceptance band should only be set if a limited number of the tokens are available for generating the token’s value measurement, or if the tokens show very large tolerance values. Otherwise, there is the danger that a large number of false coins will be accepted. If a security stock is configured for the individual tubes, the Coin Changer will not vend a minimum number of tube coins. The security stock can be set between 1 and 9 coins.
FUNCTIONS Optipay™CC Section4 being refilled, rather than from the stored number of coins set in the register (see section 11 "Configuration"). by the main currency counter. Chapter 11 "Configuration" describes which configuration tool is used to program a second currency.
Section 4 Optipay™ CC THIS PAGE INTENTIONALLY LEFT BLANK 5900335 © 2005 JCM-American Corporation 4-4
Optipay™ CC A-66 Coin Changer Section 5 5 INSTALLATION This section provides a installation instructions for the Optipay™ CC A-66 Coin Changer.
INSTALLATION Optipay™CC 6. Connect the Coin Changer to the Vending Machine using the MDB connecting cable (See Figure 5-1 [1]). NOTE: A second Harness containing a four pin connector is used with the optional DBV-301 Validator’s RC-10 Recycling Unit. This should be tied off if not being used. 7. Reconnect the Vending Machine’s main AC power supply. The three LEDs (See Figure 51 [2]) located on the Coin Validator’s front panel will briefly illuminate to test their functions.
Optipay™ CC A-66 Coin Changer Section 6 6 ENERGIZING 2. Insert the coin tubes. The Coin Validator’s tube counter meters in the accepted coins, and the Coin Changer sorts the corresponding coin type into its preconfigured tube until either: This section provides energizing (power-up) instructions for the Optipay™ CC A-66 Coin Changer.
Section 6 Optipay™ CC THIS PAGE INTENTIONALLY LEFT BLANK 5900335 © 2005 JCM-American Corporation 6-2
Optipay™ CC A-66 Coin Changer Section 7 7 OPERATION If the Coin Changer is configured so the inventory keys are disabled, these membrane keys will not be active. The device is either configured so the keyboard can be enabled by the Vending Machine’s control system, or so the keyboard must be initially activated by one of the various configuration tools (see section 11 "Configuration").
Section 7 Optipay™CC OPERATION and right side catches and gently pulling forward as indicated by the arrows illustrated in Figure 7-1 . 1. Press the Plus key. An audible signal will sound and the Green LED will begin flashing indicating that the Coin Changer is no longer in a standard operating mode and has now entered the filling level mode. 2. Insert the coin tubes.
Optipay™ CC A-66 Coin Changer Section 8 8 CLEANING This section explains how to clean the Optipay™ CC A-66 Coin Changer. 1. Remove the Vending Machine’s main AC power plug. Only wipe the Coin Validator from time to time with a damp cloth (use luke warm water containing a mild dish cleaning liquid): 2. Press up on the locking catch lever and open the Coin Validator panel to the left (See Figure 8-1 [1]). 3. Wipe the coin runway clean once inside the coin validation area.
Section 8 Optipay™ CC THIS PAGE INTENTIONALLY LEFT BLANK 5900335 © 2005 JCM-American Corporation 8-2
Optipay™ CC A-66 Coin Changer Section 9 9 TRANSPORT This chapter explains how to transport the Optipay™ CC A-66 Coin Changer. To avoid unnecessary damage, only transport the device in its original packaging; and, under no circumstance carry it by it’s connecting cable. Empty the tube cassette before transporting the device so that loose coins do not fall out. Pull the Vending Machine's main AC power plug before removing the Coin Changer from the Vending Machine.
Section 9 Optipay™ CC THIS PAGE INTENTIONALLY LEFT BLANK 5900335 © 2005 JCM-American Corporation 9-2
Optipay™ CC A-66 Coin Changer Section 10 10 TECHNICAL DATA This section lists and defines the Optipay™ CC A-66 Coin Changer specifications. A-66 Specifications Coin acceptance 20 coin types maximum 16 different coin channels (up to 3 tokens) Coin diameter: 0.59–1.23 in. (15–33 mm) Coin thickness: 0.047–0.138 in. (1.2–3.5 mm) Coin vending: 4 coin types from a tube cassette (coin diameter and thickness depends on the specific tube cassette) Device dimensions: Height: 14.96 in. (380.0 mm) Width: 5.
Section 10 Optipay™ CC THIS PAGE INTENTIONALLY LEFT BLANK 5900335 © 2005 JCM-American Corporation 10-2
Optipay™ CC A-66 Coin Changer S e c t i o n 11 11 CONFIGURATION – Tester G-19.0641or G55.0338 for checking the power supply. This section explains how to configure the Optipay™ CC A-66 Coin Changer for use. If the vending unit does not require testing, it is unnecessary to dismantle the entire Coin Changer. In this case it is just sufficient to remove the Coin Validator from the Coin Changer in order to configure or test it.
Section 11 Optipay™CC The WinEMP© software or PalmA66© and PalmEMP© software is used to diagnose and configure JCM Coin Validators as well as update the data block in the device memory (data block download). All three programs identify the connected Coin Validator and the device’s own data, and present them on the video screen of your PC or on the Palm Pilot® handheld’s display.
CONFIGURATION Optipay™CC Section11 • Tester G-19.0641 for the checking the power supply (See Figure 11-1 ). Figure 11-1 PC Programming Station Connection Connecting a Palm Pilot® Handheld PalmEMP© and PalmA66© are JCM software solutions that can be installed on a Palm Pilot® handheld as additional applications.
Section 11 Optipay™ CC THIS PAGE INTENTIONALLY LEFT BLANK 5900335 © 2005 JCM-American Corporation 11 - 4
Optipay™ CC A-66 Coin Changer Section 12 12 PALM PILOT® USAGE A66US Changer Program Usage a ® This section describes the use of a Palm Pilot to configure the Optipay™ CC A-66 Coin Changer using PalmA66© and/or PalmEMP© software.
Section 12 Optipay™CC PALM PILOT® USAGE 5. Select Inhibit Mask… on the screen to enable or disable coin/bill acceptance (See Figure 12-6 a). a a). Select the tick box next to each denomination that is to be disabled (See Figure 126 b). b c d e f g h j a i Figure 12-5 Operating Modes 4. Set functions listed in Figure 12-5 “a” through “h”. Select the desired settings and click Send (See Figure 12-5 i) to program the Coin Changer or Cancel (See Figure 12-5 j) to return to the Settings screen. b a).
PALM PILOT® USAGE Optipay™CC Section12 8. Configuring Changer tube “Coin Sorting”. c). Float-up function warning (See Figure 128). a). Select Coin sorting… from the mode menu. b). The screen shows the current tube configuration (See Figure 12-10). c). To change the tube configuration, select Change (b) and then select from the available payout combinations listed. d). Click OK (c) to select or e). Back to reset to Step “b” and then f). Send to program the Coin Changer.
Section 12 Optipay™CC PALM PILOT® USAGE 11. Cloning configuration settings. a a). Click on the menu bar and select Clone setting data (See Figure 12-13 a). c a b d Figure 12-11 Recycler Mode 12. The “Other settings” configurations. a). Select the Other settings… mode on the menu screen and the following selections will appear: • Smallest coin value: – Reference value for all coin values programmed. All coin values to be accepted must be a multiple of the smallest coin value (See Figure 12-12).
PALM PILOT® USAGE Optipay™CC a). Select the Service tab on the main menu screen (See Figure 12-14 a), and then b). Select Payout set on the menu that appears to view the coin levels in each tube (See Figure 12-14 b). Click on the ML MR R tube related L position tab to perform a payout test on the respective tube (See Figure 12-14 c). c). To edit the counter, click Edit counter (See Figure 12-14 d) and d). Adjust levels using the respective “up” and “down” pointing triangular arrow (See Figure 12-14 e).
PALM PILOT® USAGE Optipay™CC a). The menu functions available (See Figure 12-19 b) are as follows: • Software: – Current software version number • EMP: – Changer self test • Sorting: – Sorting gate test • Tube sensors: – Self test • Payout module: – Self test • Inhibit switches – Current switch positions graphic. b). Select Details (See Figure 12-19 c) to page access the fault description and review the fault status if any. 2. To view the changer statistical meters: b a Section12 c a).
Optipay™ CC A-66 Coin Changer Section 13 13 INDEX Coin type inhibiting A Acceptance band token validation programming… 4-2 width of… 4-2 certain types of… 4-2 Coin types differences of… 3-3 Coin Validator cleaning the… 8-1 integral part of Coin Changer A-66.
Section 13 Optipay™CC INDEX F K False coin introductions Keyboard new & fast reactions to… 1-2 description of uses for… 7-1 front part of Coin Validator membraine type… 3-2 Fault diagnosis quick LED indicating for… 3-2 Fault LED illumination conditions L Green, Yellow, Red… A-1 Fault List screen display LED error counter, error code and sensor failure totals of… 12-6 Fault occurance indicators… A-1 FE messages… A-2 Light-Emitting Diode … 3-2 part of Coin Validator diagnostics LED Indicat
INDEX Optipay™CC Section13 Ribbon cable software application description of… 1-2 flat, multi-wire usage… 3-2 PalmE66 RJ-45 PC plug adaptor… 1-3 JCM/Palm software type uses for… 1-1 software application description of… 1-2 S Safety PalmFlash instructions for… 2-1 pictographs indicating… 1-1 a Palm Pilot handheld application… 1-3 Payout module Second Currency Type location & usage… 3-4 accepting & converting of… 4-3 Payout Unit Security stock location & use of… 3-3 tube cassettes & payout
Section 13 Optipay™CC INDEX correct unit operating voltage… 2-1 disposal of unit… 2-1 electrical shock… 2-1 electronic components… 2-1 electrostatic discharge damage… 2-1 emptying Cash Box prior to refilling… 4-1 flat 40-wire ribbon cable connection… 5-1 Float up function zero setting… 12-3 handling static sensitive components… 2-1 keeping unit dry and clean… 2-1 liquid damage… 8-1 pulling connecting cable… 2-1 removing power… 2-1 security stock level 3 coin minimum… 12-3 setting the currency conversion
Optipay™ CC A-66 Coin Changer Appendix A A TROUBLE SHOOTING If the Green LED at the top of the Coin Validator is lit or is flashing, no faults are indicated and the device is working properly (See Figure A-1). If a Coin Changer fault occurs, the pilot lights at the top of the Coin Validator will indicate the fault’s location. If the Yellow LED in the middle of the Coin Validator flashes there is a definite fault which generally can be easily remedied.
Appendix A Optipay™CC Table A-2 Display Indicators (Continued) Table A-1 LED Indicator Meanings (Continued) LED Meaning Trouble Display Yellow Coins stuck in Remove tube cassette Flashes vend area or and any jammed coins, Twice motor failure then vend one coin from each tube using the inventory keys or Service case Yellow Coin changer Check Vending Machine (possibly Flashes inhibited empty or defective) 3 times by Vending Machine Red Fault in Coin Flashes Validator once Remove jammed coins by press
Appendix A Optipay™CC Table A-2 Display Indicators (Continued) TROUBLE SHOOTING Table A-2 Display Indicators (Continued) Display Meaning Trouble Display Meaning Trouble Ab-06 Sensor behind the acceptance gate has not recognized the inserted coin Check acceptance gate with WinEMP® or PalmEMP® and if necessary, exchange it (Service case) or check the CP3 sensor (Service case) FE-02 Coin jammed in the payout area (middle left tube) or motor failure of middle left tube Remove the cassette and ja
Optipay™ CC TROUBLE SHOOTING THIS PAGE INTENTIONALLY LEFT BLANK 5900335 © 2005 JCM-American Corporation A-4
Optipay™ CC A-66 Coin Changer Appendix B B GLOSSARY No. Term A 1 A-66 – The Coin Changer Series product code number. C 2 Optipay™ CC – The A-66 Bill Validator Series product name. 3 Coin Validator – An integral part of the A-66 Centaur product D 4 Data Block – a specific data area in a programmable memory used to hold coin setup data. 5 DIP Switch – Dual Inline Package Switch - a printed circuit board mountable two-position slide switch package containing up to 16 individual switches.
P Appendix B Optipay™ CC Glossary Glossary of Terms No. Term Continued P 14 Palm Pilot – A portable handheld programmable electronic device that functions as a personal organizer, but can also contain other applications that allow music playback, photographic display, view and edit documents, up and down loading of software and much more. Also commonly called a Personal Digital Assistant (PDA). 15 Payout Module – a motorized coin dispensing mechanism.
Optipay™ CC Glossary 5900335 © 2005, JCM American, Corporation B-3
5900335 R Optipay CC TM A-66 Coin Changer Operation and Maintenance Manual (Revision 1) Includes configuration setup using a Palm Pilot R Setting Module May 05 5900335