
Specifications


Chapter 8 Commands 147
device designed to be used with computers, results in visual artifacts often
referred to as “combing” around the edges of moving objects. Use the Deinter-
lacing pop-up menu, set to “Good Quality” or “Best Quality” to rectify this
problem when required.
▲ IMPORTANT: Do not use this feature unless necessary. Some video material
and some cameras that can be set to a “progressive scan” mode do not
need deinterlacing, and using it may reduce the image quality.
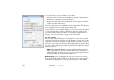
Stage Preview. Set to “Live” if you want to preview the Live Video in the
Stage window of the production computer. Otherwise, set this to “Thumbnail”.
This setting affects the Stage window preview only – not what’s shown by the
display computers.
◆ NOTE: In order to preview Live Video in the Stage window of the production
computer, this computer must have the appropriate video capture capabil-
ities, and the video signal to preview. Set the input associations for the
production computer in Preferences (see “Video In” on page 124).
Trim Edges. The fringes of a video signal sometimes contain noise. These
four fields allow you to selectively trim each of the edges of the video image to
remove such noise.
Dimensions. For most video standards, the dimensions are fixed by the
standard. However, when selecting “Other” on the “Video Standard” pop-up
menu, you can manually enter the desired dimensions. Use this, for example,
to enter the size of a computer signal brought into WATCHOUT using a DVI or
VGA capture card (see page 224).
◆ NOTE: The dimensions shown are after any edge trimming. For example, if
the original image is 640 by 480 and you trim 10 pixels at each edge, the
resulting dimensions become 620 by 460.