
Specifications


58 Chapter 3 Media
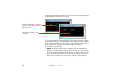
• Drag this new item from the Media window onto a timeline. Note that the
symbol on the cue is displayed in yellow, indicating that it is ready to be
recorded. Place this cue where you want the recording to start, and extend
it to cover the duration of the recording.
• Run the timeline along with the lighting console. You may simply start
WATCHOUT and cue the console manually. Alternatively, use timecode to
synchronize them.
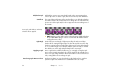
• As the timeline reaches the cue, recording commences, as indicated by the
lamp symbol on the cue turning red. Allow the timeline to run for the entire
duration of the cue.
• Once recording is complete, the lamp symbol on the cue becomes gray.
• Disconnect the lighting console from the network, or switch it off.
Play the WATCHOUT timeline again. The recorded DMX512 data will now be
played back by the cue. An Artnet-to-DMX512 adapter is required unless your
fixtures/dimmers accept Artnet directly.
You can use the Fade tween track of the cue to modulate the intensity of the
recorded channels, if desired.
◆ NOTE: Do not use the Fade tween track if any recorded channels use 16 bit
precision – often used by moving lights and similar devices.
If you make a mistake during the recording, or simply want to do another take,
you can reset the recording to its initial state by double-clicking it in the Media
window and selecting the “Re-record DMX512 File” checkbox. This dialog box
also allows you to play the recording back using a different Artnet universe
than the one recorded.
Ready to Play.
Recording.
Not recorded.