
Specifications


Chapter 4 Production 67
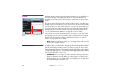
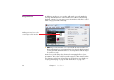
Changing a Cue’s Duration When adding moving images or sound, the duration of the cue is set to the
duration of the file. When adding still images to the timeline, the duration is set
to a default value. Change the duration by selecting the cue and dragging the
vertical bar located at either end of the cue.
◆ NOTE: If the cue has any tween tracks, their tween points will, by default,
remain stationary in relation to the timeline. To make the tween tracks
contract or expand with the cue, press the Alt key while dragging the bar.
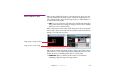
A video or sound file can be cut short by shortening the cue. Increasing the
cue’s duration beyond the actual length of the media will make a video stop at
its last frame. See also “Looping” on page 175 for more options.
◆ NOTE: Dragging the start of a moving image cue changes the starting time
along the timeline only. It does not affect the in-time of the movie. To change
the in-time, double click the cue and change its “In-Time” value.
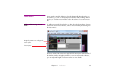
Aligning Cues in Time Use the Snap command on the Edit menu to align objects in time. Cues snap to
adjacent cues. Tween points snap to other tween points in the same cue. Cues
and tween points also snap to the current time position.
◆ HINT: To line up a number of objects in time, first position the current time
indicator then de-select “Click Jumps to Time” on the Timeline menu (see
page 151). You can now use the current time indicator as a ruler for
aligning cues and tween points.
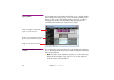
Cue Specifications In addition to direct manipulation of cues in the Timeline window, you can also
set most parameters numerically using the Cue Specifications dialog box.
Select the cue and choose Specifications on the Edit menu, or simply double-
click the cue. See “Cue Specifications” on page 170 for more details.