
Specifications


70 Chapter 4 Production
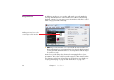
Adding Points Adding a tween track to a cue generally has no effect in itself unless you use it
to change the value governed by the tween track. This is done by adding and
adjusting tween points along the tween track. These tween points provide
values acting as key-frames along the cue’s tween track.
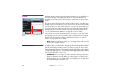
To add a tween point, click anywhere on the curve in the tween track where
there isn’t already a tween point. To edit the value of a tween point, drag it
using the mouse. For better precision, first enlarge the tween track by dragging
the partition between the tween tracks. Select multiple tween points to move
them together. Press the Shift key while dragging to constrain the movement of
the tween points.
◆ NOTE: Normally, tween points can’t be dragged past their neighbors. To
relax this constraint, press the Alt key while dragging.
Removing, Cutting and Pasting
Tween Points
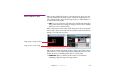
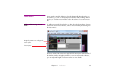
Select multiple tween points by Shift-clicking, or by dragging from a position
outside all tween points. The selected tween points can then be edited using
commands on the Edit menu. This makes it easy to move complex tween tracks
from one cue to another, by simply copying and pasting the tween points.
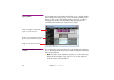
Stretching Tween Tracks When changing the length of a cue by dragging its end, you have the option
of either leaving its tween points at their current time positions or making them
expand and contract with the cue, as if the cue was a rubber band. Press the
Alt key during the drag to get the rubber band effect.
Corners and Smooth Tween Points For simple values, there are two kinds of tween points: corners and smooth
points.
◆ NOTE: Position tween tracks use a different method to create smooth
motion, as described on page 75.