
Operating instructions

8
Push the switch forward to operate in MOTION mode, leave in the central position to operate
NON MOTION and pull back and release to RETUNE in NON MOTION and to recentralise the
meter.
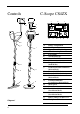
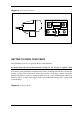
You will see the control panel on the front of the detector has been grouped into boxes. The DISC
and NOTCH controls and the NOTCH switch are functional when the detector is in MOTION
mode only. The GROUND control and switch are functional in the NON MOTION mode. The
SENSITIVITY control is common to both modes. The function of each control is explained fully in
the section headed 'CONTROLS' (PAGE 8).
Find an area where the search head can be put, free from metal, including floor boards and
reinforced concrete, and try out the detector, i.e. on a table with search head facing upwards and
overhanging the edge.
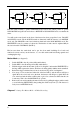
Motion Mode (see diagram 5):
1. Switch NOTCH to the off position (fully anticlockwise).
2. Switch DISC to the all metal position (fully anticlockwise).
3. Hold the trigger switch in the retune position 1 in diagram 5 and turn the SENSITIVITY to
the large white segment, the detector should now be sitting quietly with the meter centralised.
4. Release the trigger switch and move it into its motion mode position 3 in diagram 6.
5. Now sweep a coin over the head, either side of the head will do, and the detector will give a
signal. Move the coin slowly across the head, the detector will still give a signal. Place the
coin on the head and the detector will be quiet or give a low volume tone all the time the coin
is stationary. This is how the MOTION mode operates.
6. Remove the coin and recentralise the meter if necessary by pulling the trigger switch towards
you and releasing (RETUNING), then pushing the switch away from you. The detector is
ready for use in MOTION mode.
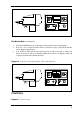
Diagram 5 Settings For Motion Mode - All Metal Searching
Motion Non Motion Hold
Tune/Retune