
User Manual
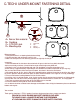

A
B
D
C
E
C-TECH-I FLUSH-MOUNT FASTENING DETAIL
A= 2cm or 3cm material.
B= C-TECH-I sink.
C= Screw.
D= Mounting clip.
E= Sink clip.
Before you begin:
1. Verify that the hole is cut properly and the sink fits tightly.
2. You will need a screwdriver and caulking to install this sink.
3. Make sure to inspect the sink and verify you have the right clips for the job.
Instructions:
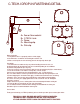
1. You will need to assemble the clip sets prior to installing them on the sink, use
the diagram above to calculate how many are needed. Depending on site conditions
the amount and position of clips may vary.
2. Take the screw (C) and insert it counter clock wise into the mounting clip (D) as shown above, .
3. Insert the end of the screw into the sink clip hole, same on all clips
Once they are all installed turn them all flat towards the sink. **If your opening is
over 1/4" smaller that the sink then you will have to install the clips after you drop the sink.
4. Prior to dropping the sink into the hole apply a small bead of caulk where the sink will lay.
5. Drop the sink in, turn the clips so they look like the sketch above and gently tighten
the screws. Once they are slightly tightened check to see how the sink sits and tighten
each clip as needed.
6. Wipe and clean any excess caulking off of sink and countertop with water and dry off.
7. Install self adhesive sound pads on each side of the bowls.
8. In an effort to minimize accidental future damages to the bottom of the sink by the
homeowner please recommend bottom strainer-grids.
You are done
Thank you for choosing a C-TECH-I product,if you have further questions please contact your dealer.
FOLLOW ALL LOCAL BUILDING AND SAFETY CODES IN YOUR AREA.
THE ABOVE IS ONLY A SUGGESTED METHOD TO BE PERFORMED
AT YOUR OWN RISK. REFER TO OSHA FOR PROPER SAFETY PRACTICES.