USER’S GUIDE English
PLEASE NOTE! For instructions in other languages please consult our webpage http://www.cpen.com. First edition (March 2001). This manual is published by C Technologies AB, without any warranty. Improvements and changes to this manual necessitated by typographical errors, inaccuracies of current information, or improvements to programs and/or equipment, may be made by C Technologies AB at any time and without notice.
Contents INTRODUCTION TO ......................................................... 5 C-Pen Models ................................................................................ 5 Your Personal Digital Assistant ...................................................... 7 Optimal Reading Conditions .......................................................... 8 User Documentation and Support .............................................. 10 Care and Safety .........................................................
Getting Help ................................................................................ 74 C-Pen Viewer .............................................................................. 74 Copy and paste in the PC Environment ...................................... 75 Installing and Removing Applications .......................................... 76 Transferring Files ......................................................................... 77 C Direct .....................................................
INTRODUCTION TO Congratulations - you have just bought a photographic memory! C-Pen is a Mobile Information Collector that reads, remembers, processes and transfers printed text to your Windows-equipped PC and PDA products. C-Pen is in essence an electronic highlighter that saves the text you are marking. Carry it with you wherever you go! Make it a habit to take your portable text collector with you, and you are always ready to read and save text from books, papers, brochures or business cards.
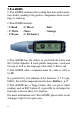
C-Pen 600MX C-Pen 600MX combines the reading function with translation ability, making it the perfect companion when travelling or studying. C-Pen 600MX includes: • C Read • C Write • C Beam • C Direct • Notes • C Dictionary • Info • Storage C-Pen 600MX has the ability to read both the Latin and the Cyrillic alphabet. It reads polish, hungarian, czech and russian as well as the languages that other C-Pens read. C-Pen 600MX offers communication by cable as well as by IR.
Your Personal Digital Assistant Powerful features • C Read Reads in text - the basic function of C-Pen. Move C-Pen over the text, and the text will be captured by the pen, where it can be saved as a file for later processing. • C Write (only the Latin alphabet) Allows you to enter characters by writing with C-Pen as if it were an ordinary pen.
• Storage Storage area in C-Pen, which can be used as a floppy disc for files. Optimal Reading Conditions C-Pen uses Optical Character Recognition (OCR) to read text. OCR is the process of turning an image of characters into computer-readable text. As C-Pen moves over the text, its internal light source illuminates the characters and a camera takes pictures of the text. During OCR, C-Pen analyzes the pictures taken by its camera and translates them into text characters.
• Position and movement of C-Pen It is important how you hold and move C-Pen over the printed text. Please see Reading text, p. 22 or read the Quick Start folder to learn how to use C-Pen correctly. It is crucial that you follow these instructions in order to get the best results. • The language of the text Set the text language of the text you wish to read, to get the most suitable OCR. See Text Language, p. 55.
User Documentation and Support There are several sources of support for your C-Pen. This User's Guide contains a description of C-Pen, its applications and instructions for reading and editing text and saving files. The following applications are explained: • C Read • C Direct • Storage • C Write • C Beam • C Dictionary • Notes • Info • Settings You can also learn how to connect C-Pen to a PC. The enclosed C-Pen CD contains the C-Win Software for communication between C-Pen and your PC.
• Make sure the camera opening is free from dust or any other objects. • Do not deliberately insert any object into the camera opening. • Clean C-Pen with a dry cloth. Do not use detergents or other chemicals when cleaning C-Pen. • C-Pen models that are powered by alkaline batteries, require two 1.5 V AAA batteries of type LR03. See Battery, p. 17. • Make backup copies of your C-Pen files regularly and keep the copies in a safe place. Copies are made using C-Win Software, see Using C-Pen with your PC, p.
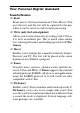
PRESENTATION OF C-PEN Parts of C-Pen Description of the different parts: 3 5 8 8 7 5 3 1 2 4 7 4 1 6 12
1. On/Off and Nav Turns C-Pen on or off when pressed and held for more than two seconds. This button is also used to scroll through the menus and texts (push up or down) and to select an item or an option (press briefly). 2. ESC Closes menus. This is the button on the side of C-Pen. The functions of Trigg and ESC can be exchanged to suit your own preferences. See System Settings, p. 59. 3. Display Used to display scanned text and for communication between C-Pen and the user.
7. Battery Compartment This is where you insert the batteries. 8. Camera Opening The Camera Opening is not protected in any way. This enhances C-Pen’s reading ability but it also makes it important to see to that dust or other objects do not enter the camera opening.
Text Quality Battery power level Text Language Application icons The applications are represented by application icons on the main screen. The applications are described in the chapter Applications, p. 39. C-Pen main screen Application icons Menus Menus provide different options. A scroll bar indicates if there are more menu items available above or below the visible section. Menu items Menu Scroll bar Check boxes Check boxes also provide different options.
Checked box Unchecked box Dialog boxes A dialog box appears when you need to enter information or give commands to C-Pen. A dialog box contains one or more objects such as edit fields or dialog buttons. Edit field Dialog box Dialog buttons Edit fields It is possible to enter and edit text in an edit field. An edit field is recognized by its frame, see the figure above. Dialog buttons Dialog buttons are used in dialog boxes to give simple instructions to C-Pen.
GETTING STARTED Turning C-Pen On and Off To turn C-Pen on and off, press the On/Off button until the display is activated/deactivated. C-Pen turns off automatically after 5 minutes of inactivity. To change the automatic power-off time, see System Settings, p. 59. Press Nav to turn C-Pen on and off Battery Installing the batteries 1. Remove the battery cover from the back of C-Pen. Lift the cover here to open ! It is imperative to observe the polarity of the batteries.
2. Insert two alkaline AAA batteries (1.5 V, type LR03). 3. Replace the battery cover. You should hear a “click” when it locks in place. ! Please do not dispose of batteries in a fire as there is a danger of explosion. Please recycle the batteries! Battery power level The battery power level is shown by the battery indicator at the bottom of the status field. Text Quality Battery power level Text Language If the battery power level is getting low, the message “Battery low” will appear on the display.
! Please note that information may be lost if you remove the batteries without turning C-Pen off first. However, when you turn C-Pen off properly, all information is saved in the memory and it is safe to remove the batteries. C-Pen is reset by removing the batteries from the battery compartment. Do this when C-Pen has encountered problems or has “frozen”. Navigating and Selecting Nav (the navigation control) is used for navigation and to select an object.
Menus Selecting a menu item marked with a further alternatives in a new menu. will display Selecting EXIT or CANCEL will close the menu. Instead of selecting EXIT or CANCEL, you can press ESC. Menu item with alternatives Dialog buttons In a dialog box you can instruct C-Pen how to continue by selecting a dialog button: • OK You accept a suggestion in a dialog box. • YES Your answer is “Yes” to a question in a dialog box. • NO Your answer is “No” to a question in a dialog box.
Edit field A cursor will appear in the edit field and the status field will show the edit mode symbol. See Editing text, p. 26. Cursor Press to select an object Edit mode symbol Check boxes To mark an alternative in a list of check boxes, navigate to the alternative of your choice (using the Nav button). Mark the alternative by selecting it (press the Nav button briefly). The check box becomes checked and the OK button is highlighted.
READING AND SAVING TEXT Please follow the instructions in this chapter in order to get the best results from your C-Pen. Take a few minutes to learn how to use C-Pen correctly. See also Optimal Reading Conditions p. 8. In this User's Guide “read text” should be interpreted as reading a line of text, not a line on C-Pen’s display. Reading Text To read a line, follow the steps below. 1. Turn C-Pen on. Make sure the text settings are set to the appropriate values.
! Please note that the text surface must be completely flat in order to achieve maximum reading accuracy. 4. Move C-Pen over the line of text, keeping Trigg pressed. You can move C-Pen left-to-right or right-toleft over the text. You can read up to 15 cm/second (5 inches/second). 5. Release Trigg at the end of the line.
Continued reading The Text screen will appear on the display. Text screen The text is placed in a new text file in Notes, see p. 41. You can also create a new, empty text file by selecting New... and then FILE in Notes, before you start reading. Reading another line Read the second line in the same way as you read the first. A space, a line break or a tab is inserted between the lines, see Read Mode, p. 55. You can insert a line break by pressing Trigg. The last line is highlighted (negative), i.e.
Saving Text Press Nav to open the Text menu (see Notes, p. 41) and choose Exit. The Save As dialog box appears. Choose YES if you want to save the text, NO if you want to discard the text or CANCEL if you want to return to the text. The dialog box contains an edit field with a suggested file name. You can change the file name before you save the file; see Editing text in the next section.
EDITING TEXT To be able to edit text in a text file or in an edit field you must enter edit mode. Entering Edit Mode You can enter edit mode in different ways depending on your starting-point. You can enter edit mode from the Text screen or from an edit field. Entering edit mode from the Text screen Press Nav in the Text screen to open the Text menu. Select Edit/C Write to enter edit mode. You can now edit text either by using the Edit menu (see below) or by using C Write (see p. 31).
In edit mode you can move the cursor one character at a time by turning Nav. You can move to the beginning or the end of the text with the Go to option in the Edit menu. Move the cursor to the position where you want to edit the text. Press Nav to open the Edit menu. Edit menu The options in the Edit menu are slightly different, depending on where you want to edit a field. The most common items in the Edit menu are: • Quit Editing Exits edit mode in the Text screen.
• Paste Pastes a cut out or copied selection of characters. • Delete Deletes a character or a selection of characters. • Go to Moves the cursor to the beginning or the end of the text. • Select Highlights characters or an entire text. • Settings Sets the text settings (Text Language, Text Quality and Read Mode) of the text you are reading. The options Calibration and C Write Feedback are also included here. • Cancel Closes the edit menu. Returns to the read text.
As default C Write Prototype Viewing is enabled. When scrolling in the character set you can see how the characters should be drawn if you want to use C-Pen as a normal pen during editing. C Write Prototype Viewing is automatically turned on/off when C Write Feedback is turned on/off, see p. 32. Insert Move the cursor to the place where you want to insert text, and select Insert from the menu. You can choose between inserting a space, a line break, a character or multiple characters.
Select Use the Select command to edit more than one character at a time. Then select Characters and turn Nav to mark multiple characters. Press Nav and choose Cut, Copy or Delete from the menu. If you select All, the entire text will be selected. Cut, Copy and Paste To be able to choose Cut, Copy or Paste you must have selected part of a text. If you have chosen Cut or Copy you can Paste the text section at the cursor’s position by pressing Nav and selecting Paste in the menu.
• Text Quality Select Normal or Inverted. • Calibration You can either calibrate C-Pen or revert to the default setting. Quit Editing Quit edit mode by selecting Quit Editing. C Write ! Please note that you can only use C Write for the Latin alphabet. C Write is a feature that allows you to draw characters by using C-Pen as an ordinary pen. C-Pen can track its own movement over a surface and recognize the movement as a letter, digit or a symbol.
5. Lift the pen from the surface. When the pen is lifted from the surface an image will briefly appear on the display, showing the letter as perceived by your C-Pen. You do not have to wait for this image to disappear to write your next letter. The function is called C Write Feedback, and is enabled as default. Visual feedback The C Write Feedback utility can be switched on/off as follows. 1. Go to Settings in the main screen. 2. Select C Write Feedback. 3.
In order to obtain maximum accuracy when writing with CPen, your characters should resemble the prototypes on the following pages as closely as possible. A character must be drawn in one single stroke. The dot indicates the starting point of the stroke, see next page. The height of the character should be 1 - 4 cm (¼ - 1¼ inch). Capital letters When you enter edit mode the status field will change appearance. The edit mode symbol indicates that C Write will generate lowercase letters.
The status field displays the Symbol mode icon. Write one of the symbols in the symbol table. After writing a symbol, C-Pen automatically returns to normal mode. C Write symbol mode icon If you want to quit symbol mode without writing a symbol, you have to draw a backspace symbol.
C Write Prototypes Letters, digits and shift Shift Space Backspace New line Aa Bb Cc Dd Ee Ff Gg Hh Ii Jj Kk Ll Mm Nn Oo 35
Pp Qq Rr Ss Tt Uu Vv Ww Xx Yy 1 2 3 4 5 6 7 8 9 0 Zz 36
Special characters Çç Ææ Øø Accents and umlauts Write the letter first and then the accent or umlaut. Example: ä=a+ ¨ º ^ ´ ` ~ Symbols Enter symbol mode by pressing Trigg briefly. .
( ) [ ] { } - + * $ @ “ # _ < > ? ¿ ! ¡ £ § ß %
APPLICATIONS C-Pen’s application icons are shown on the main screen. You can move between the icons by using Nav. Press Nav to start an application. C-Pen main screen Notes contains your read and stored text files. See p. 41. C Dictionary can read and translate words between the languages you have chosen for your C-Pen. See p. 45. Settings contains parameters which can be changed such as power-off time and reading options. See p. 54.
PDAs (Personal Digital Assistant). C Beam supports the standard infrared protocol IrOBEX. See p. 64. C Write contains information about and examples of how to write letters with C-Pen. See p. 31.
Notes Notes contains the text files you have read and saved. Enter Notes by selecting the Notes icon on the main screen. Your list of text files starts here Inside Notes, move between items using Nav. You can transfer files from Notes in C-Pen to your PC. To do this, C Win Software must be installed on your PC. See Using C-Pen with your PC, p. 71. Creating a new file or folder Selecting New... will open a dialog box. Select create a new file.
then write a name with C Write. To save the folder, select OK. The folder will be placed in Notes. If you want to save a file in a specific folder, you must create the file in that folder. Open the folder, select New... and then select FILE in the dialog box. The Command menu The Command menu contains commands for handling texts. Open the menu by selecting a text file and pressing Nav. Command menu The options in the Command menu are: • Open Opens the selected file. • Rename Renames the selected file.
• Properties Displays the file size, and if applicable the creation date and the date of last modification of the selected file. • Beam Transfers the selected file by IR, see p. 64. • Cancel Closes the Command menu. The Text menu In the Text screen you can move the cursor line by line with Nav. You can insert a new line at the cursor position (the flashing triangle) by reading a new line with C-Pen.
• Edit/C Write Enters edit mode. See p. 26. • Settings Opens the text settings of the text you are reading. See Settings, p. 54. • Select Highlights a read line/word. • Go to Moves the cursor to the beginning or the end of the text. • Cancel Closes the Text menu.
C Dictionary Introduction C Dictionary is a software application that allows you to translate and/or look up definitions of words in less than a second. Whether you translate or look up definitions depends upon which dictionary you choose to install. With bilingual dictionaries, you can translate from one language to another. Some dictionaries are monolingual reference dictionaries and with them you can look up definitions of words.
the web below. Make sure you have your C-Pen CD in your CD-ROM drive. ! Please note that dictionaries not available on the CD at the time of going to press will be available on www.cdictionary.com/mx/ as soon as they are made available. 2. You can now see the C Dictionary Installer view. Make sure the dictionaries you want are selected. 3. Start your C-Pen, position C-Pen so that it is aligned with the PC’s IR port or ensure that the cable is connected, then press Start. 4.
ber of dictionaries that can be installed in C-Pen depends on the amount of free memory in your C-Pen. Access to dictionaries Dictionaries are protected from unauthorized use by a dictionary license key. For more information about how to obtain the license key, see www.cdictionary.com. The user is requested to provide the license key to activate a new dictionary in C-Pen (the DICTIONARIES button in the C Dictionary application). The Enter License Key dialog box contains six number boxes.
dictionary you want to delete. Use the Delete command in the File menu. You have to use your PC to remove a dictionary from C-Pen. ! Please make sure that you have the license key before you delete a dictionary. Using C Dictionary Start C Dictionary by selecting the C Dictionary icon in the main screen and press Nav. C-Pen main screen C-Pen is now ready to translate/look up words. If you want to change dictionaries before you start reading, see DICTIONARIES button, p. 52.
3. Several words are read. The words are shown on a new screen where you can select the words to be translated/ looked up, see Word selection screen, p. 51. 4. A dialog box appears, telling you that the word cannot be found in the dictionary. When you are reading a word, the word (or part of the word) in front of and/or behind the accurate word might also be included. If this is the case C Dictionary acts according to the following rules: • If two words are read, the longest word is translated.
Word references Some words in the dictionaries contain references to other words. The references are displayed in bold italic style. If you press Nav when a word reference is displayed, a menu appears and you can choose to: • look up the reference • cancel the menu • close the translation/definition containing the reference If you choose to look up the reference, the word will be translated. Translation/definition screen The Translation/definition screen displays the translation of the selected word.
Word selection list If the word being read does not match any word in the dictionary, the application will search for similar words and display alternatives in a Word selection list. The most probable word is presented at the top of the list with the others in descending order of probability. A maximum of ten words will be displayed. Select a word to see the translation/definition. The reason why a word cannot be found may be that the word is misspelled or that the OCR has given an erroneous result.
The selected word is looked up and the Translation/definition screen, Word selection list or Can’t find dialog box will be displayed. To cancel the scanned word/text and go back to the C Dictionary main screen, press Trigg briefly. Word selection screen You can start to read a new word without closing the screen. Close the Word selection screen by pressing ESC or by selecting the CANCEL button. Text Language The Text Language is automatically set to the language you are translating from; i.e.
The DICTIONARIES button gives you access to the list of dictionaries in your C-Pen. Select the dictionary you want to use by checking its check box, and then select OK. ! If you want to use the same dictionary the next time you use your C-Pen you do not have to repeat this procedure, since the dictionary setting is stored when C-Pen is turned off.
Settings Settings contains the parameters that control C-Pen. Enter Settings from the Main screen by selecting the Settings icon. You can also enter text settings from the Text menu, p. 43 and the Edit menu, p. 26. A list of the available settings appears. The following settings are available: • Text Language • Read Mode • Text Quality • Beam Settings • C Write Feedback • Calibration • System Settings Text Language, Read Mode and Text Quality are referred to as text settings.
Text Language Select the language of the text you want to read from the list of languages, by checking the check box. If you only intend to read numbers, select Numbers Only as the language. Read Mode Read Mode adjusts C-Pen’s reading format. The options are: • Continuous A space is inserted between two separate readings with the C-Pen. Suitable when you read a complete paragraph which will be used in a document on your PC. • Separate lines Each reading starts on a new line.
Beam Settings • Recieving files Select the language of the file you are beaming to CPen. • Always send as Unicode If enabled, all files will be sent in the Unicode standard. • Cancel Return to Settings. C Write Feedback Check the check box if you want to enable/disable the visual feedback facility in C Write. Calibration The Calibration option increases C-Pen’s reading ability if the text is not black, if the background is not white, or if the text quality is poor.
! If calibration does not improve the reading accuracy, return Please note that it is impossible to read red text. to the default setting. The Calibration menu contains three items: 1. Calibrate, where you can : Calibrate immediately by moving the pen over the text surface, see How to... p. 58, or return to the DEFAULT SETTING which is the factory setting. 2. Options, where you can enable/disable the Quick Calibration option.
How to Calibrate Calibrate adjusts C-Pen’s reading ability according to the contrast between the text and its background. When the CPen display says “Press scan to calibrate”, follow these instructions: 1. Hold C-Pen with the pen tip flat against the surface. 2. Press Trigg while moving the pen. If calibration is performed from a menu other than the Settings main menu, you should press Trigg, hold the pen still for two seconds and then move it over the surface. 3.
System Settings • PIN code You can control access to your C-Pen by a four-digit PIN code. Enter the PIN code setting to enable or disable your PIN (Personal Identification Number). When the dialog box opens, the zero in the first position will blink. Turn Nav to select the first digit of your PIN. Then press Nav to go the next position. Continue with all four digits. When you have reached OK, press Nav and confirm the PIN in a new dialog box.
• Menu Language The language that C-Pen uses in its menus and dialog boxes. Select the desired menu language in the list of check boxes. • Font The font size on C-Pen’s display can be altered between Large (default) and Small. Large gives a 3 row display and Small gives a 4 row display. • Power-off time The duration of inactivity in minutes before C-Pen turns off automatically. • Left/Right Hand A Left/Right-handed option.
Info Info contains a list of help and information topics. Press Nav or ESC to close the topic. The topics are: • Exit Exits Info. • Getting started Instructions on how to perform a successful reading. • Troubleshooting Solutions to common problems. • Support Support addresses to C Technologies. • About C-Pen Contains OS (Operating System) version numbers and serial number. You should have these numbers available when you contact C Technologies for support. The amount of free memory space is also given.
Storage Storage is a storage area for computer files, that can be used as a floppy disk. Selecting a file in Storage opens a menu with the following menu items: • Open Opens the selected file. • Delete Removes the selected file. • Properties Displays the selected file size, creation date and date of last modification. • Beam Transfers the selected file by IR, see p. 64. • Cancel Cancels the menu. To be able to use Storage, C-Pen must be connected to a PC and C Win Software must be installed.
Double-click the file and you will be asked if you want to open a copy instead. Choose to open a copy. In these cases, if you edit the file and save it, your changes will be saved on your PC, not in your C-Pen. Files are copied as usual in Windows, i.e. either by using drag-and-drop or Copy/Paste in the Edit menu. See Copy and Paste in the PC Environment, p. 75. You can delete files in Storage by selecting the file/files you wish to delete and then pressing the Delete button on your keyboard.
C Beam C Beam is used to transfer notes and other files between CPen and PDAs (Personal Digital Assistant). C Beam supports the standard infrared protocol IrOBEX. ! Please note that the PDA device must support the standard infrared protocol IrOBEX in order to be used with C-Pen. If you should experience problems with C Beam, start by turning off and on both C-Pen and the PDA device. Receiving files In order to receive information files from a PDA device with your C-Pen, follow the steps below. 1.
6. After transmission the Accept dialog box is displayed, asking if you want to accept the transferred file. 7. If you press YES the file will be saved in the appropriate place, i.e. a text file is saved in Notes. Files not compatible with any of the C-Pen applications are saved in Storage. If you press NO, C-Pen will discard the received file and no further action will be taken. You must repeat the transmission if you press NO by mistake.
Select Beam in the menu Send other files, saved in Storage. Enter Storage and select the file you want to send, then select Beam in the menu that appears. ! Please note that only files can be sent, not folders. 3. C-Pen starts searching for the PDA device in order to send the file and the Searching dialog box appears on the screen. Searching dialog box 4. During transmission, the file name is displayed in a dialog box together with a progress bar. 5.
prevent this automatic conversion, check the Always send as Unicode checkbox in Beam Settings/Always send as Unicode, see p. 56. All files will now be sent as Unicode. ! Please note that this will not affect how files are received to C-Pen.
C Direct C Direct gives you the opportunity to enter text from your C-Pen at the cursor position in any Windows program. To be able to use C Direct, C Win Software has to be installed on your PC. See Using C-Pen with your PC, p. 71. The easiest way to control C Direct is from the C Direct icon in the system tray in Windows. By clicking on the icon, you can choose Connect, Disconnect or Exit C Direct. To activate C Direct you can simply double-click on the icon.
When you read text with C-Pen, it will appear as usual on C-Pen’s display. To transfer the text to the Windows program, direct C-Pen’s IR-eye towards the PC’s IR port. The text will disappear from C-Pen’s display and be transferred to the cursor position in the Windows program. Using cable To activate C Direct make sure C-Pen is connected to your PC with the cable. Click the Start button/Programs/C-Pen/ C Direct or click on the C Direct shortcut on your desktop.
C Write (only available for latin characters) C Write is a feature that allows you to draw characters by using C-Pen as an ordinary pen. C Write makes it possible to quickly write new texts into your C-Pen but it is also an important tool during editing. C-Pen can track its own movement over a surface and recognize the movement as a letter, digit or symbol. C Write is an alternative to using the character frame when inserting characters in a text.
USING C-PEN WITH YOUR PC A working connection with a PC is required to install and remove applications in C-Pen. To enable this communication certain hardware and software must be installed and configured properly on your PC. The following is required for IR communication: 1. An IR port. Laptops often have a built-in IR port. Refer to your PC’s manual to find out whether your PC is equipped with an IR port and if so, where it is located. Most desktop PCs do not have a built-in IR port.
program also enables you to view Tutorial videos, which demonstrate how to use C-Pen for best results. Click the file you want to read. To install C-Win Software (C-Win): 1. Put the C-Pen CD into your PC’s CD-ROM drive and the installation program will start automatically. If installation does not start, click the Start button/Run and type x:\cpen.exe, where x: denotes the CD-ROM drive. 2. To install C-Win, click Software installation.
The installation program will place a C-Pen icon (My CPen) on your PC’s desktop. When C-Pen is within range of the PC’s IR port you can double-click on the icon. If communication is established between the PC’s IR port and C-Pen, a communication icon will appear in the status field on C-Pen’s display. On most laptops the built-in IR port - a red or black shiny plastic square - is found on the back or side of the computer.
The installation program will place a C-Pen icon (My CPen) on your PC’s desktop. When C-Pen is connected to your PC you can double-click on the icon. If the cable connection between C-Pen and the PC is in order, a communication icon will appear in the status field on C-Pen’s display. Getting Help To get more detailed help using C-Win, open C-Pen Viewer (by double-clicking on the My C-Pen icon), from the Help menu select the C-Pen Help Topics. Or click your PC’s Start button/Programs/C-Pen/C-Pen Help.
The user interface looks like Windows Explorer and you will recognize the applications from the main screen in CPen. Use C-Pen Viewer to open and browse files in your CPen, to create new folders and to remove applications from your C-Pen. Your C-Pen Viewer might look different from the figure above, depending on which options you have enabled in the Explorer’s View menu. Copy and paste in the PC Environment In the C-Pen Viewer you can view the details of the pen and also perform copy and paste operations.
Then click the Edit menu and select Copy in the menu that appears. Select the folder in which you want to put the copy. Then click the Edit menu and select Paste. A copy of the file is now placed in the selected folder. Another way is to use “drag and drop”. Click the file you want to copy and keep the mouse button down. While keeping the mouse button down, move the mouse to point at the folder where you want to copy the file. Release the mouse button when the folder becomes highlighted.
The application can be uninstalled if the menu option Uninstall C-Pen Application is enabled. Transferring Files There are two ways to transfer files to and from C-Pen. Either between a PDA and C-Pen, or between C-Pen and a PC. It’s practically the same as working with a floppy disk or a hard drive. Transferring files to and from a PC Before transferring files you have to double-click on the My C-Pen icon on your PC in order to open the C-Pen Viewer. See C-Pen Viewer, p. 74.
Transferring files to and from a PDA device Files can be transferred to and from PDA devices if the PDA device supports the standard infrared protocol IrOBEX. Files are transferred with the application C Beam, see p. 64. C Direct C Direct allows you to enter text from your C-Pen directly at the cursor position in any Windows program. The C Direct application in the C-Pen main screen only gives information about the function. C Direct is activated from the PC and communicates by IR or cable.
Closing the Connection Close the connection between your C-Pen and your PC by selecting Disconnect C-Pen from the File menu in the C-Pen Viewer.
TECHNICAL SPECIFICATIONS C-Pen 600MX Size: 140 x 35 x 24 mm (5.5 x 1.38 x 1.
WARRANTY C Technologies AB warrants that this product is free from defects in materials and function at the time of original purchase and for a period of one year from that date. When the name C Technologies is mentioned in the following text, it means, unless otherwise stated, C Technologies AB (reg. number 556532-3929), its subsidiaries and retailers.
7. Damage caused by the usage of inappropriate battery. 8. Damage arising in connection with or as a consequence of upgrading with additions to or alterations of the product, using software or hardware not produced by or approved by C Technologies. If your C-Pen product requires warranty service you should return the product to the dealer/retailer from whom it was purchased. The product must be packed in original packaging or with sufficient care so as to avoid shipping damage.
LIMITED WORLDWIDE WARRANTY To the extent such dealer/retailer has joined C Technologies’ worldwide warranty program, you may, in addition to returning the product to the dealer/retailer from which it was purchased, also return the product to any dealer/retailer in the world carrying such product. To the extent permissible under law, the warranties provided herein are exhaustive and constitute the sole and only warranties provided by C Technologies AB.
Warranty Information Serial number: CT number: Date: Customer: Address: Dealer: Address: 84
DECLARATION OF CONFORMITY 86
UL STATEMENT All UL-labelled C-Pen products fulfill the requirements of the UL 1950 standard: UL Standard for Safety of Information Technology Equipment. C-Pen models with built-in rechargeable batteries are to be used with Direct Plug-In Transformer unit marked “Class 2” rated from 4.05-4.95 Vdc, 450-550 mA. The built-in rechargeable batteries are not operator accessible or replaceable.
C DICTIONARY COPYRIGHT NOTICE Copyrights for the following dictionaries are held by their respective publisher. Copyright information for additional titles from current and/or additional publishers made available by C Technologies after this publication goes to print will be listed at www.cdictionary.com.
• Concise Oxford-Duden German Dictionary © Oxford University Press and Bibliograpisches Institut & F.A. Brockhaus AG 1991, 1997, 1998 • Concise Oxford Spanish Dictionary © Oxford University Press 1995, 1998 • Oxford Zanichelli Concise Dictionary ©1997 Zanichelli editore S.p.A.
INDEX A Application icon 15 Applications 39 C Beam 39, 64 C Dictionary 39, 45 C Direct 39, 68 C Write 40, 70 Info 39, 61 Notes 41 Settings 39, 54 Storage 62 B Battery 17 Battery Compartment 14 Battery power level 18 Beam Settings 56 C C Beam 7, 39, 64 Accept dialog 65 Folders 66 Installing C Beam 64 Receive dialog 64 Save files 65 Searching dialog 66 Using C Beam 64 C Dictionary 7, 39, 45 Dictionaries button 52 Dictionary licence key 47 Exit C Dictionary 53 Info button 53 Installing a dictionary from C-Pe
Cable Connector 13 Calibration 56 How to...
I Info 39, 61 C-Pen facts 61 Getting started 61 Troubleshooting 61 Infrared drivers 71 Installing Applications 76 C-Win Software 71 Installing a dictionary from CPen CD 45 Installing a dictionary from the web 46 Installing C Beam 64 Installing C-Win software 71 Introduction to C-Pen 5 Inverted text 55 IR communication C-Win software 71 Infrared driver 71 IR port 71 IR port 13, 73 Ir protocol 64 L Language, setting 55 Left/Right hand 60 M Main screen 15 Menu 15, 20 ESC 20 Selecting 19 92 Menu language 60
S Saving text 25 Selecting 19 Settings 39, 54 Beam Settings 56 C Write Feedback 32, 56 Calibration 56 Modify a setting 54 Read Mode 55 System settings 59 Text Language 55 Text Quality 55 Status field 14 Storage 8, 62 Delete file 62 File properties 62 Open file 62 Using Storage 62 Support 10, 61 System Settings 59 Contrast 59 Exchange Trigger/ESC 60 Font 60 Left/Right Hand 60 Menu Language 60 PIN code 59 Power off time 60 T Technical Specifications 80 Text menu 43 Text Quality 55 Text Quality icon 14, 18