USER GUIDE WIRELESS USB HOST ADAPTER Model: 29578 1
TABLE OF CONTENTS Introduction.................................................................................................................................................2 Features......................................................................................................................................................3 System Requirements.................................................................................................................................4 Package Contents.........
INTRODUCTION Thank you for purchasing the TruLink™ Wireless USB Host Adapter. This product utilizes the latest in wireless technology, so you can connect USB enabled devices such as printers, external hard drives, and digital cameras, monitors/displays up to 30 feet away. This adapter will transmit information from your PC to any Certified Wireless USB™ devices.
FEATURES Certified by the USB-IF, guaranteeing connectivity with all Certified Wireless USB™ products Based on Ultra Wide Band technology, providing speedy data transfer and low power consumption Convenient plug-and-play connectivity, with simple software installation and setup 3
SYSTEM REQUIREMENTS Microsoft® Windows® XP 32-bit with Service Pack 3 or higher or Microsoft® Vista® 32-bit/64-bit 4
PACKAGE CONTENTS Wireless USB Host Adapter for your computer One (1) Dipole Antenna USB Extender with Cradle Quick Start Guide Driver CD w/electronic User Guide Pin-Association stickers 5
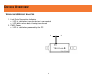
DEVICE OVERVIEW WIRELESS USB HOST ADAPTER 1. Link: Data Connection Indicator • LED is solid when transfer device is connected • LED blinks when data is being transferred 2.
D OVERVIEW SEVICE OFTWARE /DEVICE INSTALLATION IMPORTANT NOTE: • If you have purchased this TruLink Wireless USB Host Adapter as an additional adapter to other TruLink Wireless USB Host Adapter/s and you have already installed the software on your PC, step 1 (software installation) can be skipped. • If installing on Windows XP, Service Pack 3 (SP3) is required. Verify that this has been installed before installing the Wireless USB software.
SOFTWARE/DEVICE INSTALLATION This will take you to the TruLink Wireless USB Kit InstallShield Wizard. Click “Next” to go to proceed with the install. Read and accept the Wireless USB Kit software License Agreement by clicking “Yes”.
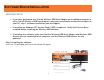
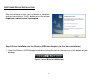
SOFTWARE/DEVICE INSTALLATION After the software installs your installation is complete and you can click the “Finish” button to exit the wizard. Important: reboot/restart if prompted. Step 2-Driver Installation for the Wireless USB Host Adapter (for first time installation) 1. Open the Wireless USB Manager by double-clicking the icon on the icon tray at the bottom of your desktop.
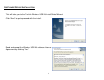
SOFTWARE/DEVICE INSTALLATION The Wireless USB Manager will open and instruct you on what to do next. Figure: Getting Started Screen 2. Make sure the antenna is connected to the Wireless USB Host Adapter. 3. Plug the Wireless USB Host Adapter into any available USB port on your computer. You also have the option to connect the Wireless USB Host Adapter to the USB Cradle provided in the package if you need to make the Adapter more mobile.
SOFTWARE/DEVICE INSTALLATION Windows will automatically install the appropriate Wireless USB Host Adapter drivers and you will get a Successful Install message pop-up such as the following or one similar depending on your operating system to let you know it was successful. Figure: Successful Install Message In order to use Certified Wireless USB Devices with your Wireless USB Host Adapter, you need to associate your Certified Wireless USB Devices with your Wireless USB Host Adapter.
SOFTWARE/DEVICE INSTALLATION Cable Association If your Certified Wireless USB Device does not support PIN association you will be have to perform a cable association. Please refer to your Certified Wireless USB Device manufacturer’s user guide for instructions on how to do a cable association for your Certified Wireless USB Device. After your Certified Wireless USB Device is successfully installed, your device icon will appear on the Display: All Devices page in the Wireless USB Manager.
USING THE WIRELESS USB MANAGER WIRELESS USB MANAGER The Wireless USB Manager is simple and easy to use interface to manage your Wireless USB devices and control your Wireless USB Host Adapter settings. The Wireless USB Manager can be accessed via Wireless USB Manager Icon in the Windows tray (Figure: Wireless USB Manager Icon). Figure: Wireless USB Manager Icon To launch the Wireless USB Manager, double click on the Wireless USB Manager icon.
USING THE WIRELESS USB MANAGER The VIEW menu will give the option of what type of devices you wish to display (All Devices, Connected Devices and Not Connected Devices). The OPTIONS menu will give the option to launch Host Settings window and turn the Wireless USB Host Adapter radio on or off. The HELP menu offers quick help on how to connect devices to your Wireless USB Host Adapter.
USING THE WIRELESS USB MANAGER To manage the Wireless USB Host Adapter settings, either select “Host Settings” in the “Option” menu of the Wireless USB Manager application or right click on the Wireless USB Manager icon in the Windows tray. GENERAL TAB (Figure: Host Settings – General) 1. Enable this Wireless USB radio: turn on or off the Wireless USB radio. 2. Host name: Change the name of your Wireless USB Host Adapter. 3. Cable association connection rules: Always, Never or Ask me each time.
USING THE WIRELESS USB MANAGER ADVANCED TAB (Figure: Host Settings – Advanced) 1. Channel selection: this function allows you to set manually a radio channel for the wireless communication (combination of Band Group and Channel). For optimal performance, the automatic setting is recommended.
TECHNICAL SPECIFICATIONS Operating System Support Microsoft XP 32-bit; Microsoft Vista 32-bit/64-bit PHY Data Rate 53.3Mbps, 80Mbps, 106.6Mbps, 160Mbps, 200Mbps, 320Mbps, 400Mbps, 480Mbps Operating Range Up to 30 feet (10 meters) Frequency 3.1GHz to 4.8GHz (WiMedia Band Group 1) Number of Channel 7 channels (3 FFI + 4 TFI) RF Modulation Type QPSK/DCM Interface USB 2.0 USB Specification Certified Wireless USB 1.0; USB 2.
CABLES TO GO™ WARRANTY STATEMENT At Cables To Go, we want you to be totally confident in your purchase. That is why we offer a one year warranty on this device. If you experience problems due to workmanship or material defect for the duration of this warranty, we will repair or replace this device. To request a Return Merchandise Authorization (RMA) number, contact customer service at 1-800-293-4970 or www.cablestogo.com. Cables To Go 3555 Kettering Blvd. Moraine, OH 45439 1-800-826-7904 www.cablestogo.
IMPORTANT SAFETY INFORMATION ! Do not plug the unit in any outlet that does not have enough current to allow the device to function. Refer to the specifications in this manual for power level of the unit. ! Liquid: If this unit or its corresponding power adapter has had liquid spilled on or in it, do not attempt to use the unit. Do not attempt to use this product in an outdoor environment as elements such as rain, snow, hail, etc. can damage the product.
APPENDIX ASSOCIATION WITH OTHER DEVICES ASSOCIATION CONCEPT In order to establish a secure wireless connection, both the Wireless USB Host Adapter and your Certified Wireless USB Device must exchange information about each other. This is done via cable or PIN association. ASSOCIATION PROCESS If you purchase additional Certified Wireless USB devices, you will have to associate them with your Wireless USB Host Adapter.
APPENDIX CABLE ASSOCIATION PROCEDURE Cable association steps: Examples/Figures shown used with the association of the TruLink Wireless VGA Device Adapter 1. Make sure that the Wireless USB Manager is running. Check your Windows tray for the Wireless USB Manager icon (Figure: Wireless USB Manager). 2. Make sure the WIRELESS/WIRED switch is in the WIRELESS position 3. Plug in the power supply for your Wireless USB device adapter (TruLink Wireless VGA Device Adapter). 4.
APPENDIX Associated Certified Wireless USB Devices will appear as icons in the Wireless USB Manager. When the Certified Wireless USB Devices are connected, the icons will appear in color (Figure: Wireless VGA Adapter and TruLink Hub Connected). Display: All Devices Figure: Wireless VGA Adapter and TruLink Hub Connected Note: You may rename or delete the Wireless USB Device Adapter by right-clicking the device icon in the Wireless USB Manager and select “rename” or “delete”.
APPENDIX PIN ASSOCIATION PROCEDURE PIN association steps: Examples/Figures shown used with the association of the TruLink Wireless VGA Device Adapter. 1. Make sure your Certified Wireless USB Device is powered on and your Wireless USB Host Adapter is connected to your computer. Click the “Discovery Mode” button (Figure: Discovery Mode Screen).
APPENDIX 2. The Wireless USB Host will search for any available Certified Wireless USB Device within its range. Note that this operation can take up to 20 seconds (Figure: Discovery Mode in Process). Figure: Discovery Mode in Process 3. Once the Wireless USB Host Adapter and the Certified Wireless USB device have exchanged security information, the following dialog will appear.
APPENDIX 4. Enter the PIN of the Wireless USB device (4-digit PIN) and click Accept Association. The Wireless USB device and Wireless USB Host Adapter are now associated and ready for operation. Stickers have been provided in case you would like to write down the 4-digit PIN of your Certified Wireless USB Devices. Sticker can be applied to your Certified Wireless USB Devices.
For more information on this product or to check for updated drivers, manuals or frequently asked questions please visit our website. www.cablestogo.com VER. 1.0.2.18.