TruLink™ KVM Extender Model: 39969 - VGA/USB over Cat5 Model: 39970 - VGA/ (PS/2) over Cat5 Operation Manual Ver. 1.
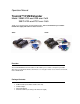
Operation Manual TruLink™ KVM Extender Model: 39969 VGA and USB over Cat5 39970 VGA and PS/2 over Cat5 Thank you for purchasing the TruLink KVM Extender. We recommend that you read this manual thoroughly and retain for future reference. 39969 39970 Function: The TruLink KVM Extender from Cables To Go allows you to control a computer up to 230ft. away from your keyboard, monitor, and mouse. Use it to give remote access from a server room, rack or KVM switch.
Table of Contents Function...…………………………………………………………………………...ii Package Contents……………………………………………………………….....ii Features……………………………………………………………………………..1 Connecting the KVM Extender...........................……….....…………………....1 Operating the KVM Extender............................………………………………....3 Specifications……………………………………………………………………......4 Warranty/Important Safety Information…………………………………………...
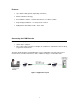
Features: • Up to 1600 x 1200 @ 75Hz (depending on distance) • Advanced CAT5 technology • Pure hardware solution – real time data transfer, no software conflicts • Plug-and-play installation – no extra protocols needed • Multi-platform Transmitter models - PS/2 / USB Connecting the KVM Extender Note: Before making any connections, please do the following • Switch off the computer • Place cables away from fluorescent lights, air conditioners, and machines that are likely to generate electrical n
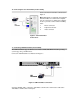
1a. Connecting the PS/2 Transmitter (model: 39970) Connect the PS/2 Transmitter as illustrated in Figure 2. Note: Although we recommend connecting the PS/2 Transmitter to a switched off computer, you can connect it to a switched on computer. To do so you must connect it in the following order: 1. 2. 3. Mouse connector Keyboard connector Video connector Figure 2. PS/2 Transmitter Connections 1c.
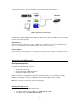
3. Connect the Receiver to a PS/2 KVM console as illustrated below in Figure 4. Figure 4. Receiver connections 4. Connect the supplied 5VDC Power adapter to the Receiver. The Transmitter receives its power from the connected computer. LED indicators Both the Transmitter and Receiver have 2 LEDs above the RJ45 port. The green LED indicates power is on. The flashing yellow LED indicates the system is connected.
• For AIX, press Shift, Tab, U, 3, Esc Display Data Channel (DDC) hotkey Display Data Channel is a VESA standard for communication between a monitor and a video adapter. To input the monitor’s DDC information into the Transmitter’s memory, press: Shift, Tab, D, Esc Update the DDC information if you replace the monitor. To do so, repeat the above hotkey sequence. Changing the Shift hotkey to Ctrl You can change the hotkey to Ctrl. Once you do so, replace all the instances of Shift appearing above to Ctrl.
Cables To Go™ Three Year Warranty At Cables To Go, we want you to be totally confident in your purchase. That is why we offer a three year warranty on this device. If you experience problems due to workmanship or material defect for the duration of this warranty, we will repair or replace this device. To request a Return Merchandise Authorization (RMA) number, contact customer service at 1-800-506-9606 or www.cablestogo.com.