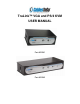
TruLink™ VGA and PS/2 KVM USER MANUAL Part #52041 Part #52042
Contents Introduction ............................................................................2 Overview ............................................................................2 Package Contents..............................................................3 Requirements.....................................................................4 Console .........................................................................4 Computers .....................................................................
Introduction Overview The TruLink™ VGA and PS/2 KVM delivers performance and value to your desktop! By controlling multiple computers from a single PS/2 keyboard, VGA monitor, and PS/2 mouse console, the TruLink VGA KVM eliminates the expense of having to purchase separate console components for each computer. The space those extra components would take up is also eliminated in addition to the inconvenience and wasted effort involved in constantly moving from one computer to another.
• • • • Hot pluggable – add or remove computers without powering down the switch Caps Lock, Num Lock, and Scroll Lock states are saved and restored when switching Keyboard and mouse emulation for error free computer booting All cables included so there is nothing more to buy! Package Contents The 52041/52042 package consists of: ¾ ¾ ¾ ¾ ¾ ¾ ¾ TruLink™ 2 or 4 Port VGA and PS/2 KVM User Manual (2)1.2m PS/2 KVM cable (2) 1.
Requirements Console • A VGA, SVGA, or Multisync monitor capable of the highest resolution that you will be using on any computer in the installation A PS/2 style keyboard A PS/2 style mouse • • Computers The following equipment must be installed on each computer that is to be connected to the system: • • • A VGA, SVGA or Multisync port. A PS/2 Style keyboard port. A PS/2 Style mouse port. Cables Only cable sets specifically designed to work with this switch may be used.
Safety Instructions Read all of these instructions. Save them for future reference. Follow all warnings and instructions marked on the device. • Do not place the device on any unstable surface (cart, stand, table, etc.). If the device falls, serious damage will result. • Do not use the device near water. • Do not place the device near, or over, radiators or heat registers. • The device cabinet is provided with slots and openings to allow for adequate ventilation.
• Position system cables and power cables carefully; Be sure that nothing rests on any cables. • When connecting or disconnecting power to hot pluggable power supplies, observe the following guidelines: • If the system has multiple sources of power, disconnect power from the system by unplugging all power cables from the power supplies. • Never push objects of any kind into or through cabinet slots. They may touch dangerous voltage points or short out parts resulting in a risk of fire or electrical shock.
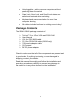
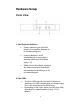
Hardware Setup Front View 1. Port Selection Switches • Press a switch to give the KVM focus to the computer attached to its corresponding port. • Pressing Buttons 1 and 2 simultaneously for more than 3 seconds starts Auto Scan Mode (see p. 13). • While in Auto Scan Mode, pressing any button exits Auto Scan Mode and switches the KVM focus to its corresponding port. 2. Port LEDs • • The Port LEDs are built into the Port Selection Switches.
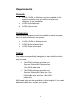
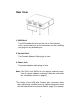
Rear View 2 1. KVM Ports* The KVM cables that connect the unit to the keyboard, video, and mouse ports on the computers you are installing can plug into any available port 2. Console Port* The Console Adapter Cable plugs in here. 3. Power Jack The power adapter cable plugs in here. Note: The 52041 and 52042 do not require external power. Use of a power adapter is optional. (See the note under the Installation section on page 9).
Installation 1. Important safety information regarding the placement of this device is provided on page 5. Please review it before proceeding. Make sure that power to all the devices you will be connecting has been turned off. You must unplug the power cords of any computers that have the Keyboard Power On function. 2. Refer to the installation diagrams on the next page (the numbers in the diagrams correspond to the steps indicated below) as you do the following: 1.
Note: The default setting is to link to the first computer you turn on.
Operation LED Display The information provided by the front panel LED activity is explained in the following table: Activity Explanation Off Port is not selected. On – Steady The computer connected to the LED's corresponding port is the one that has the KVM focus. On – Flashing The computer connected to the LED's corresponding port is the one that has the KVM focus and is being accessed in Auto Scan mode.
Hotkey Port Selection Hotkey port selection allows you to directly access a computer from the keyboard, instead of having to manually switch to it with the port selection switches. For both the 52041 and 52042 KVMs, hotkey operations begin by tapping the Scroll Lock key twice. Port Selection • For the two port 52041, tapping [Scroll Lock] [Scroll Lock] toggles the KVM focus between the two ports.
Auto Scan Mode In addition to manually invoking Auto Scan Mode (discussed on page 11), the 52042 also provides hotkey invocation. • To invoke Auto Scan Mode using hotkeys instead of manually, enter the following combination: [Scroll Lock] [Scroll Lock] [A][Enter] • While Auto Scan Mode is in effect, ordinary keyboard and mouse functions are suspended. You must exit Auto Scan Mode in order to regain normal control of their use. • To exit Auto Scan Mode, press [Esc] or [Spacebar].
Appendix Hotkey Summary Table The hotkey functions are summarized in the following table: Hotkey Action [Scroll Lock] [Scroll Lock] [↑] Brings the KVM focus from the port that currently has the focus to the next port on the installation: 1 to 2; 2 to 3; 3 to 4; 4 to 1. [Scroll Lock] [Scroll Lock] [↓] Brings the KVM focus from the port that currently has the focus to the previous port on the installation: 4 to 3; 3 to 2; 2 to 1; 1 to 4.
Specifications Function KVM Ports 52041 52042 2 4 Port Selection Connectors Push Button ; Hotkeys KVM 2 x SPHD-15 F(Yellow) Console LEDs Power Consumption 1 x SPHD-15 M(Yellow) 2 x Selected Port (Green) 4 x Selected Port (Green) 0.4W 0.
Troubleshooting Symptom 1 Keyboard and/or Mouse2 Not Responding Video Problems Possible Cause Action Loose cables. Check all cable connections to make sure they are completely seated in their sockets. Switch is in Auto Scan Mode. 1. Press a port selection switch to manually exit Auto Scan Mode. 2. Press [Esc] or [Spacebar] to hotkey exit Auto Scan Mode. Keyboard / Mouse needs to be reset. Unplug the keyboard / mouse from the Console Keyboard Port, then plug it back in. Mouse set to serial mode.
Limited Warranty IN NO EVENT SHALL THE DIRECT VENDOR'S LIABILITY EXCEED THE PRICE PAID FOR THE PRODUCT FROM DIRECT, INDIRECT, SPECIAL, INCIDENTAL, OR CONSEQUENTIAL DAMAGES RESULTING FROM THE USE OF THE PRODUCT, DISK, OR ITS DOCUMENTATION. The direct vendor makes no warranty or representation, expressed, implied, or statutory with respect to the contents or use of this documentation, and especially disclaims its quality, performance, merchantability, or fitness for any particular purpose.
FCC Information This is an FCC Class A product. In a domestic environment this product may cause radio interference in which case the user may be required to take adequate measures. This equipment has been tested and found to comply with the limits for a Class A digital device, pursuant to Part 15 of the FCC Rules. These limits are designed to provide reasonable protection against harmful interference when the equipment is operated in a commercial environment.
Notes 19
Notes 20