PRODUCT MARKING AND BARCODE IDENTIFICATION Barcode/Label printer Operating Instructions Edition 5/06
A2+/A4+/A6+/A8+ copyright by cab / 9008499 / Q25 / 1 Information on the scope of delivery, appearance, performance, dimensions and weight reflect our knowledge at the time of printing. We reserve the right to make modifications. All rights, including those regarding the translation, are reserved.
A2+/A4+/A6+/A8+ Table of contents 1 1.1 1.2 1.3 2 2.1 2.2 2.3 3 3.1 3.2 3.3 3.4 4 4.1 4.2 5 5.1 5.2 6 6.1 6.2 6.3 6.4 6.5 6.6 6.7 7 7.1 7.2 7.3 7.4 8 8.1 8.2 8.3 8.4 8.5 8.6 8.7 8.8 9 9.1 9.2 9.3 Edition 5/06 Notes on the documentation . . . . . . . . . . . . . . . . . . . . . . . . . . . . . . . . . . . . . . . . 5 Structure of the documentation and navigation . . . . . . . . . . . . . . . . . . . . . . . . . . . . . . . 5 Warnings, notes and other identifying markings . . . . . . . . . . . . . .
A2+/A4+/A6+/A8+ 10 EC Declaration of Conformity . . . . . . . . . . . . . . . . . . . . . . . . . . . . . . . . . . . . . . 37 Index . . . . . . . . . . . . . . . . . . . . . . . . . . . . . . . . . . . . . . . . . . . . . . . . . . . . . . . . . . .
A2+/A4+/A6+/A8+ Notes on the documentation 1 Notes on the documentation 1.1 Structure of the documentation and navigation The documentation for the A2+ A4+ A6+ A8+ barcode/label printers is comprised of the following parts: • Operating Instructions This is included in printed form in the scope of delivery and is directed toward persons who operate the label printer and perform basic maintenance and service work on the printer.
A2+/A4+/A6+/A8+ Notes on the documentation DANGER! Risk of death via electric shock! Before opening the housing cover, disconnect the device from the mains supply and wait a few minutes until the power supply unit has discharged. 1.2.2 Notes Important information is identified with an exclamation mark on the left-hand side of the page. Information is identified with an "i" on the left-hand side of the page. 1.2.
A2+/A4+/A6+/A8+ Safety and the environment 2 Safety and the environment Read these operating instructions carefully before using the label printer for the first time. The operating instructions describe all of the functions of the label printer during operation. The available functions depend on the version used for a specific job. A detailed product description with all the technical data can be found in the “Configuration Instructions for the A2+ A4+ A6+ A8+“, on the CD-ROM and at www.cabgmbh.com. 2.
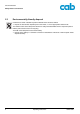
A2+/A4+/A6+/A8+ Safety and the environment 2.3 Environmentally-friendly disposal Used devices contain valuable recyclable materials which should be utilized. Dispose of used devices separately from other waste, i.e. via an appropriate collection site. The modular nature of the label printer allows it to easily be disassembled into its component parts so that the parts can be turned in for recycling. The PCB of the label printer has a lithium battery.
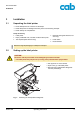
A2+/A4+/A6+/A8+ Installation 3 Installation 3.1 Unpacking the label printer Lift the label printer out of the box via the straps. Check label printer for damage which may have occurred during transport. Check delivery for completeness. Scope of delivery • Label printer • Dispense plate (peel-off device ver- • Empty cardboard core, mounted on ribbon take-up hub • Tear-off plate (basic devices only) sion only) • Power cable • Documentation Retain the original packaging for subsequent transport.
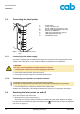
A2+/A4+/A6+/A8+ Installation 3.3 Connecting the label printer 1 2 3 4 5 6 7 8 1 2 3 Power switch Power connection jack Slot for Cardbus or a Type II PC card Slot for a CompactFlash memory card Ethernet 10/100 Base-T USB port for a keyboard or scanner USB high-speed slave port Serial RS 232 C port 4 5 6 7 8 Fig. 2: 3.3.1 Power and computer connections Connecting to the power supply The printer is equipped with a versatile power supply unit.
A2+/A4+/A6+/A8+ Operating panel 4 Operating panel The user can control the operation of the printer with the operating panel, for example: • pause, continue or cancel print jobs • set printing parameters, e.g.
A2+/A4+/A6+/A8+ Operating panel 4.2 Functions of the operating panel during printing 4.2.1 Symbol indicators The symbol indicators shown in the following table can appear on the status line of the screen, depending on the configuration of the printer. They inform you of the current status of the printer at a glance. For configuration of the status line, see the “Configuration Instructions“.
A2+/A4+/A6+/A8+ Operating panel 4.2.3 'Ready' mode The printer is ready and can receive data. The display shows the text Ready and the configured symbol indicators, such as the time .
A2+/A4+/A6+/A8+ Operating panel 4.2.6 'Fault - correctable' mode An error which can be remedied by the operator without canceling the print job has occurred. The print job can be continued once the error is remedied. The display shows the symbol , the error type and the number of labels still to be printed.
A2+/A4+/A6+/A8+ Device types 5 Device types 5.1 Standard device The standard device is used for printing labels or continuous media on rolls or fanfolded media. In Tear-Off mode, labels are removed by hand. The labels can be cut off automatically with the 'cutter' accessory. For details, see the Operating Instructions for the 'cutter' accessory. The labels can be wound up with the 'external rewinder' accessory. For details, see the Operating Instructions for the 'external rewinder' accessory.
A2+/A4+/A6+/A8+ Loading media 6 Loading media For adjustments and simple installation work, use the accompanying hexagonal wrench located in the bottom section of the print unit. See Fig. 5, Item 8. No other tools are required for the work described here. 6.1 Loading labels from a roll 6.1.1 Removing and installing the core adapter A core adapter is mounted for better guidance of the label roll on the roll retainer when using label rolls with a core diameter ≥ 75 mm (versions A6+ and A8+).
A2+/A4+/A6+/A8+ Loading media 6.1.2 Positioning the label roll on the roll retainer 1 2 10 9 3 4 8 Fig. 5: 7 6 5 Loading labels from a roll 1. Open cover (10). 2. Loosen knurled screw (1) and swivel guide (2) upward and push it all the way out. 3. Remove core adapter (4) for label rolls with a core diameter ≤ 75 mm (see ”6.1.1” on page 16). 4. Load label roll on the roll retainer in such a way that the labels can be inserted into the printhead in the right position.
A2+/A4+/A6+/A8+ Loading media 6.1.4 Setting the label sensor 1 2 3 Fig. 6: Setting the label sensor The label sensor (2) can be shifted perpendicular to the direction of paper flow for adaptation to the label medium. The sensor unit (1) of the label sensor is visible from the front through the print unit and is marked with a indentation in the label sensor retainer. Position label sensor with tab (3) in such a way that the sensor (1) can detect the label gap or a reflex or perforation mark.
A2+/A4+/A6+/A8+ Loading media 6.1.5 Winding up the label strip in Rewind mode 5 4 3 2 1 Fig. 7: Guiding the label strip in Rewind mode In Rewind mode, the labels are wound up internally after printing for later use. 1. Remove the locking system for Rewind mode if necessary (see ”6.7” on page 25) and install rewind guide plate (see ”6.6” on page 24). 2. Guide label strip around the rewind guide plate (4) to the internal rewinder (2). 3.
A2+/A4+/A6+/A8+ Loading media 6.1.6 Winding up the liner in Peel-Off mode 7 6 5 4 Fig. 8: 3 2 1 Guidance of the liner in Peel-Off mode In Peel-Off mode, the labels are removed after printing, and only the liner is wound up internally. 1. Lift the pinch roller (4) off the rewind assist roller (5). 2. Remove labels from the first 100 mm of the liner. 3. Guide liner to the rewinder (2) around the dispense plate (6) and the rewind assist roller (5). 4.
A2+/A4+/A6+/A8+ Loading media 6.1.7 Setting the head locking system The printhead is pushed on via two plungers. The location of the outer plunger must be set to the width of the label medium used so as to • achieve even print quality across the entire label width • prevent wrinkles in the feed path of the transfer ribbon • prevent premature wearing of the print roller and printhead. 1 2 3 Fig. 9: Setting the head locking system 1. Turn lever (3) clockwise to lock the printhead. 2.
A2+/A4+/A6+/A8+ Loading media 6.2 Removing the wound roll 7 6 5 4 3 2 1 Fig. 10: Removing the wound roll 1. Turn lever (7) counterclockwise to lift the printhead. 2. Cut label strip and wind it fully around the rewinder (2). 3. Hold rewinder (2) firmly and turn knob (3) clockwise. The rewinder spindle relaxes and the wound roll is released. 4. Remove wound roll from rewinder (2). 6.3 Loading fanfold labels 1 2 5 3 4 Fig. 11: Feed path of paper with fanfold labels 1.
A2+/A4+/A6+/A8+ Loading media 4. Guide label strip to print unit via the roll retainer (3). See Fig. 11. 5. Push guide (2) against the label strip, swivel it upward against the roll retainer and tighten knurled screw (1). 6. Insert label strip into printhead (see ”6.1.3” on page 17). 7. Set label sensor (see ”6.1.4” on page 18). 8. Set head locking system (see ”6.1.7” on page 21) 9. Turn lever (5) clockwise to lock the printhead. 6.
A2+/A4+/A6+/A8+ Loading media 6.5 Setting the feed path of the transfer ribbon Transfer ribbon wrinkling can lead to print image errors. Transfer ribbon deflection can be adjusted so as to prevent wrinkles. See also “Setting the head locking system” on page 21. The adjustment is best carried out during printing. 1. Read current setting on the scale (1) and record if necessary. 1 2. Turn screw (2) with hexagonal wrench and observe the behavior of the ribbon.
A2+/A4+/A6+/A8+ Loading media 6.7 Removing and installing the locking system Removing the locking system 1. Position printer at edge of table so that the oblong hole is accessible from below. 2. Screw out screws (1) (2) and remove them. 1 3. Remove the pinch roller (4) and bottom plate (3). Installing the locking system 1. Position printer at edge of table so that the oblong hole is accessible from below. 2.
A2+/A4+/A6+/A8+ Printing 7 Printing CAUTION! The printhead can be damaged if handled improperly! Do not touch the bottom of the printhead with your fingers or sharp objects. Ensure that the labels are clean. Ensure smooth label surfaces. Raw labels are like emery and reduce the service life of the printhead. Print at the lowest possible printhead temperature. 7.
A2+/A4+/A6+/A8+ Cleaning and basic maintenance 8 Cleaning and basic maintenance DANGER! Risk of death via electric shock! Disconnect the printer from the power supply before performing any maintenance work. 8.1 Maintenance plan Maintenance task When General cleaning (see ”8.3” on page 28) as necessary Clean print roller (see ”8.4” on page 28) each time the label roll is changed or when the print image and label transport are adversely affected. Clean printhead (see ”8.
A2+/A4+/A6+/A8+ Cleaning and basic maintenance 8.3 General cleaning CAUTION! Abrasive cleaning agents can damage the printer! Do not use abrasives or solvents to clean the outer surfaces or assemblies. Remove dust and paper fuzz in the printing area with a soft brush or vacuum cleaner. Clean outer surfaces with an all-purpose cleaner. 8.4 Cleaning the print roller 1. Turn lever (4, Fig. 12) counterclockwise to lift the printhead. 2. Remove labels and transfer ribbon from the printer. 3.
A2+/A4+/A6+/A8+ Cleaning and basic maintenance 1. Turn lever (1) counterclockwise to lift the printhead. 2. Remove labels and transfer ribbon from the printer. 3. Remove hexagonal wrench (5) from its retainer. 1 4. Press the latch (3) and slowly pull label sensor outward via the tab (4). Ensure that the label sensor cable is not tensioned by this. 2 3 5. Clean label sensor and sensor units (2) with brush or cotton swab soaked in pure alcohol. 6. Push label sensor back via tab (3) and set it (see ”6.1.
A2+/A4+/A6+/A8+ Cleaning and basic maintenance CAUTION! The printhead can be damaged by static electricity discharges and impacts! Set up printer on a grounded, conductive surface. Ground your body, e.g. by wearing a grounded wristband. Do not touch contacts on the plug connections (2, 3). Do not touch printing line (5) with hard objects or your hands. 8 9 10 2 4 1 7 4 6 11 6 5 3 Fig. 18: Removing and installing the printhead Removing the printhead 1.
A2+/A4+/A6+/A8+ Cleaning and basic maintenance 8.8 Replacing the print roller and rewind assist roller Removing the side plate 1. Turn lever (1) counterclockwise to lift the printhead. 2. Lift the pinch roller (5) off the rewind assist roller. 3. Remove labels and transfer ribbon from the printer. 4. Loosen screws (4) on plate (6) with hexagonal wrench by several turns and remove plate (6). 4 6 3a 5. Unscrew screws (3abc) of the side plate (2) with hexagonal wrench. 3b 2 6. Remove side plate (2).
A2+/A4+/A6+/A8+ Error treatment 9 Error treatment 9.1 Error types When an error occurs, the diagnostic system displays the error on the screen and switches the printer into one of the three possible error modes, depending on the error type: Symbol Navigator pad Error type pause flashes cancel illuminates Fault - correctable (see ”4.2.6” on page 14) cancel flashes Fault - irrecoverable (see ”4.2.7” on page 14) — System error (see ”4.2.8” on page 14) Tab.
A2+/A4+/A6+/A8+ Error treatment 9.2 Troubleshooting Problem Cause Solution Transfer ribbon wrinkles Transfer ribbon deflection not adjusted See “Setting the feed path of the transfer ribbon” on page 24. Head locking system not adjusted See “Setting the head locking system” on page 21. Transfer ribbon too wide Use only transfer ribbons which are just a bit wider than the label. Printhead dirty See “Cleaning the printhead” on page 28.
A2+/A4+/A6+/A8+ Error treatment 9.3 34 Error messages and recovery Error message Cause Error recovery ADC malfunction Hardware error Switch printer off and on again. If it occurs again → Service. Barcode error Invalid barcode contents, e.g. alphanumeric characters in numerical barcode Correct barcode contents. Barcode too big Barcode is too large for the allotted area of the label Shrink or shift barcode. Battery low Battery of the PC card is dead Replace battery in PC card.
A2+/A4+/A6+/A8+ Error treatment Error message Cause Error recovery No label found Several labels are missing from the label strip Press the pause button several times until the next label on the strip is detected by the printer. The label format specified in the software does not match the actual format used Cancel print job. Change label format in the software. Restart print job. A continuous medium is located in the printer, but the software is waiting for labels Cancel print job.
A2+/A4+/A6+/A8+ Error treatment Error message Cause Error recovery Protocol error Printer receives an unknown or incorrect command from the computer. Press the pause button to skip the command or Press the cancel button to cancel the print job. Read error Read error when accessing memory card Check data on memory card. Save data. Reformat card. Structural err. Error in directory of the memory card, non-secure data access Reformat memory card.
A2+/A4+/A6+/A8+ EC Declaration of Conformity 10 EC Declaration of Conformity *HVHOOVFKDIW IU &RPSXWHU und Automations%DXVWHLQH PE+ &R .* :LOKHOP 6FKLFNDUG 6WU ' .DUOVUXKH EU Conformity Declaration We declare herewith that as a result of the manner in which the machine designated below was designed, the type of construction and the machines which, as a result have been brought on to the general market comply with the relevant fundamental regulations of the EU Rules for Safety and Health.
A2+/A4+/A6+/A8+ Index Index C Cleaning . . . . . . . . . . . . . . . . . . . . . . . . . 27, 28 Label sensor . . . . . . . . . . . . . . . . . . . . . . 28 Print roller . . . . . . . . . . . . . . . . . . . . . . . . 28 Printhead . . . . . . . . . . . . . . . . . . . . . . . . 28 Cleaning agents . . . . . . . . . . . . . . . . . . . . . . 27 Cleaning the label sensor . . . . . . . . . . . . . . . 28 Computer connection . . . . . . . . . . . . . . . . . . 10 Connections . . . . . . . . . . . . . . . . . . .
A2+/A4+/A6+/A8+ Index Synchronization . . . . . . . . . . . . . . . . . . . . . . 26 System error . . . . . . . . . . . . . . . . . . . . . . . . 14 U T W Tear-Off mode . . . . . . . . . . . . . . . . . . . . . . . 26 Tools . . . . . . . . . . . . . . . . . . . . . . . . . . . 16, 27 Transportation safeguards . . . . . . . . . . . . . . . 9 Edition 5/06 Unpacking . . . . . . . . . . . . . . . . . . . . . . . . . . . 9 Winding up the label strip . . . . . . . . . . . . . . .
A2+/A4+/A6+/A8+ 40 Operating Instructions Edition 5/06