Configuration Manual Label Printer EOS
Configuration Manual for the following products Family Type EOS EOS1 2 EOS4 Edition: 06/2013 - Part No. 9009272 Copyright This documentation as well as translation hereof are property of cab Produkttechnik GmbH & Co. KG. The replication, conversion, duplication or divulgement of the whole manual or parts of it for other intentions than its original intended purpose demand the previous written authorisation by cab.
Table of Contents 1 Introduction............................................................................................................................................. 4 2 2.1 2.2 2.3 2.4 2.5 Connecting Label Printer to Computer................................................................................................. 5 Connecting Label Printer via Ethernet Interface.......................................................................................
1 Introduction Important information and instructions in this documentation are designated as follows: Danger! Draws your attention to an exceptionally grave, impending danger to your health or life. ! ! Warning! Indicates a hazardous situation that could lead to injuries or material damage. Attention! Draws attention to possible dangers, material damage or loss of quality. i Notice! Gives you tips. They make a working sequence easier or draw attention to important working processes.
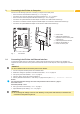
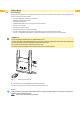
2 Connecting Label Printer to Computer 5 Choose from the following options for connecting a computer to the label printer: • Direct connection to the Ethernet interface (4) ”2.1” on page 5. • Connection via a computer network to the Ethernet interface (4) ”2.1” on page 5. • Direct connection to the full-speed USB slave interface (3) ”2.2” on page 6. • Connection via optional RS-232 interface adapter connected to an USB master interface (2).
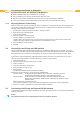
2 Connecting Label Printer to Computer 2.1.1 Print Services Raw-IP and LPR/LPD in MS Windows XX Install a standard TCP/IP port as additional port for printing. XX During installation of the new port choose between "Raw" and "LPR" XX Raw-IP: Enter the same port address in the printer which you have selected during installation. XX LPD: "lp" (line printer) must be entered as the name of the printer on the computer (queue name). 2.1.
2 Connecting Label Printer to Computer 2.4 Setting Up a WLAN Connection 7 To set up a WLAN connection a WLAN USB Adapter (Part No. 5906225 ) is required. 1. Connect the WLAN USB adapter to an USB master interface. 2. Start the Offline menu. 3. Select Setup > Interfaces > Network > WLAN. 4. Set DHCP or IP and Mask and if necessary Gateway for WLAN operation ”4.1.4” on page 16. 5. Select Access-Point. 6. Select Scan. The display shows the available Access-Points. 7.
3 3.1 Offline Menu 8 Structure of the Offline Menu The offline menu contains setting options on several levels for configuring the label printer. In addition, the offline menu features test functions for supporting the configuration or checking the function of the label printer. Using status functions, the set parameters can be displayed or printed.
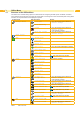
3 Offline Menu 3.2 Navigating in the Offline Menu XX Select 9 in the start display to start the Offline menu. Return from a submenu Status line Menu title Leaving the Offline menu Jump into a submenu Start of the Offline menu Fig. 2 Navigating in the Offline Menu Cancel setting Fig.
3 Offline Menu 3.3 Service Key A service key is required for accessing special service functions not accessible to the operator.
4 Configuration 4.1 11 Configuration via Control Panel A host of parameters for configuring the printer are found in the Setup menu of the offline menu. XX Configure the printer via the control panel during initial commissioning and when making major changes to the operational conditions. XX For changes required for processing different print jobs use software settings. i 4.1.1 Notice! The Setup menu can be protected from unauthorized access via a code number (PIN).
4 4.1.2 Configuration 12 Machine Parameters XX Start Offline menu. XX Select Setup > Machine param.. Parameter Printhead pos. X Printhead pos. Y Meaning Shifting of the entire print image perpendicular to the direction of paper flow. The absolute shifting is limited by the margins of the print zone. Those are determined by the width of the printing line on the printhead. The Printhead pos. X can also be set via software. The offset values from the Machine param.
4 Configuration Parameter Cleaning interval Debug mode Table 4 13 Meaning Setting of intervals for printhead cleaning in increments of 100 m media passage. If the set length of the medium (label strip, transfer ribbon) has passed the printhead and an error occurs in the flow of the medium (e.g. label end, transfer ribbon end), the Clean printhead! message appears in the display. The error message for the error which occurred is not displayed until the Clean printhead! message is acknowledged.
4 4.1.3 Configuration 14 Print Parameters XX Start Offline menu. XX Select Setup > Print param.. Parameter Meaning Default Heat level The Heat level setting only affects the test printouts and print jobs without heat level definition in the software. Otherwise the heat level defined in the software is used. 0 Print speed Basic print speed setting. 50 mm/s The print speed can be re-specified for each print job via software. The basic setting is not changed by this.
4 Configuration Parameter Error-Reprint Reprint option 15 Meaning Default On: With a correctable error and corresponding troubleshooting, the label being printed when the error occurs is repeated. On Off: Print job is continued with the next label. Printing of another label with the information of the previous print job by touching . This function can be executed until the print buffer is cleared with Protocol error On .
4 4.1.4 Configuration 16 Interfaces XX Start Offline menu. XX Select Setup > Interfaces. Parameter Meaning Network Configuration parameters of the network interfaces Additional configuration parameters for the network interfaces can be accessed via the web interface ”Setup Tab” on page 20.
4 Configuration 4.1.5 17 Status Line Select the parameters (widgets) to be displayed in Ready mode. XX Start Offline menu. XX Select Setup > Status line. XX Activate the desired widgets. i Notice! Because of the limited width of the display it is not possible to display all widgets simultaneously. Widget Clock Meaning Displays the current time. Default On Date sheet Displays the current calendar day.
4 Configuration 4.2 Configuration via the Web Interface The parameters accessible via the control panel can also be set via the web interface contained in the firmware of the printer. In addition, other parameters for the Ethernet and WLAN interfaces are accessible there. The printer web interface can be accessed with a browser (e.g. Microsoft Internet Explorer, Mozilla Firefox) with JavaScript activated via the Ethernet interface or the optional WLAN interface. 4.2.
4 Configuration Status tab Fig.
4 Configuration Setup tab On the "Setup" tab all the configuration parameters can be set which are also accessible via the control panel in the Setup menu. In addition, other parameters for the Ethernet interface or the WLAN interface can be set (see below). Fig. 6 "Setup" tab on the printer web interface To change a parameter: 1. Locate parameter in the tree structure. 2. Set the value of the parameter at the right end of the concerning line.
4 Configuration 21 The following parameters for the Ethernet or WLAN interface can only be accessed via the web interface: Parameter Meaning Default Hostname Printer name for identification in the network generated from OEM name and the last six numbers of the MAC address Raw-IP-Port Service for printing on the network ”2.1.1” on page 6. 9100 XX Select a predefined port address. LPD Activation of the network printing service LPD ”2.1.1” on page 6: Off XX Set parameter to "On".
4 Configuration Interpreters tab On the "Interpreters" tab the interfaces can individually be set to the interpretation of JScript or ZPL data. Fig. 7 "Interpreters" tab on the printer web interface To change a parameter: XX Click the desired selection button.
4 Configuration 23 Notifications tab The "Notifications" tab allows to send status and error messages automatically to a SNMP manager or via e-mail to selected addresses via the Ethernet interface or WLAN. Furthermore sounds can be assigned to the several messages. Fig. 8 "Notifications" tab on the printer web interface To change settings: 1. If necessary expand the tree structure. 2. Locate and click the message in the tree structure. 3. Select management station, e-mail address or sound. 4.
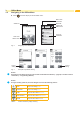
4 Configuration Devices tab The "Devices" tab provides an overview of the most important hardware components installed in the printer and the optional devices connected. Fig. 10 "Devices" tab on the web interface The contents of the display correspond with those of the Device list and are described in table 14 on page 30. Fonts tab The most important parameters of the fonts available in the printer are listed on the "Fonts" tab.
4 Configuration Help menu Independent from the chosen tab some help functions can be selected : Fig. 12 “Help” menu on the web interface Transmission of a printer status report to the service/support department. XX Send the status report after request of the service/support department only. Check of the firmware version and offer for update. Visit the cab-Website. Information about the version and the latest alterations of the web interface.
5 5.
5 Test Functions 5.3 27 Status Print The Status print function prints a test image containing information on the configuration and status of the printer. The printout occurs using the heat level and print speed specified in the Setup > Print param. menu. i Notice! The printout occurs without taking the label gaps into consideration. This is why endless media are most suitable for this purpose. XX Insert printable medium (labels, endless paper) which extends across the entire printing width.
5 Test Functions The Status print contains the following information : Symbol Information • Date and time of the printout • Device type • Version and creation date of the firmware • Serial number of the PCB CPU Current values of selected local settings "4.1.1" on page 11. Current values of selected machine parameters "4.1.2" on page 12. Current values of selected print parameters "4.1.3" on page 14. Current values of selected interface parameters "4.1.4" on page 16.
5 Test Functions 5.4 29 Font List The Font list function prints the most important parameters of the fonts available in the printer in tabular form. The table contains both the original fonts in the printer and other fonts loaded into the printer. The printout occurs using the heat level and print speed specified in the Setup > Print param. menu. i Notice! The printout occurs without taking the label gaps into consideration. This is why endless media are most suitable for this purpose.
5 Test Functions 5.5 30 Device List The Device list function prints out the most important information on hardware components of the printer and connected devices. The printout occurs using the heat level and print speed specified in the Setup > Print param. menu. i Notice! The printout occurs without taking the label gaps into consideration. This is why endless media are most suitable for this purpose.
5 Test Functions 5.6 31 WiFi Status Access only when a WLAN adapter is installed! The WiFi status function prints out a list the most important parameters of the accessible Wireless Access Points. The printout occurs using the heat level and print speed specified in the Setup > Print param. menu. i Notice! The printout occurs without taking the label gaps into consideration. This is why endless media are most suitable for this purpose.
5 Test Functions 5.7 32 ASCII Dump Mode ASCII Dump Mode offers the option of checking incoming control sequences at an interface. The commands are printed out as text. In addition, a corresponding error message is printed out immediately after an error occurs. The printout occurs using the heat level and print speed specified in the Setup > Print param. menu. i Notice! The printout occurs without taking the label gaps into consideration and without transfer ribbon checking.
5 Test Functions 5.8 33 Label Profile The Label profile function carries out a longer label advance. It saves the values measured by the label sensor here and then prints them out in a diagram. The printout is used to check label detection in conjunction with the optical properties of the label medium. The printout occurs using the heat level and print speed specified in the Setup > Print param. menu. i Notice! The printout of the diagram occurs without taking the label gaps into consideration.
5 Test Functions 5.9 Event Log Access only with service key inserted! The label printer saves the following events in the Event log: • Hardware fault • Printhead replacement • Firmware updates • Resetting of the service counters The printout occurs using the heat level and print speed specified in the Setup > Print param. menu. i Notice! The printout occurs without taking the label gaps into consideration. This is why endless media are most suitable for this purpose.
6 Service Functions 6.1 Firmware Update from Storage Device i Notice! Access only with storage device defined as Default storage ! The firmware file can be obtained from the internet. 1. Select Setup > Interfaces > Default Storage > USB Memory "4.1.4" on page 16. 2. Format USB flash drive in the printer "9.5.3" on page 44. The directories "fonts", "images", "labels" and "misc" are created on the storage device here. 3. Copy the firmware file to the "misc" directory of the storage device.
6 Service Functions 6.3 Save Settings Access only with storage device defined as Default storage ! With the Save settings function the printer configuration can be saved to a storage device (USB flash drive, Internal Flash File System). The configuration will be saved as XML file in the folder \MISC of the storage device. The current date is used as file name YYYYMMDD.XML (e.g. 20130104.XML for a file saved on 01-04-2013). 1.
6 Service Functions 6.5 37 Reset Service Counter Access only with service key inserted! The printer has total and service counters. • • Total counter: The total counter contains the values for the entire service life of the printer up to now. The values of the total counter are displayed in the Short status and in the Status print. Service counter: The service counter can be reset after more substantial maintenance or repair work with the service key inserted.
6 Service Functions 6.7 Save Log files Access only with storage device defined as Default storage ! The function Save log files saves a file with the name export.log on the storage device. That file contains the printer settings and the executed processes since the last startup. The function supports the firmware programmer in localizing errors. 1. If the log file should be saved to an USB flash drive, select USB Memory as Default Storage and insert USB flash drive into a USB master interface.
7 Pay-per-Print 39 PPP™ stands for „Pay-per-print“. cab established for distributors a secure internet portal, which can be used to transfer data for: • pay-per-print leasing/rental services • online-purchase of printer features (like database connector) • online-purchase of services (e.g. unlocking printer PIN) Typically for each transaction an encrypted data packet (voucher) of the .ppp type is created, which can be loaded to the printer with several methods ( "7.2" on page 39). 7.
8 FTP Printer Management 40 The File Transfer Protocol (FTP) allows to manage and transfer files on the network via the Ethernet or WLAN interface . An FTP program (FTP client) is required which supports the "binary" transfer mode to manage the printer. The printer functions as an FTP server. FTP printer management is comprised of four functions: 8.
8 FTP Printer Management 8.4 FTP Firmware Update FTP allows to carry out a firmware update: XX Establish a FTP connection with the user name ftpadmin and the defined password (Default: admin). An empty folder of the FTP server will be shown. XX Copy a valid firmware file (e.g. 413_3115.cfw) to the folder. The status of the saving procedure is shown by a progress indicator in the display. The printer resets automatically after the update is carried out successfully. XX Close the FTP connection.
9 Storage Devices Label descriptions, graphics, fonts, and database information can be saved for the long-term on memory media. i 9.1 Notice! XX Always create a backup copy of external devices in case of a malfunction. Suitable Storage Devices External Devices • USB flash drive at USB master interface. Internal Devices • 9.2 approx. 16 MByte flash memory inside the printer (Internal Flash File System IFFS) Installation For external storage devices only! 1.
9 Storage Devices 9.4 Writing 43 The storage devices can be written to in several ways. The most functionally secure way is writing to the storage device via a data interface. ! Attention! The device selected as Default storage is written to by default. To write to another device specify the path name of the device in the file name ( “Programming Manual“).
9 Storage Devices 9.5.2 44 Printing Directory The Print directory function creates a list of the files stored on the default storage device. 1. Insert printable medium (labels, endless paper) which extends across the entire printing width. 2. If the printout is to occur using thermal transfer printing, insert transfer ribbon with the maximum width. 3. Start Offline menu. 4. Select Storage device > Print directory. The directory of the storage device will be printed. Content of the printout: 9.5.
10 External Keyboard 45 An external keyboard or a compatible input device (e.g. barcode scanner) can be connected directly to the printer. Using an external keyboard facilitates the entry of variable data while processing print jobs and printing from storage devices. Input prompts and the data received from the keyboard are shown in the display. 10.1 Connecting External Keyboard Any HID compatible USB keyboard can be connected to the printer.
10 External Keyboard 10.3 46 Special Key Functions General : Executes the Load label storage device function. [F1] [F2] Prints an additional label from the last print job. Corresponds . [F3] Repeats the last print job with renewed polling of the variable data and polling of the label quantity. [Shift][F5] ASCII dump mode [Shift][F6] Status print [F7] Short status [F8] Functions in the same manner as [Enter] Switches to the offline menu.
11 cabFirmwareUpdater The cabFirmwareUpdater, which can be downloaded free of charge from the cab Website, offers an easy way to transfer firmware and PPP files from the computer to the printer. Fig. 20 cabFirmwareUpdater With the cabFirmwareUpdater it is possible to start a firmware update or to load a PPP voucher via USB, Ethernet or the optional serial interface : 1. Start the cabFirmwareUpdater. 2. Select the printer model "EOS1, EOS4". 3. Select the interface (Port). 4. Choose "Firmware" or "PPP".
12 Index 48 A FTP logon..........................................40 Protocol error.....................................15 Activating a PIN.................................17 FTP server.........................................40 R ASCII dump mode.........................8, 32 G Raw-IP.................................................6 B Gateway............................................16 Reprint option....................................15 Backfeed..........................................