
User Manual


4. Rotate the tool in the opposite direction another
few turns. Exception: For RG-7 and -11 cables, do
not rotate the tool in the opposite direction.
Because these cables have low braid coverage,
doing so tends to wind the braid around the
dielectric.
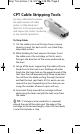
5. For small-diameter cables, you can pull the jacket
and dielectric off the cable with the tool. Leave the
tool closed around the cable, grasp the head of the
tool, and pull it off the end of the cable. This action
will remove the jacket, excess braid, and dielectric.
For large cables, squeeze the handles together to
open the tool, and remove it from the cable. Using
your fingers, pull the jacket and dielectric from the
cable.
NOTE: As you squeeze the handles, a patented
clean-out feature automatically removes debris from
between the cutting blades of the rear cartridge
whenever you open the tool.
TIP: If a longer center conductor is required,
extend the end of the cable past the edge of the
cartridge to the desired length, unless the tool body
is one that includes a stop.
TIP: If it is necessary to clean additional debris
from the sides of the cartridge, the center conductor
of the cable you just stripped may be used for this
purpose.
TIP: If you stripped flooded cable, remove the
flooding compound residue from the tool using a
cotton swab and Cable Clear® cleaning solution,
available from Cable Prep.
6
Drop Tool Instrux 1.16 2/2/16 2:48 PM Page 6