VPM2 Operation Manual Whip Mix Corporation • 361 Farmington Ave. • P.O. Box 17183 • Louisville, KY 40217-0183 USA 502-637-1451 • 800-626-5651 • Fax 502-634-4512 • www.whipmix.
VPM2 Operation Manual Features • Premixing – The Vacuum Mixer includes a unique mixing feature which eliminates the need for hand incorporation. It gives the user the option to premix up to 8 stages. Premixing is customizable with options to adjust the speed, time and direction in all 8 stages. • The Whip Mix VPM2 is designed for mixing all types of gypsum, plaster and investment material. • Powerful Vacuum – The twin-chamber vacuum pump quickly creates a high vacuum.
VPM2 Operation Manual Symbols Used = Safety Ground = Warning or Caution = Important Note Cautions CAUTION: Never place your finger inside the vacuum casting for any reason or injury could result. If the mixing paddle will not rotate, contact service provider. CAUTION: Always place one hand below the mixing bowl before pressing the Start/Stop button to release vacuum.
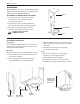
VPM2 Operation Manual Installation After unpacking the unit, check for possible damage during shipping or transport. Should there be any damage please notify your dealer or Whip Mix immediately. Mixer Installation on Column/Base Assembly 1. Connect the base to the stand column using the two flat washers, two lock washers and two 1/4" x 1/2" bolts provided. 2. Assemble the column to the mixer using the four 1/4" bolts, flat washers and lock washers provided. Stand Column 3.
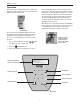
VPM2 Operation Manual Operation Once the Start/Stop button is pressed and the bowl is placed on the chuck, the program begins and the vacuum pump starts. The vacuum will rise until there is no need to hold the bowl in place. Mixing occurs automatically from this point until the end of the program. When a program finishes, the VPM2 will play the program finished tune repeatedly and the vacuum will continue to run until the Start/Stop button is pressed.
VPM2 Operation Manual To add a program to memory: 1. Press the 11. Pre Vacuum? No will be displayed. If Pre Vacuum is desired press an Arrow button and the Enter button then select the amount of time for Pre Vacuum. If no Pre Vacuum is desired press the Enter button again. Menu button. Step (Arrow) buttons to select 2. Use the Add/Delete Programs. 3. Press the Enter button. 12. Mix Speed? will be displayed. Use the number pad to enter the desired Mix Speed (100 rpm – 500 rpm).
VPM2 Operation Manual To delete a program from memory: 1. Press the 6. Use the Arrow keys or the alphanumeric keypad to select a program number to delete. Menu button. 2. Use the Step (Arrow) buttons to select Add/Delete Programs. 3. Press the 7. Press the 8. Use the Enter button. Step (Arrow) buttons to select Yes. 9. Press the Enter button. The deletion of the program should be complete. 4. Use the Step (Arrow) buttons to select Delete Program. 5. Press the Enter button. Enter button.
VPM2 Operation Manual Premix/Mixing Program 2 – Invest 60 Before using – rinse the bowl and lid assembly. Shake off the excess water. This is most important whenever water and material are measured. Proportion water and material (water first – material next) into bowl according to manufacturer’s specifications. Premix Premixing may eliminate the need to hand incorporate the mix before placing the bowl into the mixer.
VPM2 Operation Manual Troubleshooting Start Button Does Not Start the Program – Reset the unit (cycle the power off then back on) and try again. If the problem persists the button is probably bad and needs to be replaced. Call technical support. Paddle Jams – If the mixing paddle jams for any reason, switch the power to the mixer off, clear the jam, then turn the power back on to reset the fault condition, then test the mixer with an empty mixing bowl/lid to ensure normal operation.
VPM2 Operation Manual Warranty Replacement Parts The VPM2 is covered by a standard Whip Mix three year warranty. All parts and labor for three years on purchases made after 9/1/05. Part # Description 29347 Inlet Filter Service 29349 O-Ring 29350 5 Amp Fuse (Package of 2) 29351 Control Pad Overlay 29356 Logic Board 29358 Pump 29359 Inline Filter 29360 Motor Driver Board 08940 Drive Nut Assembly Contact Information: 800-626-5651 or 502-637-1451 361 Farmington Ave. P.O.