
Owner manual


Chapter 3: Installation
3-6 2M46-04R/2M46-04RDC User’s Guide
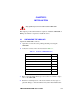
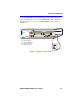
Figure 3-3 Installing the Rackmount Brackets
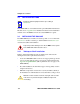
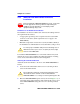
3. With the mounting brackets installed, position the 2M46-04R between
the vertical frame members of the 19-inch rack and fasten it securely
with mounting screws as shown in Figure 3-4.
Figure 3-4 Installing the 2M46-04R in a Rack
Bonding the Rackmount Brackets to the 2M46-04RDC
If the 2M46-04RDC is going to be mounted in a rack and needs to meet
the GR-1089-CORE Section 9 bonding requirements, use the following
instructions to install the 2M46-04RDC into a 19-inch rack.
1. Remove and discard the four cover screws (two from each side)
located along the front edges of each side of the 2M46-04RDC.
2. Remove the paint from around the area near the mounting holes on the
left and right side of the cover of the 2M46-04RDC. See Figure 3-5.
3. Apply a thin layer of anti-oxidant to the surface where the paint was
removed.
Screws (4)
Rackmount Brackets (2)
2314-04
2M46-04R
21
HSIM 1HSIM 2
RESET
COM
PWR
CPU
Screws (4)
19-Inch Rack
HSIM 1HSIM 2
RESET
COM
2314-03
2M46-04R
21
PWR
CPU