
Switch User's Guide


CSX400 Configuration with QuickSET
116 CSX400 and CSX400-DC User’s Guide
The following definitions explain the fields in the NAT Settings configuration window.
Ethernet address translation to Interface # — This pull-down menu is used to disable (OFF)
or enable NAT for an interface number. To enable NAT click the pull-down menu button and select
an interface number to run NAT through.
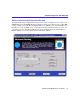
Add Proxy... — Allows you to add NAT proxy servers. Click the Add Proxy... button and an
Add NAT Proxy Server window (Figure 46) will appear. Enter an IP Address, and select a Port
number/type and a Protocol for each server entry.
Delete Proxy... — Allows you to delete NAT proxy servers.
Figure 46 Add NAT Proxy Server Window
Once your CSX400 Advanced Routing configuration is complete, be sure to save any changes you
make. Click on the N
ext>> button in the Advanced Routing configuration window to return to the
(IP/IPX) Routing configuration window.