
Switch User's Guide


Installation
CSX400 and CSX400-DC User’s Guide 59
Removing the CSX400-DC Cover
This section describes how to remove the CSX400-DC chassis cover. The cover must be removed
to install a WAN Port Interface Module (WPIM).
To remove the chassis cover, proceed as follows:
1. Disconnect the CSX400-DC from the network as follows:
a. Flip the DC switch located in the back of the CSX400-DC to the “off” position.
b. Disconnect all network cables attached to the CSX400-DC.
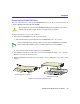
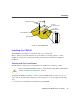
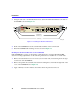
2. Use a Phillips screwdriver to remove the seven screws that attach the chassis cover to the unit.
Place the screws aside. (See Figure 12).
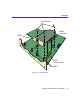
3. While facing the back of the unit, remove the chassis cover by pulling the cover toward you and
then up.
Figure 12 Removing the Chassis Cover
!
CAUTION
Do not remove the cover from the CSX400-DC while power is applied to the unit. Do
not power up the device again until the cover and screws are in place.
TIP
Before performing step b, mark any cables connected to the CSX400-DC according to
their associated port numbers. This is recommended for ease of reinstallation.
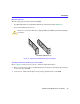
Removing the Cover Screws
Lifting the Cover Off
48/60Vdc ---
2.2A/1.5A
48/60Vdc ---
2.2A/1.5A