
Switch User's Guide


Installation
66 CSX400 and CSX400-DC User’s Guide
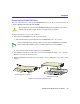
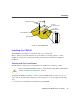
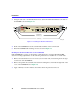
3. Using the four 6-32 x 1/4 inch flat-head screws, attach the rackmount brackets to the sides of
the CSX400 as shown in Figure 17.
Figure 17 Installing the Rackmount Brackets
4. Position the CSX400 between the vertical frame members of the 19-inch rack.
5. Fasten the CSX400 with mounting screws as shown in Figure 19.
Bonding the Rackmount Brackets to the CSX400-DC
If the CSX400-DC is going to be mounted in a rack and needs to meet the GR-1089-CORE
Section 9 bonding requirements, use the following instructions to install it into a 19-inch rack.
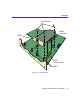
1. Remove and discard the four cover screws (two from each side) located along the front edges
of each side of the CSX400-DC.
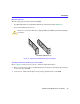
2. Remove the paint from around the area near the mounting holes on the left and right side of the
cover of the CSX400-DC. See Figure 18.
3. Apply a thin layer of anti-oxidant to the surface where the paint was removed.
Screws (4)
Rackmount
Brackets (2)
2012_09