
User`s guide


USER’S GUIDE
156 SFVRA Connection Manager
CONFIGURE THE CYBERSWITCH - USER GROUPING
Note: The Client interface should be activated before proceeding the following steps.
We will begin the network configuration by defining a CyberSWITCH - User Group. These groups
can be used to determine which Remote Access Switches the users are allowed to call. In this
example, we will configure a group based on the user’s protocol.
Note: CyberSWITCH - User Groupings can be used for all types of users, from all areas of your
network. In this example, we are grouping users by protocol for ease of understanding the
feature only.
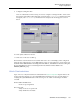
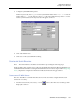
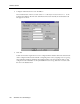
1. On the Tables menu, select CyberSWITCH - User Grouping. The Table Maintenance dialog
appears.
2. Click Add.
3. Enter the name
IP
, and click OK.
4. Click Close.
CONFIGURE THE CYBERSWITCH ON SFVRA-CONN
Note: The SFVRA-CONN software should have already been installed, and the Client interface
should be activated before proceeding the following steps.
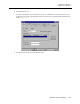
In our example, we only need to supply general properties of the CyberSWITCH in order for
SFVRA-CONN to be able to communicate with it. SFVRA-CONN requires a unique name for each
CyberSWITCH. It also requires the IP address of the LAN port through which a TCP connection is
established to send and receive information. We will also assign the CyberSWITCH to the group
that we previously defined. Lastly, in order for the SFVRA-CONN to allow the CyberSWITCH to
take incoming calls from users, we must define the number of channels it has available. The
Network Topology diagram states that this CyberSWITCH has a PRI line, which indicates that it
has 23 channels available for users. Refer to Configuring Remote Access Switches for more
information.
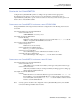
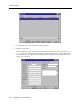
1. On the Functions menu, select CyberSWITCH, or click on the toolbar. The CyberSWITCH
List dialog appears.
2. Click Add. The Remote Access Switches dialog appears.