
Setup guide


MMAC-M8FNB SETUP
Page 3-2
3.2 SETTING UP THE MMAC-M8FNB
The following sections list the steps necessary to set up your
MMAC-M8FNB, including installing the MMAC-M8FNB in the
desired location, inserting the fan tray, inserting the power supply
module(s), and installing the security bars.
3.2.1 Rack Mounting the MMAC-M8FNB Chassis
To mount the MMAC-M8FNB in a standard 19" equipment rack:
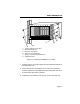
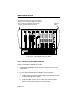
1. Using a Phillips head screwdriver, remove the eight screws (item 1,
Figure 3-1) – four on each side of the MMAC-M8FNB – which are
closest to the front of the chassis, and set them aside.
2. The rack mount brackets (item 2) provided have two sets of holes:
use the front holes (item 3) to mount the chassis flush with the
equipment rack; use the rear holes (item 4) to mount the chassis
so that it is recessed 3" from the front of the rack. Align the
appropriate four holes on one rack mount bracket with the four
holes from which you removed the screws.
3. Insert the screws through the holes on the mounting bracket and
into the screw holes on the MMAC-M8FNB.
4. Tighten the screws until the mounting bracket is securely attached
to the unit.
5. Repeat steps 2-4 for the second rack mount bracket. Be sure to use
the same set of holes on the second rack mount bracket (front for
flush mount, rear for recessed mount) that you used on the first
bracket.
6. Slide the unit into the rack, being sure to leave sufficient room to
install the cable tie tray, if desired.