
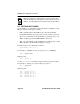
User guide


Trunking
Fast Network 100 User Guide Page 3-7
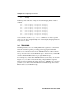
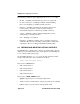
Figure 3-1 Trunk Groups
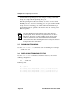
To enable trunking for the example shown above, you would:
1. Connect the desired ports of the FN100 switches together using
crossover cables.
If Switch A is handling only a small number of users, the A to B Trunk
Group could have just two ports per FN100. If Switches B and C are
expected to interconnect many users, you could use up to eight ports
in the B to C Trunk Group.
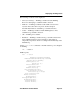
2. Using the
trunk <PORTS> command, turn on trunking for the connected
ports on each FN100.
For FN100 A, at the LCM prompt:
a. Type
trunk 1,2 on
For FN100 B, at the LCM prompt:
b. Type
trunk 1-8,9-10 on
For FN100 C, at the LCM prompt:
c. Type
trunk 1-8 on
Each FN100 determines which ports are part of which Trunk Group.
After Trunk Group configuration, the FN100 switches complete the
Trunk Group #1
FN100 B
FN100 A
Trunk Group #2
100 Mbps
100 Mbps
100 Mbps
100 Mbps
100 Mbps
100 Mbps
FN100 C