
USER'S GUIDE HSIM-W6


Chapter 5: Installation
HSIM-W6 User’s Guide 57
2. Disconnect all network cables from the chassis. Note the ports to which these cables attach.
3. Attach the antistatic wrist strap.
4. Remove the chassis cover (refer to your specific chassis documentation for instructions on
removing the chassis cover).
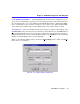
5. Remove and save the two faceplate mounting screws securing the HSIM coverplate and remove
the coverplate. See Figure 14.
6. Remove and save the two standoff screws. See Figure 14.
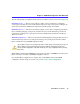
7. Place the HSIM behind the chassis faceplate. See Figure 15.
8. Ensure that the standoffs on the chassis align with the standoff screw holes on the HSIM to
prevent bending the pins and insert the connector pins of the HSIM into the HSIM connector
on the chassis motherboard.
9. Press down firmly on the back of the HSIM until the pins slide all the way into the connector
holes.
10. Secure the HSIM to the faceplate using the screws saved in step 5.
11. Secure the HSIM to the standoffs using the screws saved in step 6.
12. Reattach the chassis cover to the chassis and reconnect the power cord.
13. Reconnect the chassis to your network.
Ensure that you remove the power cord and ONLY the screws required to remove the
chassis cover. Failure to comply could result in an electric shock hazard.
Ensure that the chassis cover is in place before reconnecting the power cord.
NOTE
Proceed with step 13 ONLY after the HSIM-W6 is configured with
QuickSET
(refer to
Chapter 6).