
Specifications

SSR 8000/8600 Getting Started Guide 67
Chapter 2: Hardware Installation
3. Lock down the left and right metal tabs to secure the switching fabric module to the
chassis.
4. Use the #2 Phillips-head screwdriver to tighten the captive screws on each side of the
switching fabric to secure the switching fabric to the chassis.
Installing the Line Cards
You can install line cards in slots 1 – 7 (or 1 – 15 on the SSR 8600). If you also plan to install
a redundant Control Module, you can install line cards in slots 2 – 7 (2– 15 on the SSR
8600). You will need a #2 Phillips-head screwdriver to perform this procedure.
Warning
: The SSR supports hot swapping. This means you can remove and insert line
cards while the SSR is operating. However, you should not insert tools or body parts
inside the chassis while it is powered on. Doing so can cause electrical shock or equipment
damage.
For more information on hot swapping, see “Hot Swapping Line Cards and Control
Modules” in the SmartSwitch Router User Reference Manual.
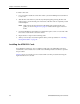
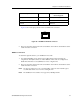
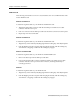
Figure 37 shows an example of how to install a line card. The procedure following the
figure describes how to do this.
Figure 37. Installing a line card
SSR-8
87654321
10/100BASE-TXSSR-HTX12-08