
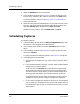
User`s guide


Scheduling a Task — Procedure Details
Scheduling Tasks
8-10
Enterprise Configuration Manager
User’s Guide
If you have questions, see Scheduling a Task — Procedure Details,
following, beginning with Step 4.
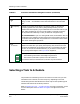
6. Check the newly displayed scheduled entry. If you made a mistake, select
the entry, click on the appropriate schedule and frequency buttons, and
then select Modify. When satisfied, click on Save and Close.
To delete the entry, select it, click on Delete, Save, and Close.
Scheduling a Task — Procedure Details
To schedule an ECM task for automatic operation at the time specified:
1. Select the task. See Scheduling Loads and/or Verifications on Page 8-7 or
Scheduling Captures on Page 8-8 if you have any questions.
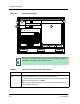
2. In the Scheduler dialog box, click on the task button (at the top left of the
box) to select the task — either Capture or Load and Verify. A black box
surrounds the button when it is selected.
When you select a task, the system displays a message box asking you to
confirm your choice. Load also asks you to specify various load options.
3. Click on Yes in the message box.
• If you are confirming a load or a verification, ECM returns you to the
Scheduler.
• If you are confirming a capture, a Capture Configuration dialog box
appears in which you specify a template and a name for the
configuration. See Step 4 in Scheduling Captures, starting on
Page 8-8, for more detailed instructions on this step.
4. Select one of the Frequency options — Hourly, Daily, Once, Weekly,
Monthly.
When you select a Frequency option, the Frequency section displays
additional options. See Figure 8-3 on Page 8-11. Since you can schedule
tasks for only a one-year period beginning with the current date, dates
before and after this period are grayed-out.
5. Click on the appropriate buttons in the Frequency section to specify the
date(s) and time(s) of the load, capture, or verification. Table 8-2 on
Page 8-12 explains the functions of the various controls.
The start time in the Once, Daily, Weekly, and Monthly options can range
from 00:00 (midnight) to 23:59 (11:59 PM). Click on the increment and
decrement buttons to specify the time.