
User`s guide


Editing a Schedule
Scheduling Tasks
8-12
Enterprise Configuration Manager
User’s Guide
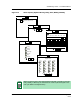
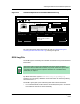
6. When you have selected the desired scheduling options, click on the Add
button.
ECM inserts the scheduling information in the Scheduled Entries field.
7. Repeat steps 1-5 for each new entry until you schedule all operations.
The Scheduled Entries field displays every entry that you schedule.
8. When you are finished, click on the Save button to send the entry or
entries to the scheduled queue.
ECM will then perform the operations automatically at the specified
time(s).
9. Press Close to close the Scheduler dialog box.
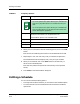
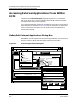
Editing a Schedule
You can use the Scheduler editing options:
• To change entries before and after you save them to the scheduled queue.
• To remove entries from the Scheduled Entries field and the scheduled
queue itself.
Table 8-2. Frequency Options
Option Description
Once Specifies the month, day, and start-time of a single operation:
• On a unix system, this option allows you to schedule the
task on any day between the current date and one year
later.
• On an NT system, this option allows you to schedule the
task only between the current date and one month later.
Other dates appear grayed-out.
Hourly Specifies the minute at which the hourly task will be
performed. The number can range from 00 to 59.
This Scheduler option is not available on NT.
Daily Specifies the time (minute and seconds) of the daily task.
Weekly Specifies the day of the week and the time.
Monthly Specifies the day of the month and the time.
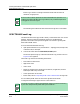
NOTE