
User manual

10
6.4
6.5
Using the
Bayonet
Mount
Frequency
Selector
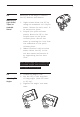
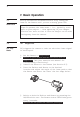
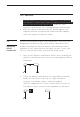
6.4.1 Installing the Hood
1. AttachtheHoodusingits
bayonet-style mount to the
S e n s o r.
2. Align the white dots on the
S e n s o r a n d H o o d. W h e n t h e y a r e
inplace,turntheHood
clockwise to lock it.
3. TurntheHoodcounter-
clockwise to detach it.
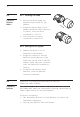
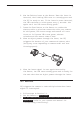
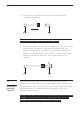
6.4.2 Storing the LV5 system
1. RemovetheHoodifitis
mounted on the Sensor.
2. Align the centre of the LV5
Emitter On/Off Switch to the
white dot on the rim of the LV5
Sensor. When they are in place,
turn the Emitter clockwise to
lock it.
3. To detach the Sensor from
Emitter, turn the Emitter
counter-clockwise.
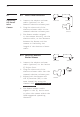
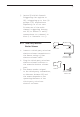
There are 2 frequencies available on the LV5:
500 H z a n d 1 K H z (1000 H z).
ALWAYSchoose1KHzundernormalshootingcircumstances.
Us e 5 0 0 H z O N L Y w h e n t h e l a s e r b e a mi s b ei n g i n t e r fe r e d b y
other light source in the environment.
To select frequency:
1. Use Frequency Selector on the Emitter to select the
desirable frequency.
2. Pair up the Emitter with the Sensor.