User Manual Wireless Flash RF60
Table of Contents 1. Getting to Know your RF60 03 2. Caution and Warnings 04 3. Major Specifications 05 4. Package Contents 06 5. Nomenclature 07 6. LCD Panel 08 7. Getting Started 08 8. On-camera Operation: 18 Local Mode 9. Wireless Flash: 20 Master and Slave Modes 10. Group Aliases 25 11. Advanced Operation 27 12. Personalizing the RF60 39 13.
1. Getting to Know your RF60 Thank you for purchasing the Cactus Wireless Flash RF60. We know that you will enjoy the benefits of your new wireless portable flash. The RF60 is unique among other flashes available on the market. With a built-in transmitter and receiver, it not only receives wireless signals, but it also functions as a commander to control other RF60s.
2. Caution and Warnings Before using the product, read the following instructions to ensure correct and safe use and to help prevent damage of the Cactus RF60. 1. Turn OFF all your equipment (Cactus units, cameras, etc.) before changing batteries or making a connection. 2. Remove batteries and switch off the flash when it is not in use. 3. Use only the batteries specified in this instruction manual. 4. Do not permanently store the product in a high temperature environment (i.e.
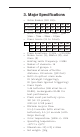
3. Major Specifications –– Guide Number (ISO 100): Zoom (mm) 24 GN (meter) 33 28 35 50 70 80 34 38 45 51 54 56 108 112 124 147 168 177 183 GN (feet) 105 –– Motor zooms: 24mm – 28mm – 35mm – 50mm – 70mm – 80mm – 105mm –– Power levels (22 in total): 1/1 1/2 1/4 1/8 1/2+0.3 1/4+0.3 1/8+0.3 1/16+0.3 1/32+0.3 1/64+0.3 1/128+0.3 1/16 1/32 1/64 1/128 1/2+0.7 1/4+0.7 1/8+0.7 1/16+0.7 1/32+0.7 1/64+0.7 1/128+0.
4.
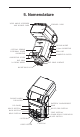
5. Nomenclature WIDE ANGLE DIFFUSER AND BOUNCE CARD FRESNEL LENS TRIPOD MOUNT 3.
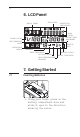
6. LCD Panel GROUP PANEL TEXT AREA ZOOM LEVEL POWER LEVEL INCREMENT POWER LEVEL HSS SYMPATHY MODE OPERATING MODES SELECTION INDICATORS STATUS BAR CHANNEL BEEP INDICATOR OPTICAL SLAVE HIGH TEMPERATURE WARNING BATTERY LEVEL DELAY INDICATOR 7. Getting Started 7.1 Inserting Batteries 1. Using your thumb, press on the battery compartment door and slide it open in the direction shown by the arrow.
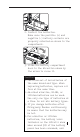
2. Install the batteries. Make sure the positive (+) and negative (-) battery contacts are properly oriented as shown in the compartment. 3. Slide the battery compartment door in the direction shown by the arrow to close it. Caution: 1. Use a new set of AA batteries of the same brand and type. When replacing batteries, replace all four at the same time. 2. AA-sized alkaline, Ni-MH, or lithium batteries can be used. Use only one type of batteries at a time. Do not mix battery types. 3.
the indicator will blink when the flash does not have enough power to fire. Replace batteries immediately when you see the blinking signal. The indicator is not applicable to Ni-MH battery. 5. When the flash is not in use, remove the batteries to prevent possible damage from battery corrosion. 7.2 Attaching to and detaching the flash from the camera 1. To attach the flash, slide the flash’s hot shoe mounting foot all the way into the camera’s hot shoe. 2.
3. To detach the flash, rotate the locking wheel on the mounting foot to the right until it is loosened. 7.3 Turning the Flash on 1. Switch the On/Off Switch to ON. The flash starts charging. 2. Check that the flash is ready. - The flash-ready indicator blinks in red, indicating that the flash is ready for quick flash (see Section 12.3).
- Once fully charged, the flashready indicator stays red and the flash is ready to give full power output. - Press the button to fire a test flash. Caution: 1. When the flash is switched ON but not used, after a certain period of time, the flash’s power turns off automatically. However, the flash still consumes power and batteries discharge over a long period of time, which may damage the battery contacts of the flash. Therefore, shut off the flash power if the flash is not in use. 2.
behind the subject for a more natural-looking shot. This is called a bounce flash. Tip: When using bounce flash, try to avoid hitting the subject with direct flash light. Make sure the flash head is sufficiently angled away from the subject. The flash head of the RF60 can be tilted up to a vertical angle of 90˚, with click stops at 30˚, 60˚, and 75˚. Horizontally, it can be rotated up to 180˚ to the right and 90˚ to the left, with click stops at 30˚, 60˚, 90˚, 120˚, 150˚ (right) and 30˚, 60˚ (left).
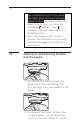
7.5 Bounce Card and Wide Angle Diffuser There is a bounce card and wide angle diffuser set built in the RF60. The bounce card and wide angle diffuser can be used separately or at the same time. Tip: The bounce card is useful in bounce flash applications to direct some of the light toward the subject in order to create catch lights and/or soften strong shadows from the bounced light. Using the Bounce Card 1. Point the flash head upward by 90°. 2. Pull out the wide angle diffuser.
Using the Wide Angle Diffuser 1. Pull out the wide angle diffuser and place it over the flash head as shown. The bounce card will come out at the same time. 2. Push the bounce card back in. The flash will illuminate at 18mm coverage. 7.6 Choosing the Operating Mode There are three operating modes in the RF60, namely Local, Master, and Slave. Upon switching on the RF60, press the button to choose the appropriate mode.
7.7 Setting Channel When the RF60 units are in the Master or Slave mode, they need to communicate in the same RF wireless channel with each other. To set the channel, press . Use the or button to select the RF channel. Press to go back to the main screen. The selected channel will be shown on the LCD panel. 7.8 Navigating the Menu There are a number of configurable menu options on the RF60. To change a menu option: 1. Press the button to access the first menu item. 2.
4. Press the button to leave and go back to the main screen, or press the button to change the menu to the next item in the sequence.
8. On-camera Operation: Local Mode Set up the RF60 in Local mode when you work with one flash on the camera’s hot shoe. In the main screen, the power level is shown on the left while the zoom level is shown on the right. The selection indicator ► will be shown at either the power level or zoom level. Press the button to switch the selection indicator in order to adjust a setting of an item. 8.
The power levels available for adjustment are: 1/1 8.2 1/2 1/4 1/8 1/2+0.3 1/4+0.3 1/8+0.3 1/16+0.3 1/32+0.3 1/64+0.3 1/128+0.3 1/16 1/32 1/64 1/128 1/2+0.7 1/4+0.7 1/8+0.7 1/16+0.7 1/32+0.7 1/64+0.7 1/128+0.7 Adjusting the Zoom Level To adjust the zoom level, press until the selection indicator ► is pointing to the zoom value (i.e., the right figure in the center row). Press to increase or to decrease the zoom level.
9. Wireless Flash: Master and Slave Modes With a built-in Radio Frequency (RF) module, the RF60 has the ability to communicate with other RF60 units wirelessly. To control and fire the RF60 wirelessly, set up one RF60 in Master mode and the other RF60 units in Slave mode. 9.1 Setting up the RF60 Slave 1. Make sure that the RF60 units that you want to control through the Master flash are set to mode (see Section 7.6). 2. Set the units to the same RF channel (see Section 7.7). 3.
9.2 Commanding with the RF60 Master 1. Set the on-camera RF60 to mode by pressing (see Section 7.6). 2. Set the RF60 Master to the same channel as the RF60 Slave units (see Section 7.7). 3. Check the group statuses on the group panel. Only activated group(s) will be shown as A, B, C, or D boxes. Changing parameters of the Master flash 4. On the RF60 Master, you can change the power level and zoom level of the Master flash itself, and the RF60 Slave flashes in groups A, B, C, and D. 5.
Changing parameters of a particular Slave group 6. To select a particular group for remote control, press and the group selection indicator will go to group A. 7. Press again to select the next group, i.e., group B. Each press of the Group button will select the next group in the following sequence: Master A B C D 8. Adjust the power level of the Master flash or of a particular group using the or button. Press to adjust the zoom level. You can also adjust the zoom level with the or button.
Changing parameters of all active groups 9. You may also change settings for all active groups at the same time. To select all groups, press and hold the button. 10. All selection indicators of the activated groups will be on and the text area will show . The first activated group in the sequence of Master-A-B-C-D will be chosen as the reference group. 11. Adjust the power and zoom levels as you would for a single group.
Turning on and off a Slave group 13. If you wish to stop firing a particular group, turn the group off by selecting the group (see steps 2 and 3) and press and hold the button. The screen will show in the center row. Note: The RF60 Master can also be turned off by pressing and holding the button in the Master group. Once turned off, the RF60 Master will not fire, but it will still command the RF60 Slaves, changing their settings and firing them accordingly. 14.
10. Group Aliases The RF60 comes with a list of pre-set group aliases to choose from for the particular slave groups according to the purpose of each. The chosen group alias will be shown in the text area next to the group panel. The group alias will display whenever the group is selected. The group aliases available for selection are: KEY – FILL – SPOT – RIM – HAIR – LEFT – RIGHT – BACK – FRONT 1.
3. Press or to confirm the alias and exit. 4. Repeat steps 1-3 to set aliases in all the Cactus RF60 units. To prevent confusion, make sure that you have set the same alias for the same group in all RF60 units. 5. The alias of each group will appear in Slave mode or Master mode whenever the group is selected.
11. Advanced Operation 11.1 Multi Flash In Multi mode, a rapid series of flashes is fired. It can be used to capture multiple images of a moving subject in a single frame. In • • • • Multi mode, you can change the: Number of flashes in a series Flash frequency per second in Hz Power level Zoom level The number of flashes represents the number of flashes firing in a series caused by a single trigger event. The flash frequency (Hz) represents the number of times the flash fires per second.
For example, if you wish to fire a series of flashes that lasts for 0.5 second at a frequency of 10 times per second (i.e., 10Hz), the number of flashes would be 5. Similarly if you wish to fire 10 flashes at a frequency of 100Hz, the flash series would last for 0.1 second. The flash series duration is usually equal to the shutter speed. However, it may be necessary to use a longer shutter speed that exceeds the flash series duration in order to expose for ambient light.
Hz 10 11 12-14 1/4 2 2 2 2 2 2 1/8 4 4 4 4 4 4 Power 15-19 20-50 60-199 1/16 8 8 8 8 8 8 1/32 20 20 20 18 16 12 1/64 50 40 40 35 30 20 1/128 70 70 60 50 40 40 Notes: 1. Multi flash is most effective with a highly reflective subject against a dark background. 2. Multi flash is not supported at power level higher than 1/4. 3. The Multi flash may be useful when combined with a camera set to bulb mode. 11.1.
3. Press to increase or to decrease the number of flashes. 4. Press until the selection indicator ► points to the frequency of flashes(Hz), i.e., the value after the hyphen. 5. Press to increase or to decrease the flash frequency per second. 6. To adjust the power level, press until the selection indicator ► points to the power level (see Section 8.1). 7. To adjust the zoom level, press until the selection indicator ► points to the zoom level (see Section 8.2). 8.
11.1.2 Multi Flash in Master and Slave Modes An RF60 in Master mode will cause a Slave RF60 that uses the same RF channel to synchronize to Multi mode settings. 1. To enter Multi mode on the RF60 Master, press until you see displayed as the group name. 2. Press the button once. The LCD of the RF60 Master and Slave units will show and . Both Master and Slave units are now in Multi Flash mode. 3. On the RF60 Master, follow the steps in 11.1.
2. Since Multi mode flashes are not supported in power levels higher than 1/4, any Slave RF60 set at power levels higher than 1/4 will only flash once in Multi mode. 3. Multi mode and HSS Sympathy mode (see Section 11.2) are mutually exclusive options. Pressing the button changes the flash modes in the following sequence: Normal Flash Multi Flash HSS Sympathy Flash 4. On the RF60 Master, Multi mode flashes can only be configured in the Master group.
to achieve shallower depth of field while maintaining correct exposure. Characteristics of HSS Sympathy Flash Compared with normal single-burst flash, the HSS sympathy flash provides continuous and constant illumination for the full duration between the first curtain opening and second curtain closing. The contribution of HSS sympathy flash to the exposure of the image is therefore different than that of a normal flash: 1.
2. The continuous light output in HSS sympathy mode does not freeze a moving object as a normal flash would do. Instead, an HSS sympathy flash will cause motion blur, much like a continuous light source would. In order to freeze motion using the HSS sympathy mode, you need to use high shutter speeds. 3. Increasing the shutter speed in HSS sympathy mode implies that the contribution of the flash decreases accordingly.
turn to HSS sympathy mode automatically. 3. Position the RF60 Master with its optical sensor facing the TTL flash head. 4. Take a test shot by pressing the camera’s shutter release button. 5. If the frame is not evenly illuminated from top to bottom, set the delay timer (see Section 11.4) of the RF60 Master to 10ms and then 15ms, 20ms, etc., until the flash fully fills up the frame. The optimum delay time that works with a high shutter speed should be within the range of 10ms to 100ms.
Camera brand Suggested delay time Canon 52ms-64ms Nikon 55ms-65ms Sony 90ms-100ms Olympus/Panasonic 65ms-75ms Pentax 75ms-82ms •• F-number: The higher the f-number, the longer the delay time within the range of the particular camera system. •• Dark Band Position: When you see a dark band at the top of the image, increase the delay time. When the dark band appears at the bottom, decrease the delay time. 11.
1. To turn on the optical trigger, press then press the button until the text area shows (short form for optical slave). Use the and buttons to select S1 (FIRST) or S2 (MAIN) in the selection area. Press or to confirm. 2. The optical slave indicator will show in the status bar of the LCD screen whenever any one of the optical trigger modes has been turned on. 3. To turn off the optical trigger, press the button and then the buttons until the text area shows .
1. To set the delay timer, press then press the button until is displayed and the selection indicator ► points at the value in ms. 2. Use the or button to set the delay timer in milliseconds (ms), which is equal to 1/1000 second. You may set a delay time from 1ms to 999ms, i.e., close to 1 second. 3. Pressing and holding the or button will automatically speed up the key effect and make faster changes. Pressing and holding will reset the delay time to 0. 4.
12. Personalizing the RF60 12.1 LCD Backlight The LCD backlight of the RF60 turns on whenever any button is pressed. In order to conserve energy, there is a timer setting that automatically turns off the backlight. 1. To configure the backlight duration, press , and press until the text area shows . Then use the or buttons to choose from OFF, 5sec, 15sec, or ON. 2. The option will instruct the LCD to be on constantly. 3.
1. To configure the sleep timer, press , and press a few times until the text area shows . Then use the or buttons to choose from OFF, 3min, 5min, 15min, 30min, or 60min. 2. The option will deactivate the sleep mode. 3. Press to confirm and configure other items, or press to confirm and leave. 4. To wake up RF60 from sleep mode, press any button once. Note: Wireless triggering will not wake up RF60 Slave units remotely. 12.
1. To enable or disable the quick flash option, press , and then until the text area shows . Then use the or – buttons to choose OFF and ON. 2. Press to confirm and configure other items, or press to confirm and return to the main screen. 12.4 Beep Feedback In addition to the flash ready indicator, the built-in buzzer of the RF60 can also notify you when the flash is ready according to your custom settings.
fired a quick flash with a power level lower than the selected level. *Both Fn1 and Fn3 are only available for selection when the Quick Flash has been enabled (see Section 12.3). 1. To configure the beep option, press , and press until the text area shows . Then use the or buttons to choose from OFF, Fn1 (QCK FL), Fn2 (READY) or Fn3 (WARN). 2. When choosing the options with the or buttons, the abbreviation for each option will be shown in the text area. 3.
13. Working with Cactus Triggers The RF60 is compatible with Cactus Wireless Flash Transceivers V6, V5, and Laser Trigger LV5. V6 V6 V5 CAMERA SENSOR RF60 EMITTER V5 13.1 Cactus V6 With the group function, the Cactus V6 transceiver and RF60 flash can trigger and command each other, in either Master or Slave mode. 13.1.1 RF60 as Slave With a built-in Cactus V6 RF module, the Cactus RF60 can be remotely commanded and triggered by the V6 TX.
You may combine an RF60 with other V6-compatible TTL flashes to form a manual flash control system. For example, assign a RF60 to group A, Canon 580EX (with a V6 RX) to group B, Nikon SB-900 (with another V6 RX) to group C. The V6 TX will be able to trigger them all and set their power levels in either relative or absolute power mode. 13.1.2 RF60 as Master Users may assign the RF60 as master on the camera’s hot shoe and let it trigger and command other RF60 Slave and V6 RX units.
TX (Master) RX (Slave) RF60 13.2 V6 Note √ Triggering Slaves (RX) in 4 groups. √ Changing the power level of Slaves (RX) in 4 groups. √ Power levels adjustable from 1/128 to 1/1 full power, with 0.3 and 0.7 increments between major power levels (in 1/3EV power ratio). X Changing the zoom level of a flash on V6. X Changing in power ratios of 1/10EV, 1/2EV and 1EV. Cactus V5, LV5 The Cactus RF60 can work in pairs with the Cactus V5 or LV5. They all share the same 2.4GHz, 16-channel platform.
With 4x AA alkaline battery With Cactus External Battery Pack EP-1 Recycle time after a full power flash Number of full power flashes supported 5sec 100 2sec 200 For instructions on how to power the RF60 with the External Battery Pack EP-1, see the user manual of EP-1. 15. Forming the Capacitor When your flash is new or when it has not been used for a certain period of time, the capacitor may have lost its full potential to store electricity.
16. USB Connection The USB port of the RF60 is designed for firmware updates. To undergo a firmware update, switch off the RF60 and remove the batteries inside. Connect it to a computer via Cactus mini-USB cable MU-1 (optional) or a compatible USB-to-mini-USB cable. The firmware update program will then recognize the connected RF60 and start the upgrade. Please visit www. cactus-image.com/rf60.html for more information. Caution: Do not connect the RF60 to any AC power supply through the USB port. 17.
18. Troubleshooting Before reading this section, ensure that the Cactus RF60 has been set up correctly (follow the instructions in Sections 7-9 of this manual). If the problem persists after completing the troubleshooting steps, contact your seller directly for further assistance. 1.
3. Local or Master Flash does not fire SYMPTOM POSSIBLE CAUSE SOLUTION Flash Ready LED blinks or stays on, but the flash does not fire Flash is not attached securely to camera Attach the flash’s hot shoe securely to the camera Electrical contacts of the flash or camera are dirty Clean the contacts 4.
5. Flash does not fire in sync with camera SYMPTOM POSSIBLE CAUSE SOLUTION Black frame appears in pictures or frame is only partially illuminated Shutter speed - Adjust the is faster than camera’s shutter the camera’s speed to the x-sync maximum limitation supported x-sync speed - Set up the RF60 in HSS Sympathy mode (see Section 11.2) Delay timer has been set incorrectly Turn off the delay timer or adjust the delay timer to correct sync time 6.
7. Flash power lower than specified SYMPTOM POSSIBLE CAUSE SOLUTION Insufficient Power Warning beeps (if enabled) Flash fires when it is not fully charged - Turn off Quick Flash - Allow the flash to recharge fully Ready Signal takes longer than usual to turn on Batteries are nearly depleted or have already been used up Replace batteries with a new set of AA batteries 19.Notices NOTICES FOR CUSTOMERS IN THE U.S.A.
If this equipment does cause harmful interference to radio or television reception, which can be determined by turning the equipment off and on, the user is encouraged to try to correct the interference by one or more of the following measures: • Reorient or relocate the receiving antenna. • Increase the separation between the equipment and receiver. • Connect the equipment into an outlet on a circuit different from that to which the receiver is connected.
R&TTE Declaration of Conformity (DOC) We, Harvest One Limited, 9D On Shing Industrial Building, 2-16 Wo Liu Hang Road, Fo Tan, Hong Kong, declare under our own responsibility that the product: Cactus Wireless Flash RF60 is in conformity with the essential requirements and other relevant requirements of the R&TTE Directive (1999/5/EC). This product, Cactus Wireless Flash RF60, is in conformity with the provisions of EU Council Directive: 1999/5/EC.
parts or exchanged for a new Wireless Flash as determined by Harvest One Limited or authorized dealers. This limited warranty shall only apply if the Wireless Flash is used in conjunction with compatible camera and flash equipment, as to which items, Harvest One Limited, shall have no responsibility.
INCIDENTAL, OR CONSEQUENTIAL DAMAGES CAUSED BY THE USE OR MISUSE OF, OR INABILITY TO USE, THE WIRELESS FLASH, REGARDLESS OF THE LEGAL THEORY ON WHICH THE CLAIM IS BASED, AND EVEN IF HARVEST ONE LIMITED HAS BEEN ADVISED OF THE POSSIBILITY OF SUCH DAMAGES. IN NO EVENT SHALL THERE BE RECOVERY OF ANY KIND AGAINST HARVEST ONE LIMITED GREATER IN AMOUNT THAN THE PURCHASE PRICE OF THE CACTUS WIRELESS FLASH SOLD BY HARVEST ONE LIMITED OR ITS AUTHORIZED DEALERS AND CAUSING THE ALLEGED DAMAGE.
www.cactus-image.