
Operating Instructions and Installation Instructions


19
VEGA - SIRE
3
PLUS - DOGE
3
PLUS - SFERA
3
- SFERA
3
PLUS - PRINCE
3
- PRINCE
3
PLUS - GLOBE - TREND - ELISE
3
PLUS
EN
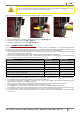
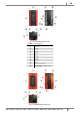
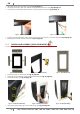
Fig. 21 - Frontal panel assembly Fig. 22 - Frontal panel position Fig. 23 - Frontal panel xing
• Hook the frontal panel cogs at its specic holes (see Fig. 21 page 19).
• Place the frontal panel in the correct position (see Fig. 22 page 19).
• Fix the frontal panel by tightening two screws in the lower part (see Fig. 23 page 19).
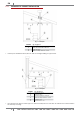
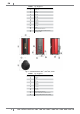
11.5 TILE ASSEMBLY (SIRE
3
PLUS MODEL)
Proceed as follows to assemble the tiles:
Fig. 24 - Prole and tiles Fig. 25 - Tighten the prole to the tiles Fig. 26 - Fixing to stove
• Assemble the galvanised prole to the tiles (see Fig. 24 page 19 and Fig. 25 page 19).
• Connect the tile teeth to the stove (see Fig. 26 page 19).
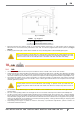
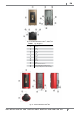
11.6 PANELS ASSEMBLY (SFERA
3
/ SFERA
3
PLUS MODELS)
For panels installation, proceed as follows:
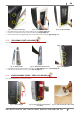
Fig. 27 - Panels assembly Fig. 28 - Panel with hole assembly (Sfera
3
Plus model)
Fig. 29 - Open the hole (Sfera
3
Plus model)