
Operating Instructions and Installation Instructions


20
VEGA - SIRE
3
PLUS - DOGE
3
PLUS - SFERA
3
- SFERA
3
PLUS - PRINCE
3
- PRINCE
3
PLUS - GLOBE - TREND - ELISE
3
PLUS
EN
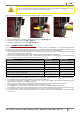
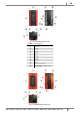
• Hook the panels at its specic cogs (see Fig. 27 page 19).
• Hook the punched panel at its specic cogs at the back of stove (see Fig. 28 page 19).
• For Sfera
3
Plus model with lateral duction, open the hole as shown in Fig. 29 page 19.
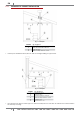
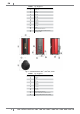
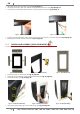
Fig. 30 - Place the bracket Fig. 31 - Screw the bracket
• Place the bracket between the colored panels, in the upper part, to lock the sides (see Fig. 30 page 20).
• Blocking the bracket with the screw (see Fig. 31 page 20).
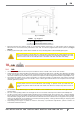
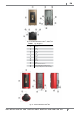
11.7 FRONTAL PANEL ASSEMBLY (VEGA STONE MODEL)
For frontal panel installation, proceed as follows:
Fig. 32 - Place the stones Fig. 33 - Fasten the stones Fig. 34 - Assembled frame
• Place the stones on the frame (see Fig. 32 page 20).
• Fasten the stones with the screws behind the frame (see Fig. 33 page 20).
• Assembled frame (see Fig. 34 page 20).
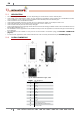
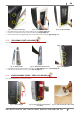
Fig. 35 - Frontal panel assembly Fig. 36 - Frontal panel position Fig. 37 - Frontal panel xing
• Hook the frontal panel cogs at its specic holes (see Fig. 35 page 20).