
Operating Instructions and Installation Instructions
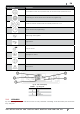

28
VEGA - SIRE
3
PLUS - DOGE
3
PLUS - SFERA
3
- SFERA
3
PLUS - PRINCE
3
- PRINCE
3
PLUS - GLOBE - TREND - ELISE
3
PLUS
EN
"OFF".
• Press P4 key three times to exit from the menu.
12.14 WEEKLY PROGRAMMING
It allows to enable, disable and settle the weekly hermostat functions (saturday and sunday included).
Press P3 key and then P5 key till the menu "SET CHRONO". Press once P3 key and with P5 and P6 keys select
"PROGRAM WEEK". Press once P3 till nding "WEEKLY CHRONO". With P1 and P2 keys put in "OFF" or "ON". It is
possible to set four working times delimited by the set times.
After "WEEKLY CHRONO":
Press P5: the display shows "START PROG-1", with P1 and P2 keys insert the ignition time value or put in "OFF".
Press P5: the display shows "STOP PROG-1", with P1 and P2 insert the switching off value or put in "OFF".
• Press P5: the display shows "MONDAY PROG-1", with P1 and P2 keys set "ON" or "OFF".
• Press P5: the display shows "TUESDAY PROG-1", with P1 and P2 keys set "ON" or "OFF".
• Press P5: the display shows "WEDNESDA PROG-1", with P1 and P2 keys set "ON" or "OFF"".
• Press P5: the display shows "THURSDAY PROG-1", with P1 and P2 keys set "ON" or "OFF".
• Press P5: the display shows "FRIDAY PROG-1", with P1 and P2 keys set "ON" or "OFF".
• Press P5: the display shows "SATURDAY PROG-1", with P1 and P2 keys set "ON" or "OFF"".
• Press P5: the display shows "SUNDAY PROG-1", with P1 and P2 keys set "ON" or "OFF".
Now press P5 and repeat all the previous instructions for Prog-2, Prog-3, Prog-4.
• To exit press three times P4.
12.15 FAN ADJUSTMENT
Press P3 button in menu 1 “FAN ADJUST”: the fan menus no.2 will open.
Press P1 to adjust fan no. 2.
Function “A” activates the default fan data. (For example: heat output 1 activates default rotations at heat
output 1, heat output 2 activates default rotations at heat output 2, etc.).
With function “1” or "2" or "3" or "4" or "5" the fan is forced to work at the selected output. (For example: by setting
“2”, even if the fan is set to heat output 5 it will work as if set to heat output “2”, etc.).
If the stove is set to maximum heat output 5 and the fans to minimum output 1, this may
cause overheating and the “THERMAL SAFETY” alarm to go off.
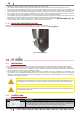
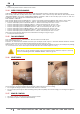
12.16 PELLET SUPPLY
Fig. 51 - Wrong opening of the pellets bag Fig. 52 - Right opening of the pellets bag
It is necessary to avoid to ll the hopper with the pellet when the stove is running.
• Do not get the bag of pellet in contact with hot stove surfaces.
• Do not empty the hopper with remaining fuels (unburnt pellet) from the burning pot coming from ignition
waster.
12.17 REMOTE CONTROL
• The stove can be operated through a remote control.
• Operation requires 1 CR 2025 Lithium battery.