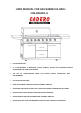
USER MANUAL FOR GAS BARBECUE GRILL CB6-SBG001-A • FOR PROPANE ONLY. • IF A REPLACEMENT IS NECESSARY, PLEASE CONTACT EITHER OUR CUSTOMER SERVICE DEPARTMENT OR YOUR LOCAL DEALER. • THE USE OF UNAUTHORISED PARTS CAN CREATE UNSAFE CONDITIONS AND ENVIRONMENT. • FOR OUTDOOR USE ONLY. • READ THE MANUAL CAREFULLY BEFORE ASSEMBLY AND USE. • ACCESSIBLE PARTS MAY BE VERY HOT. PLEASE KEEP YOUNG CHILDREN AND PETS AWAY. • PLEASE RETAIN THESE INSTRUCTIONS FOR FUTURE REFERENCE.
Safety Symbols The symbols and boxes shown below explain what each heading means. Read and follow all of the ! WARNING ! messages found throughout the manual. ! WARNING ! ! CAUTION ! ! DANGER ! Indicates an imminently hazardous situation which, if not avoided, will result in death or serious injury. ! CAUTION ! ! DANGER ! WARNING ! Be alert to the possibility of serious bodily injury if ! CAUTION ! the instructions are not followed. Be sure to read ! DANGER ! and carefully follow all of the messages.
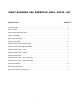
EIGHT BURNERS GAS BARBECUE GRILL PARTS LIST DESCRIPTION QUANTITY Cooking Grate . . . . . . . . . . . . . . . . . . . . . . . . . . . . . . . . . . . . . . . . . . . . . . . . . . . . . . . . . .3 Flame Tamer . . . . . . . . . . . . . . . . . . . . . . . . . . . . . . . . . . . . . . . . . . . . . . . . . . . . . . . . . .6 Swing-away Warming Rack . . . . . . . . . . . . . . . . . . . . . . . . . . . . . . . . . . . . . . . . . . . . . . . .1 Firebox Assembly . . . . . . . . . . . . . . . . . . . . . .
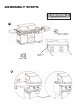
ASSEMBLY STEPS ! CAUTION ! Sharp edges! Wear gloves if necessary 1 Tighten the screws M6X15 4PCS 2 4
3 Flame Tamer 4 Instruction for replacing burners (if burners need to be replaced) (1) (2) 5 (3)
5 Place cooking grates (No. 2) into main body. Grate wires running front to back should be toward the top side of square tubes at each end. No.
AA Battery (Battery is not provided) 7
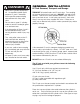
! CAUTION ! ! DANGER ! 1. Never fill the cylinder beyond 80% full. An overfilled cylinder (liquid propane LP) tank is hazardous due to possible propane being released from the safety relief valve. 2. Do not store a spare LP cylinder under or near this barbeque grill or in an enclosed area. GENERAL INSTALLATION LP Tank Removal, Transport and Storage TURN OFF all control knobs and LP tank valve. Turn coupling nut counter-clockwise by hand only. DO NOT use tools to disconnect.
The LP tank must be provided with a listed overfilling prevention device. LP tank must be arranged with vapor withdrawal and include a collar to protect LP tank valve. LP (Liquified Petroleum Gas) LP gas is odorless and colorless when produced. For your safety, LP gas has been given an odor so that it can be smelled. LP gas is highly flammable and may ignite unexpectedly when mixed with air. LP Tank Filling Use only licensed or experienced dealer. LP dealer must purge new tank before filling.
The grill must be tested outdoors in a well-ventilated area, away from ignition sources such as gas fired or electrical appliances. During leak test, keep grill away from open flames or sparks. Use a clean paintbrush and a 50/50 mild soap and water solution. Brush soapy solution onto areas indicated by arrows in figure below. ! WARNING ! ! CAUTION ! DO NOT use chemical household cleaning agents. Damage to gas train components can result.
5. Hold regulator and insert nipple into LP tank valve. Hand-tighten the coupling nut, holding regulator in a straight line wtih the LP tank valve so as not to cross-thread the connection. Nipple has to be centered in the LP tank valve. Hold coupling nut and regulator as shown for proper connection to LP tank valve. 6. Turn the coupling nut clockwise and tighten to a full stop. The regulator will seal on the back-check feature in the LP tank valve, resulting in some resistance.
LEAK TESTING VALUES, HOSE AND REGULATOR 1. Turn all grill control knobs to OFF 2. Be sure regulator is tightly connected to LP tank. 3. Completely open LP tank valve by turning hand wheel counter-clockwise. If you hear a sound, turn gas off immediately. It could mean there is a major leak. Correct before proceeding. 4. Brush soapy solution onto areas circled above. 5. If “rowing” bubbles appear, there is a leak. Close LP tank valve immediately and retighten connections.
Use grill at least 3 ft. from any wall or surface. Maintain 10 ft. clearance to objects that can catch fire or sources of ignition such as pilot lights on water heaters, live electrical appliances, etc. APARTMENT DWELLERS: Check with management to learn the requirements and fire codes for using an LP gas grill in your apartment complex. If allowed, use outside on the ground floor with a three-foot clearance from walls. DO NOT use on or under balconies. NEVER attempt to light burner with lid closed.
! WARNING ! ! CAUTION ! Putting out grease fires by closing the lid is not possible. Grills are well ventilated for safety reasons. ! DANGER ! DO NOT use water on a grease fire. Personal injury may result. If a grease fire develops, turn knobs and LP tank off. DO NOT leave grill unattended while preheating or burning off food residue on High. If grill has not been regularly cleaned, a grease fire can occur that may damage the product. IGNITER LIGHTING DO NOT lean over grill while lighting. 1. OPEN LID.
LIGHTING THE ROTISSERIE BURNER 1. Read and follow all of the warnings and instructions in Owner’s Manual before lighting. 2. Open grill hood before lighting rotisserie burner 3. Make sure control knob is in the “OFF” position 4. Push and turn the control knob to the high position. Continue to push in control knob while pressing electronic igniter for no less than 5 seconds. 5. Once burner is lit, continue to push and hold control knob for 30 seconds. 6.
IGNITER CHECK Turn gas off at LP tank. Press and hold electronic igniter button. A click should be heard and a spark seen each time between burner and electrodes. See Troubleshooting section if there is no click or spark. VALVE CHECK Important: Make sure gas is off at LP tank before checking valves, and knobs are in Off position. To check valves, first push in knobs and release, knobs should spring back. If knobs DO NOT spring back, replace valve assembly before using grill.
NATURAL HAZARD SPIDERS FACT: Sometimes spiders and other insects climb into the grill tubes attached to the burners. The spiders spin webs, build nests and lay eggs. The webs or nests can be very small, but they are very strong and can block the flow of gas. Clean burners prior to use after storing, at the beginning of grilling season, or after a period of one month not being used.
CLEANING THE BURNER ASSEMBLY (continued) 5. Brush entire outer surface of burner with a wire brush to remove food residue and dirt. 6. Clean any blocked ports with a stiff wire such as an open paper clip. 7. Check burner for damage. Due to normal wear and corrosion, some holes may become enlarged. If any large cracks or holes are found, replace burner. 8. Carefully replace burners. 9. Replace cotter pin beneath each burner. 10. Replace grease tray, grease cup, and cooking grates.
FOOD SAFETY Food safety is a very important part of enjoying the outdoor cooking experience. To keep food safe from harmful bacteria, follow these steps: • Clean: Wash hands, utensils and surfaces with hot soapy water before and after handling raw meat and poultry. • Separate: Separate raw meats and poultry from ready-to-eat foods to avoid cross contamination. Use a clean platter and utensils when removing cooked foods. • Cook: Cook meat and poultry thoroughly to kill bacteria.
TROUBLESHOOTING PROBLEM Burner(s) will not light using ignitor. POSSIBLE CAUSE PREVENTION/SOLUTION Wire and/or electrode covered with cooking residue. Clean wire and/or electrode with rubbing alcohol and clean swab. Electrode cracked or broken “sparks at crack”. Replace electrode(s). Electrode tip not in proper position. Wires are loose or disconnected. Wires are shorting (sparking) between ignitor and electrode. Reconnect wires or replace electrode/wire assembly.
TROUBLESHOOTING (continued) PROBLEM Flames blow out. POSSIBLE CAUSE High or gusting winds. PREVENTION/SOLUTION Turn front of grill to face wind or increase flame height. Low on LP gas. Refill LP tank. Excess flow valve tripped. Refer to “Sudden Drop in Gas Flow” on previous page. Grease build-up. Clean grill. Excessive fat in meat. Trim fat from meat before grilling. Excessive cooking temperature. Adjust (lower) temperatuare accordingly. Persistent grease fire.
TROUBLESHOOTING - ELECTRONIC IGNITION PROBLEM POSSIBLE CAUSE CHECK PROCEDURE PREVENTION/SOLUTION No sparks appear at any electrodes when ignition switch is pushed; noise can be heard from spark module. Output lead connections not completed. Are output connections on and tight? Remove and reconnect all output connections at module and electrodes. Sparks are present, but not at all electrodes and/or not at full strength. Output lead connections not complete.
LIMITED LIFETIME WARRANTY All Cadero BBQ & Hardware Barbecues have been manufactured under the highest standards of quality and workmanship. Cadero BBQ & Hardware. warrants the following materials and workmanship to be free of defects for as long as you own the grill. This covers the following components: the main stainless steel outer hood, stainless steel cooking grills, stainless steel handle, and stainless steel burners.