
Installation Guide

INSTALLATION INSTRUCTIONS (continued)
__________________________
Part One
__________________________
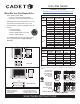
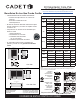
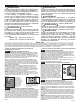
Figure 5
Model CST
Figure 4
Model CS
How do I install for a ceiling mount?
Mount The Wall Can
STEP 1
Important:
1. For models up to 1,500 Watts – MAXIMUM.
2. Do not mount the heater in low-density ber board or
false ceilings.
3. Models with a built-in thermostat are not recommended.
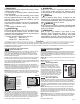
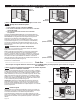
REQUIRED MINIMUM distance of 6 inches from adjacent
surfaces (See Figure 6). However, Cadet RECOMMENDS
12 inches from adjacent surfaces for longer and cleaner
performance.
Secure the wall can to studs/rafters on opposite sides (See Fig-
ures 6 and 7) with 4 screws (not provided). The face of the wall
can must extend 1/2 or 5/8 inch from face of rafters to allow for
thickness of sheetrock.
Route Supply Wires
STEP 2
Important: Supply connections must use wires suitable for at least
167˚F (75˚C).
Route supply wire from the circuit breaker, to the thermostat, to
the wall can. Remove a knockout from the wall can and attach the
supply wire with a strain relief connector (not included) leaving
a minimum of 6 inches wire lead for later use. Connect supply
ground wire to grounding screw in wall can (See Figure 3). Pro-
ceed to PART TWO.
__________________________
Part Two
__________________________
After you have followed all instructions in PART ONE you are ready to install the heater assembly.
STEP 1
STEP 1
How do I insert the heater assembly into the wall can?
Install Heater Assembly
STEP 1
Install Grill
STEP 2
Secure grill with the screws provided. If you have a built-in thermo-
stat model, slide thermo stat knob onto shaft. Turn power on at the
electrical panel board.
Warranty is void if any material is sprayed on the element or blower.
Use a paint mask to cover any exposed areas of the heater if walls
are to be textured or painted.
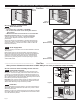
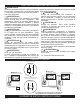
Turn the heater face down, element facing down and the motor
facing you. Connect the supply wires to the heater wires with wire
connectors (not included) (See Figure 8). Rotate the heater up so
that the element and fan are facing you, with the fan below the ele-
ment. Insert the bottom edge of the heater assembly into the tabs in
the bottom lip of the wall can (See Figure 9).
Important: Push wires into bottom of wall can during insertion. Be
sure that supply wires are not caught between motor and wall can.
Attach heater assembly at top with screw provided.
Figure 6
(Model CS shown)
Figure 7
(Model CS shown)
Figure 8
Figure 9
Page 4