OWNER’S GUIDE SOFTHEAT GENTLE FLUID HEAT FOR THE PEOPLE YOU LOVE MOST For how-to videos or more information, please visit: http://cadetheat.com/install/softheat ESPAÑOL ver la guía del propietario en cadetheat.com/espanol/softheat cadetheat.com 855.CADET.
® ® 2 IMPORTANT INSTRUCTIONS When using electrical appliances, basic precautions should always be followed to reduce the risk of fire, electric shock, and injury to persons, including the following: 1. Read all instructions before 5. Do not insert or allow foreign installing or using this heater. objects to enter any ventilation 2. A heater has hot and arcing or or exhaust opening as this may sparking parts inside.
INSTALLATION INSTRUCTIONS 1. All electrical work and materials must comply with the National Electric Code (NEC), the Occupational Safety and Health Act (OSHA), and all state and local codes. 2. Use copper conductors only. 3. Do not install below an electrical receptacle. 4. Do not install the heater against combustible low-density cellulose fiberboard. 5. Heater must be level. 6. CAUTION – High temperature. Keep electrical cords, drapes, and other furnishings away from heater. 7.
INSTALLATION INSTRUCTIONS STEP 2 Wire connection • KNOW YOUR VOLTAGE and CHECK YOUR BREAKER! • All baseboards require two supply wires and a grounding lead. For 240 volts, both supply wires (black and white) are hot. For 120 volts, one supply wire is hot (black) and one is neutral (white). For 208 volts, applications vary and both supply wires (black and white) can be hot or you may have one hot and one neutral. grounding screw grounding lead cable clamp connector (view from back) 4.
INSTALLATION INSTRUCTIONS 208 VOLT - LEFT END ALL VOLTAGES - RIGHT END do not disconnect new connection new connection new connection NEUT RAL new connection Figure 4 new connection new connection Figure 5 120 or 208 volt One hot, one neutral C. For 208 volts, connect the neutral (white) supply wire to the orange heater wire on the left end (Figure 4). On the right end with a neutral supply, connect the wire labeled NEUTRAL to the white supply wire (Figure 5).
INSTALLATION INSTRUCTIONS If both supply wires are hot, wrap (white) supply wires with black tape to identify them as hot, not neutral! from power supply ground wire connection to to heater heater #1 #2 connections with power supply (line) double pole wall thermostat (sold separately) connections with heaters (load) Figure 8 1. A separate set of electrical supply wire must be run from the wall thermostat to each baseboard. 2.
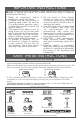
OPERATING INSTRUCTIONS 1. Make sure all wires are properly connected and your heater is installed before you turn it on. 2. Do not tamper with the hightemperature safety shutoff. How to operate your heater The room temperature is controlled by a thermostat located either on the wall, or on the heater. Once installation is complete and power has been restored, follow the steps below for your thermostat. If you have a wall or built-in thermostat with a knob: 1.
MAINTAINING YOUR HEATER Clean heater at least every 24 months or as required. 1. It is important that you verify power has been turned off and the element is cool. 2. Wipe cover with damp cloth and dry. 3. Use the hose on your vacuum to clean the heater. Do not touch the element. 4. Turn power back on at the main disconnect panel. ny service other than cleaning should be performed by an authorized A service representative. TROUBLESHOOTING Symptom Problem Solution Heater 1.