OWNER’S GUIDE COM-PAK PERFECTLY SIMPLE WARMTH FOR ANY ROOM COM-PAK TWIN IDEAL WARMTH FOR LARGER AREAS For how-to videos or more information, please visit: cadetheat.com/install/com-pak ESPAÑOL ver la guía del propietario en cadetheat.com/espanol/com-pak cadetheat.com 855.CADET.
IMPORTANT INSTRUCTIONS ® When using electrical appliances, basic precautions should always be followed to reduce the risk of fire, electric shock, and injury to persons, including the following: 1. Read all instructions before using 6. To disconnect heater, turn conthis heater. trol(s) to off, and turn off power to 2. This heater is hot when in use. heater circuit at main disconnect To avoid burns, do not let bare skin panel. touch hot surfaces. Keep combusti- 7.
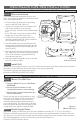
INSTALLATION INSTRUCTIONS 1. All electrical work and materials must comply with the National Electric Code (NEC), the Occupational Safety and Health Act (OSHA), and all state and local codes. 2. Use copper conductors only. 3. DO NOT install the heater directly above bathtub or sink. DO NOT install in shower stall area. Manufacturer recommends a minimum 2 foot (61 cm) side clearance. 4. Heater must be installed in a wall can: Model CS - wall can models CC or CCSM Model CST - wall can model CTC 5.
¾" (1.9 cm) Min. PARED ADYACENTE INSTALLATION INSTRUCTIONS TIPS BEFORE YOU BEGIN • Verify power has been turned off before starting any work! • The Com-Pak model CS can be mounted with the element up, or with the element on the left. For ceiling installation, see page 5. For multiple heater wiring, see page 6. • The Com-Pak Twin model CST can only be mounted with the elements up. It cannot be mounted in the ceiling.
INSTALLATION INSTRUCTIONS INSERT THE HEATER ASSEMBLY IN THE WALL CAN STEP 4 Wire connections Your heater has two connection wires on the back. Your supply wire has two connection wires and a supply ground wire. 1. Connect supply ground wire to grounding screw in wall can (See Figure 4). supply wires new connections 2. Connect one supply wire to one heater wire with a wire connector (not included): A. for 240 volts, it doesn’t matter which heater wire; B.
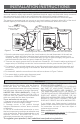
INSTALLATION INSTRUCTIONS MULTIPLE HEATERS WITH ONE THERMOSTAT (MODEL CS ONLY) More than one heater can be wired in parallel on the same circuit breaker (be sure to check national and local codes for safety requirements). Additional electrical supply wire and cable clamp connectors are required, and you’ll need to use a wall thermostat. When wiring multiple heaters to one thermostat, the heaters must be in the same room and be spaced a minimum of three feet apart.
OPERATING INSTRUCTIONS 1. The heater must be properly installed before it is used. 2. Do not operate without grill. 3. Do not tamper with the hightemperature safety shutoff. How to operate your heater The room temperature is controlled by a thermostat located either on the wall, or on the heater. Once installation is complete and power is on, follow the steps below for your thermostat. If you have a wall or built-in thermostat: 1. Turn the thermostat knob all the way to the right. 2.
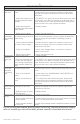
TROUBLESHOOTING CHART Symptom Problem Heater doesn’t 1. Supply connections are work at all. loose. Solution 1. Turn off power at main disconnect panel. Inspect and/ or tighten all the wire connectors inside the heater and at any connection points inside junction boxes or at the wall thermostat. 2. Heater has tripped one of 2. TO RESET: Turn power off at main disconnect panel. Allow its high-temperature safety 20 minutes to cool. Make sure heater is not blocked and is shutoffs. clean. Restore power.