
Installation Guide


INSTALLATION INSTRUCTIONS
3
STEP 1
Locate or route electrical supply wires; mount heater to wall
1. All electrical work and materials
must comply with the National
Electric Code (NEC), the Occu-
pational Safety and Health Act
(OSHA), and all state and local
codes.
2. Use copper conductors only.
3. Do not install below an electrical
receptacle.
4. Do not install the heater
against combustible low-density
cellulose berboard.
5. A heater has hot and arcing or
sparking parts inside. Do not use
it in areas where gasoline, paint,
or ammable vapors or liquids are
used or stored.
6. Maintain at least 12 inches min-
imum clearance in front of base-
board, and from objects hanging
above (i.e., drapes), and 6 inches
minimum on both sides.
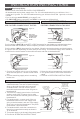
1. Turn off the electrical power supply. Locate
wall studs and electrical supply wires. DON’T
CUT ANY FACTORY CONNECTIONS
UNTIL YOU’RE READY TO WIRE!
2. Remove only the wiring compartment
cover. Wire connections can be made on
either side of the baseboard.
3. Remove one of the slotted knockouts in
the wiring compartment.
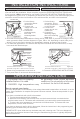
5. Connect the grounding lead to the green
grounding screw on the side you’re wiring.
6. Mount the heater securely to two or three
wall studs.
4. Install a cable clamp connector (not in-
cluded). Pull supply wires through the cable
clamp connector leaving 6-inch wire leads.
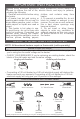
• For best results, install your baseboard heater under a window, along an outside wall, or as close as
possible to an outside door. Install only in a horizontal position, not in a vertical position.
• Remove any oor base trim or molding so the heater will set ush against the wall. It can sit directly
on any oor surface, including carpet.
• If you’re wiring a WALL thermostat, route the electrical supply wire from the circuit breaker to the
wall thermostat, and then to the baseboard. If you’re wiring a BUILT-IN model BTF or SBFT2 ther-
mostat, route the electrical supply wire from the circuit breaker directly to the baseboard.
cable clamp connector
(view from back)
DON’T CUT
YET!
Grounding
Screw
wall studs
electrical
supply wire
tip: easiest to
remove from back!
star dimples are easy
to punch through with
either screws or nails