
Installation Guide
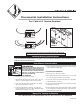

UC-T1 SINGLE POLE THERMOSTAT
1. Remove top cover off heater assembly.
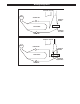
2. Attach thermostat bracket to the inside surface of front of
wall can as shown in Figure (1) with screws provided.
3. Connect the red lead from the thermostat to one supply
wire; using insulated wire connectors.
4. Connect the black thermostat wire to one heater wire
using insulated wire connectors. (Note: Remaining supply
and heater wire should be connected.)
Thermostat Installation Instructions
General Safety Information
Keep for future reference
If you are uncomfortable working with electrical appliances, unable to follow these guidelines, or do not have the necessary
equipment, consult a licensed electrician.
Installation Instructions
WARNING
Turn the electrical power off at the electrical panel
board (circuit breaker or fuse box) and lock or tag
the panel board door to prevent someone from turn-
ing on power while you are working on the heater.
Failure to do so could result in serious electrical
shock, burns, or possible death.
For Cadet UC Series Heaters
5. Remove the plug from the front grill and attach grill to installed
heater. Install the provided thermostat knob on the thermostat
shaft extending through the grill.
UC-T2 DOUBLE POLE THERMOSTAT
1. Remove top cover off heater assembly.
2. Attach thermostat bracket to the inside surface of front of wall
can as shown in Figure (1) with screws provided.
3. Connect the red leads from the thermostat to each supply wire
using insulated wire connectors.
4. Connect each black thermostat wire to each heater wire using
insulated wire connectors.
5. Remove the plug from the front grill and attach grill to installed
heater. Install the provided thermostat knob on the thermostat
shaft extending through the grill.
Tools Required: Phillips Screwdriver, Insulated Wire Connectors (Wire Nuts®)
P/N 720015 09/03
TEL: 360-693-2505 Fax: 360-694-6939 P.O. Box 1675 Vancouver, WA 98668-1675
Double Pole Thermostat
Single Pole Thermostat
FIGURE 1